Advertisement
- 1 Introduction
- 2 General Description
- 3 Resources
- 4 Installing Your Alcance Control
- 5 The second key feature "2nd"
- 6 Synchronizing Your Alcance Control
- 7 Undoing the Timing of a Single Control
- 8 Undoing the timing of all controls
- 9 Programming
- 10 Restoring the Factory Settings
- 11 Using a single TX2 controller to control multiple devices at the same time
- 12 Diagnostics
- 13 Diagnostics
- 14 Technical Specifications
Introduction
The SX2 Alcance Control was developed to for long distance control of automotive or residential audio and video whit up to 16 functions equipment. Due to its radio frequency (RF) technology, equipament can be controlled at up to 500m in open target area.
Transmission is enhanced by FSK reducing external interference. Encrypted rolling code prevents cloning technologies.
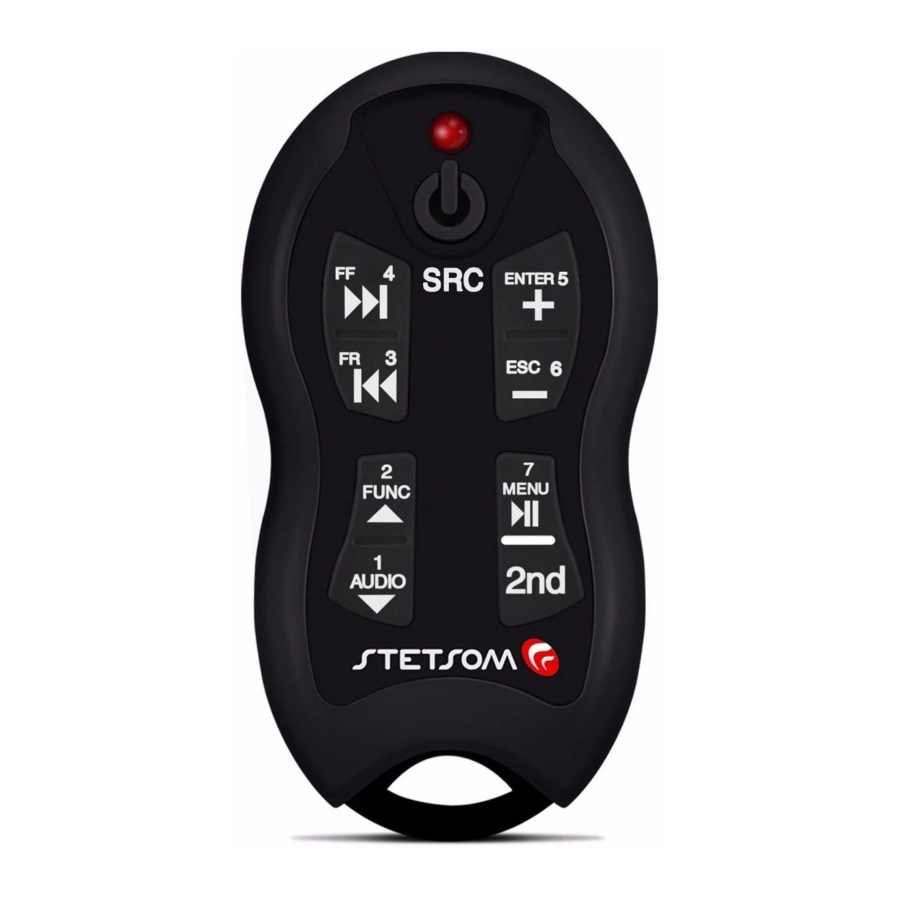
General Description

- LED Indicator
- Power
- Forward (
![]() )
) - Rewind (
![]() )
) - Up (
![]() )
) - Down (
![]() )
) - Volume (+)
- Volume (-)
- Play/Pause
- 2nd (Enables the 2nd Function)
- Strap Neck Lanyard
- Protective Holster
- Lanyard


- Programming Rod
- Antenna
- LED Indicator
- Infrared Transmitter (3m)
- Power Cable (50cm)

- Infrared Receiver
- Synchronization Key (SYNC/RESET)
- Learning Key (LRN)
Resources
- Command up to 16 functions;
- Synchronization with up to 16 controls (TX2) allowing multiple people to control the same equipment.
- TheTX2 control can command several devices even though different brands.
- Easy Sync. No need for technical assistance when purchasing new remote controls units.
- It Contains various models of appliances in memory beyond the "Learn" function that enables programmatic control of the market.
- Low battery indicator on the control and central.
Installing Your Alcance Control
The control panel can be installed or hidden somewhere visible for monitoring your LED indicator (16). The most important is that your antenna (15) is not blocked by the bodywork of the car or metal parts which act as a shield for radio transmission frequency. It may be close to the edge of the window since glass does not block the reception or in the panel and drawers. The power cable (18) is biased. The route that has white stripe should be connected to positive and black to negative way. Power can be an automotive battery, 9V or a USB.
The Red (17) Infra transmitter must be fixed at some point pointing to the panel of the equipment to be controlled, make sure that nothing is between the two.
Download manual
Here you can download full pdf version of manual, it may contain additional safety instructions, warranty information, FCC rules, etc.
The second key feature "2nd"
The Alcance Control SX2 has a great market differentiator, can control up to 16 different functions. Each one of the 8 TX2 Control keys can perform two functions, for a total of 16. The 2nd key is to select what function each button will run, first or second.
Pressing the 2nd Led (01) button lights indicating that the second function is active, pressing again it goes back to the first function keys. The second function remains active for 5 seconds, after that time the LED switches off automatically returning to first function.
Example: + key when the first function (LED indicator (01) deleted) increases the volume of the equipment, the second function acts as ENTER key widely used in DVD equipment. The Play/Pause button has the second function MENU.
The Printed functions on each TX2 control button are related to be function of each unit, and are stored in the memory of the central RX2. Nothing prevents these buttons from being reprogramed to perform different functions, by the learn mode.
Synchronizing Your Alcance Control
Timing is necessary for the connection between the central control TX2 and RX2. The Alcance Control is synchronized by the factory. This operation is required only if the owner acquired new TX2 controls for your team, replacement or loss of synchronization. The Alcance Control allows up to 16 TX2 controls are synchronized in the same central RX2.
 Attention: Before performing the timing make sure that there is no one other TX2 central control being operated near you, because it may interfere.
Follow the Steps Below to Synchronize:
- Press the SYNC key (20) the central RX2. The LED indicator (16) will flash.
![]()
- Press one of the TX2 control except Power button (2).
![]()
- The LED indicator (16) stops flashing. Timing is completed.


To synchronize more than one control (maximum 16), repeat steps 1-3. If more than 16 controls are being synchronized, this new control will override the first synchronized canceling your timing and so on.
It is also possible to undo the timing control of each or all at the same time.
Undoing the Timing of a Single Control
- Press the SYNC key (20) the central RX2. The LED indicator (16) will flash.
![]()
- Press the Power button (2) or 2nd and Power TX2 control you want to delete.
![]()
- The LED indicator (16) stops flashing. The exclusion is complete.


Note: When a control is deleted it releases one of 16 internal memories, if a new control to synchronize the operation will not delete any of the controls stored as a memory has been released.
Undoing the timing of all controls
- Press the SYNC key (20) of the central RX2. The LED indicator (16) will flash.
![]()
- Press the LRN key (21) of the central RX2. The LED indicator (16) will flash faster and delete. The exclusion is completed.
![]()


Programming
For the operation of your Alcance Control, the central RX2 should be scheduled for the model of your device. This can be done in two ways, Direct Mode (using the models of handsets from memory) or Learning Mode.
Direct Mode:
- Look for the code of your machine in Code Table "Memory ".
- Press the LRN key (21) in the central RX2. The LED indicator (16) will flash.
![]()
- Press the SYNC key (20) in the central RX2. The LED indicator (16) will flash faster.
![]()
- Press in the TX2 control the first key of the table, the LED indicator (16) will erase for a moment and return to rapid flashing.
![]()
- Press the second key of the table. The LED indicator (16) will delete.


Its central is programming for the chosen device.
Example: Programming for Player PIONNER
CD/MP3-Player DEH-8380SD
Keys Sequence

Note:Choose a dimly lit environment, prefer location without fluorescent lamp or in a car, because external light may interfere with the Receiver Infrared (19) Central. Plasma screens are also strong sources of interference.
Learning Mode:

- Press the central RX2 LRN key (21). The LED indicator (16) will flash.
- Press the control button TX2 you want to store. The LED indicator (16) will erase for a moment and light. For Second function, first press the 2nd key and then the desired key.
- Point the original remote of the device you want to copy to the central RX2 Receiver Infrared (19) and press the key to be stored. The LED indicator (16) will erase for a moment and re-flashing the recording of this key is completed.
![warning]() Note: At this stage interference of external light can occur. If this occurs, the control panel will detect the failure and rapid blinking the LED indicator (16) instead of deleting and then will erase for a moment and return to step 2 with LED indicator (16) flashing.
Note: At this stage interference of external light can occur. If this occurs, the control panel will detect the failure and rapid blinking the LED indicator (16) instead of deleting and then will erase for a moment and return to step 2 with LED indicator (16) flashing. - Repeat steps 2 and 3 for all the buttons you want to program. If a key is programmed wrong, repeat steps 2 and 3 as many times as necessary.
- To exit Learn Mode press the LRN key (21) the central RX2.
The central RX2 lets you mix Memory functions with Learning Mode, it is possible to carry a device memory by Direct Mode and change some keys without the other being affected. The process is simple:
- Follow the steps in the Direct Mode to load into memory the desired device from the table.
- Follow the steps in the Learning Mode to program keys/functions desired.
Note:Whenever using the Learning Mode, the buttons/keys that have not be reassigned will continue executing their original functions.
Restoring the Factory Settings
Pressing the RESET button (20) for 5 seconds, the indicator light (16) will flash and the factory setting are restored. The timing will be maintained.
Using a single TX2 controller to control multiple devices at the same time
For the same TX2 control to command various equipment it must be synchronized with the central RX2 of each one, to so follow the instructions in "Synchronizing your Alcance Control". Each car must to have its central RX2 programmed according to your CD/MP3-Player, to do this, follow the instructions showed in the "Programming".
Diagnostics
- Low battery indication:
When you release the Control TX2 button, the transmission LED indicator control TX2 transmission (1) and the central LED indicator (16) will remain lit for 1 second. Replacing the battery with a new one, CR2032 model is recommended because you may lose control transmission efficiency.
The TX2 transmitter has a system that is self-off if any key be pressed for more than 10 seconds to avoid undue battery drain. When you release the button, the system works normally.
Replacing the battery of the transmitter TX2:
Remove the holster, loosen the two screws on the back, remove the circuit board from the plastic box, move the discharged removing it from the clip and put a new battery in place. Observe the battery polarity; the Clip is the POSITIVE terminal. Mount the control following the steps backwards. - Loss of synchronization:
The loss of synchronization occurs when keys are pressed TX2 control over 250 times out of the reach of central RX2.
Diagnostics
In this case the central stops responding to commands from the control TX2 and your Led indicator (16) fl ashes conti nuously. Remake the ti ming control with the central to restore operati on.
- Invalid transmission default:
During the learn mode some informati on may be recorded wrong due to interference from ambient light, in this case the central will not transmit the command to the device related to that key and keep the LED indicator (16) on for 2 seconds. To solve this situati on redo the programming of your control in the "Learn " mode for the keys with problem. - The Alcance Control SX2 does not control my equipment:
Although the Alcance Control has a "Learn" functi on to fi nd equipment not previously registered in the memory, there may be original brands and models of controls that will not be recognized.
Technical Specifications
Power:
Central: 5 ~ 16V dc
Control: Batt ery CR2032 - 3,0V
Max. Consumption:
Central: 35mA
Control: 10mA
Max. Range in Open Area: 500m
Central Freq. of Transmission: 433,92 MHZ
Max. Transmit Power: 10mW
Dimensions:
Central: 57,5 x 33 x 12 mm
Control: 82,7 x 42 x 15,7 mm
Weight: Central: 46 g
Control: 37 g
Modulation: FSK
Advertisement


Need help?
Do you have a question about the SX2 and is the answer not in the manual?
Questions and answers