Table of Contents
Advertisement
Quick Links
Advertisement
Table of Contents

Related Manuals for AUTOBACS MGX D1


Summary of Contents for AUTOBACS MGX D1
-
Page 2: Table Of Contents
TABLE OF CONTENTS MAIN UNIT BUTTON FUNCTIONS ……………………………………………………………………..... 3, 4 DISPLAY ICONS ........................4 SPEAKER MIC BUTTON FUNCTIONS ................5, 6 GENERAL OPERATION ......................6 CHANNEL SCAN ....................6, 7 SQUELCH ......................... 7 DUPLEX ........................8 PRIORITY CHANNEL ....................8 REPLAY ........................ -
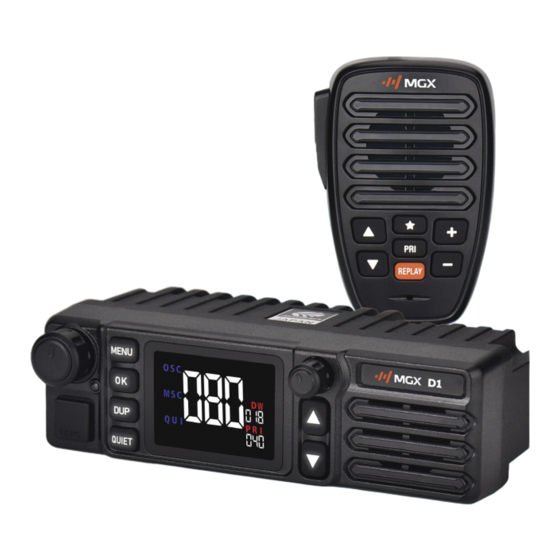
Page 3: Main Unit Button Functions
MAIN UNIT BUTTON FUNCTIONS 1. Power On/Off/Volume ● Short press: Turn the radio on. ● Long press: Turn the radio off. ● Rotate: Change the volume level. 2. Indicator Light While transmitting, the LED will be illuminated red. While receiving, the LED will be illuminated green. 3. -
Page 4: Display Icons
8. DOWN Button ● Short press: Channel down in operation mode. Scroll down in MENU mode. ● Long press: Channel scan down. 9. UP Button ● Short press: Channel up in operation mode. Scroll down in MENU mode. ● Long press: Channel scan up. -
Page 5: Speaker Mic Button Functions
SPEAKER MIC BUTTON FUNCTIONS 13. PTT Button ● Transmit when pressed, the LED (2) will glow red. ● Release to receive. 14. Speaker 15. UP Button ● Short Press: Channel up in operation mode. Scroll up in MENU mode. ● Long Press: Channel scan up. -
Page 6: General Operation
+ Button - Increase the volume. 21. – Button - Decrease the volume. 22. Microphone - For the best performance, speak approximately 5cm away from the built-in microphone. GENERAL OPERATION POWER ON/OFF Press the volume knob (1) to turn the radio on. The display will show every icon for one second, then you will hear a beep, and then the most recently selected channel will be displayed. -
Page 7: Squelch
- Open Scan Mode (OSC) Allows continuous scanning of all 80 CB channels. This is the default scanning mode. - Group Scan Mode (GS) & Priority Watch (PRI) In Group Scan Mode, only channels stored in Group Scan memory are scanned, all other channels are skipped over. -
Page 8: Duplex
DUPLEX (Repeater) Mode (DUP) Duplex operation allows the radio to transmit on a different frequency to that which it receives, allowing operation through repeater station. Repeaters automatically re-transmit your signal over a wider area, providing greatly increased range. This function is available on channels 1 – 8 and channels 31 –... -
Page 9: Tone Calling
5. Press the OK button to save the Selcall ID. 6. Press and hold the MENU button to exit the Selcall programming mode. NOTE: 5-digit Selcall is available by setting the 6 digit to “_”. - Store the Selcall IDs of other radios 1. -
Page 10: Quite Mode
TONE PERIOD (Pd) Tone period is the duration of one tone in a Selcall ID sequence. The tone period of each radio must match for Selcall to work. To set the tone period: 1. While the radio is off, press and hold the QUIET button, then turn the radio on. 2. -
Page 11: Group Calling
Auto mode (Ato) a) Transmits acknowledge tones to the caller. b) Sounds the call alarm for 10 seconds. c) Quiet mode is resumed automatically after 20 seconds if the call is not answered. Continuous mode (Con) a) Transmits acknowledge tones to the caller. b) Initially an alarm of four successive beeps activates for 20 seconds. -
Page 12: Lmr Function
Group 01 mode sets the tone period to 1 tone period (default). Group 02 mode sets the first group tone period to 3 tone periods. 1. While the radio is off, press and hold the QUIET button, then turn the radio on. 2. - Page 13 Setting a CTCSS/DCS code prevents the squelch from opening if the received signal does not have the correct subtone. 1. Press the MENU button and then press the UP button, “Cod” will be displayed. 2. Press the OK button to enter the CTCSS/DCS setting. 3.
- Page 14 mode. NETWORK SCAN CODE (nSC) 1. Press the MENU button and then press the UP button seven times, “nSC” will be displayed. 2. Press the OK button to enter the Network Scan Code setting. 3. Use the UP or DOWN buttons to select between CTCSS 01-50 and DCS 01-104. Default: CTCSS-01 4.
- Page 15 NOISE REDUCTION CONTROL (nrC) 1. Press the MENU button and then press the DOWN button three times, “nrC” will be displayed. 2. Press the OK button to enter the Noise Reduction settings. 3. Use the UP or DOWN buttons to select On or Off. Default: Off 4.
-
Page 16: Selcall Tone Frequency List
Factory Default Setting Table Channel 1 (bd1) CTCSS/DCS TX Power Level Quiet Mode High (5W) DW channel Key Beep Roger Beep Scan mode Duplex Mode Priority Watch PRI Channel Busy Lockout GS Memory None OS Memory Channel All 80 channels Channels Repeater Channels None... -
Page 17: Channel Frequency List
Channel Frequency List Simplex Mode Duplex Mode Simplex Mode CH # Transmit/Receive Transmit CH #. Transmit/Receive Frequency (MHz) Frequency (MHz) Frequency (MHz) 476.425 477.175(CH31) 476.925 476.450 477.200(CH32) 476.950(RX only) 476.475 477.225(CH33) 476.975(RX only) 476.500 477.250(CH34) 477.000 476.525 477.275(CH35) 477.025 476.550 477.300(CH36) 477.050 476.575... -
Page 18: Ctcss & Dcs Table
CTCSS Table 67.0 97.4 136.5 192.8 165.5 71.9 100.0 141.3 203.5 171.3 74.4 103.5 146.2 210.7 177.3 77.0 107.2 151.4 218.1 183.5 79.7 110.9 156.7 225.7 189.9 82.5 114.8 162.2 233.6 196.6 85.4 118.8 167.9 241.8 199.5 88.5 123.0 173.8 250.3 206.5 91.5... -
Page 19: Specifications
SPECIFICATIONS TYPE: 1-DIN CHASSIS: Die-Cast Alloy POWER SOURCE: 12/24V DC MAX POWER OUTPUT: CHANNELS CB/LMR: 2 Banks: 80 (CB), (LMR - Dealer Programmable) CB FREQUENCY RANGE: 476.425 ~ 477.4125MHz LMR FREQUENCY RANGE: 450~520MHz CHANNEL WIDTH: 12.5kHz / 25KHz (Narrowband / Wideband) DISPLAY: 3 Colour VA INGRESS PROTECTION:...
Need help?
Do you have a question about the MGX D1 and is the answer not in the manual?
Questions and answers