Table of Contents
Advertisement
Quick Links
Advertisement
Table of Contents

Related Manuals for AUTOBACS MGX C1


Summary of Contents for AUTOBACS MGX C1
-
Page 2: Table Of Contents
TABLE OF CONTENTS MAIN UNIT BUTTON FUNCTIONS ……………………………………………………………………....4 DISPLAY ICONS ........................6 SPEAKER MIC BUTTON FUNCTIONS ..................5 GENERAL OPERATION ......................6 CHANNEL SCAN ....................... 7 SQUELCH ......................... 8 DUPLEX ........................8 PRIORITY CHANNEL ....................9 REPLAY ........................9 SELCALL ....................... 9, 10 TONE CALLING .................... -
Page 3: Safety Notes
SAFETY NOTES Read these instructions carefully and completely before using this UHF CB Radio. Keep the instructions with the radio so that they are always accessible to all users. Observe the following notes about road safety: Use this device in such a way that you can always safely control your vehicle. As the driver, you should not use this unit in a way that will distract you from driving. -
Page 4: Main Unit Button Functions
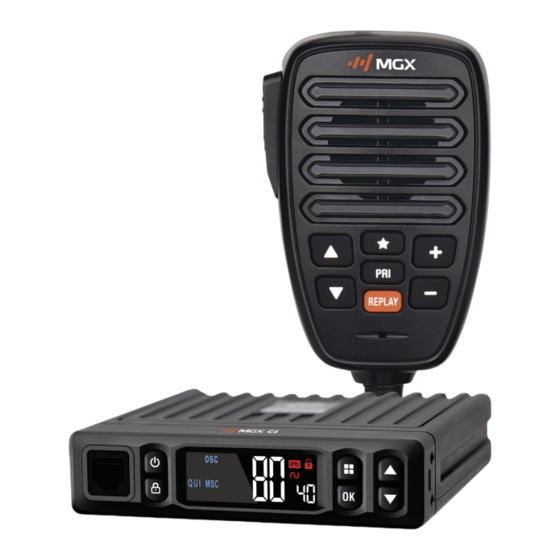
MAIN UNIT BUTTON FUNCTIONS 1. Front Mic Jack 2. Power On/Off ● Long press: To turn On or Off. 3. Button Lock/TX Call Tone ● Short press: TX Call Tone. ● Long-press: Button Lock/Un-lock. (Except for Volume and Power Buttons) 4. -
Page 5: Speaker Mic Button Functions
SPEAKER MIC BUTTON FUNCTIONS 9. PTT Button 10. Speaker 11. UP Button ● Short Press: Channel up in operation mode. Function up or Function select in MENU mode. ● Long Press: Channel scan up. NOTE: Dual Watch is disabled while scanning, short press again to exit scanning. Pressing the UP and DOWN buttons during scanning can change the scanning direction. -
Page 6: Display Icons
18. Microphone For best performance, speak approximately 5cm distance from the built-in microphone. DISPLAY ICONS GENERAL OPERATION POWER On/Off Press and hold the power button (2) to turn the radio ON. You will hear a tone when the radio is on. The LCD display will show all icons for one second and then display the most recently selected channel. -
Page 7: Channel Scan
CHANNEL SCAN The UHF CB Radio has a scanning feature that allows you to search for active channels automatically. Furthermore, the UHF CB Radio is designed to have three types of scanning; Open Scanning (OSC), Group Scanning (GSC) and Network Scan (NSB) to give you flexibility and allow you to use the radio more effectively. -
Page 8: Squelch
SQUELCH The highest level will provide less interference but will affect the communicate distance. Lowest level is fully open and allows all channels faint or close to be heard. Select a squelch level that allows only clear communications to be heard. The Squelch feature has an OFF setting and 9 preset squelch levels: Off - Squelch open 1 - Max sensitivity (min squelch) -
Page 9: Priority Channel
PRIORITY CHANNEL (PRI) - Setup 1. Press the UP or DOWN buttons to select the Priority Channel you prefer. 2. Press and hold the PRI button (14) to store the current channel as the Priority channel. The PRI icon and channel will be displayed. - Recalling the Priority Channel Press PRI at any time during standby to recall the Priority Channel. - Page 10 2. Press and hold PRI, then turn on the radio, and you will see “id” displays 3. Press OK to start the Selcall ID edit. The 6th digit of the ID flashes. 4. Use the VOLUME UP or DOWN buttons to shift between digits. A 6th digit (for 6 tone Selcall) is available and indicated by a ‘_’.
-
Page 11: Tone Calling
TONE CALLING Tone Calling allows you to selectively call other radios. To Call: 1. Select the channel that you and your group agreed to use for Selective Calling. 2. Press and hold Replay for 2 seconds. A beep tone will sound, and the last stored ID or last transmitted ID will be displayed. 3. - Page 12 - TONE PERIOD (PD) Tone period is the duration of one tone in a Selcall ID sequence. The setting of this parameter depends on the type of application. On long-distance communications, for example: where the signal strength of the transmitted information is greatly reduced and affected by noise, it is advisable to use a longer Tone Period.
-
Page 13: Call Function
To set Lead in delay (Lid) 1. Be sure radio is off. 2. Press and hold PRI, then turn On the radio. 3. Press DOWN button 2 times and you will see “Lid” displays 4. Press OK to select the lead in delay setting. 5. - Page 14 c) Resume Quiet condition automatically after 20 seconds if the call is not answered. d) The Unit will start decoding again when the 20 second period elapsed and the call remained unanswered. Call Alarm - Continue mode a) Transmit an Acknowledge Tone to the Caller. b) Initially an alarm of four successive beeps is emitted for 20 seconds and then two successive beeps every four seconds continuously unless answered.
-
Page 15: Lmr Function
to - [1] [2] [3] [4] [5] [9] all in QUI mode at CH1 If someone transmits ID 12345A on CH1, all of the above units will open their Tone Squelched Receiver. Group Call Mode (grp) The Group Tone period can be adjusted to increase the ability to identify group calls. Group 01 mode sets the tone period to 1 tone period (default). -
Page 16: Menu Function Settings
MENU FUNCTION SETTINGS Short press MENU button to enter all the functions settings highlighted in this section, then press the UP or DOWN buttons to scroll through the available functions below. Press the OK button to enter the chosen function. If there is not any operation in 10s, it will return to the current channel automatically. - Page 17 - DUAL WATCH (duL) 1. Press the MENU button and scroll UP or DOWN till “duL” displays. 2. Press the OK button to enter dual watch channel setting. 3. Use the UP or DOWN buttons to select the channel you want to set. Default: 01 4.
- Page 18 - NETWORK SCAN BAND (NSb) 1. Press the MENU button and scroll UP or DOWN till “NSb” displays. 2. Press the OK button to enter the Network Scan Band setting 3. Use the UP or DOWN buttons to select between P-, P1, P2, P3, P4. Default: P- 4.
- Page 19 - CALL TONE (CAL) 1. Press the MENU button and scroll UP or DOWN till “CAL” displays. 2. Press the OK button to enter the setting. 3. Use the UP or DOWN buttons to select 01-02-03-04-05. Default: 01 4. Press the OK button to confirm selection. - TX Noise Cancel (ANC) 1.
-
Page 20: Selcall Tone Frequency List
Factory Default Setting Table Channel CTCSS/DCS 1 (bd1) Power Level SQ Level DW channel Quiet Mode Roger Beep Key Beep Duplex Mode Scan mode PRI Channel PRI watch GS Memory None Busy Lockout Channel Repeater Channel OS Memory Channel None ALL 80 channels Rd(... -
Page 21: Channel Frequency List
UHF CB 80 Channels Frequency List Simplex Mode Duplex Mode Simplex Mode CH NO. Transmit/Receive Transmit CH NO. Transmit/Receive Frequency (MHz) Frequency (MHz) Frequency (MHz) 476.425 477.175(CH31) 476.925 476.450 477.200(CH32) 476.950(RX only) 476.475 477.225(CH33) 476.975(RX only) 476.500 477.250(CH34) 477.000 476.525 477.275(CH35) 477.025 476.550... -
Page 22: Ctcss & Dcs Table
CTCSS Table 67.0 97.4 136.5 192.8 165.5 71.9 100.0 141.3 203.5 171.3 74.4 103.5 146.2 210.7 177.3 77.0 107.2 151.4 218.1 183.5 79.7 110.9 156.7 225.7 189.9 82.5 114.8 162.2 233.6 196.6 85.4 118.8 167.9 241.8 199.5 88.5 123.0 173.8 250.3 206.5 91.5... -
Page 23: Specifications
SPECIFICATIONS TYPE: Super Compact CHASSIS: Die-Cast Alloy POWER SOURCE: 12/24V DC MAX POWER OUTPUT: 2 Banks: 80 (CB), 128 (LMR - Dealer CHANNELS CB/LMR: Programmable) CB FREQUENCY RANGE: 476.425 ~ 477.4125MHz LMR FREQUENCY RANGE: 450~520MHz 12.5KHz/25KHz (Narrowband/Wideband LMR CHANNEL WIDTH: Selectable) DISPLAY: Colour VA...
Need help?
Do you have a question about the MGX C1 and is the answer not in the manual?
Questions and answers