Advertisement
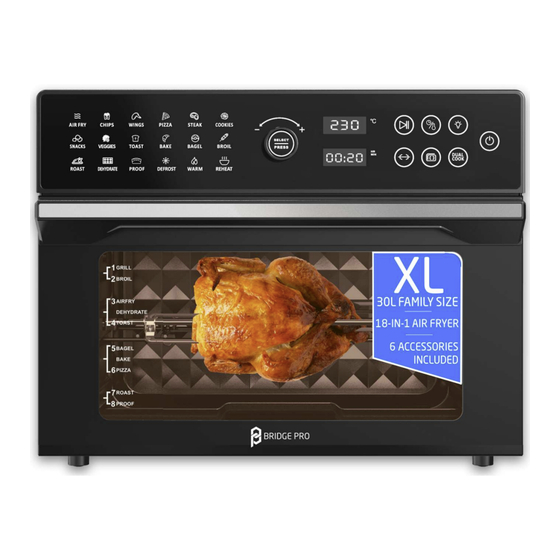
30 LITRE DIGITAL
AIR FRYER
TOASTER OVEN
Cook different amazing food with one device
543302-1
When using electric appliances basic safety precaution should always be followed. Do not
use BridgePro Air Fryer Dual Zone Oven until you have read this manual thoroughly. Please
keep this instruction manual in a safe place.
Visit BridgePro Online Store
www.bgepro.com/shop/
Download our Recipe Cookbook at
www.bgepro.com/bridgepro-air-fryer-recipes/
Advertisement
Table of Contents

Related Manuals for BRIDGE PRO 543302-1

Summary of Contents for BRIDGE PRO 543302-1
- Page 1 AIR FRYER TOASTER OVEN Cook different amazing food with one device 543302-1 When using electric appliances basic safety precaution should always be followed. Do not use BridgePro Air Fryer Dual Zone Oven until you have read this manual thoroughly. Please keep this instruction manual in a safe place.
- Page 2 _____________________________________________________________________________ IMPORTANT SAFEGUARDS ................................. 3 GETTING TO KNOW YOUR AIR FRYER TOASTER OVEN ......................7 MAIN COMPONENTS ................................7 BEFORE FIRST USE ................................. 8 FEATURES ....................................8 TECHNICAL SPECIFICATION ..............................8 LED CONTROL PANEL ................................9 TIME / TEMPERATURE SWITCH / CHANGE ...................... 12 BEFORE USING YOUR APPLIANCE ............................
- Page 3 _______________________________________________________________________________________ Always follow basic safety precautions when using your Air Fryer Toaster Oven. READ ALL INSTRUCTIONS BEFORE USE Unplug the appliance from electrical outlet when not in use and before cleaning. Allow the appliance to cool down before cleaning or handling, or putting on or taking off parts.
- Page 4 Do not use outdoors or in remote unattended areas. Do not use or place on or near a hot gas or electric burner. Do not use this appliance for other than the intended use. To avoid potential hazards, do not put the product next to or use by children. ...
- Page 5 Do not plug in the power supply or operate the control panel with wet hands. Do not place anything on top of the appliance. No items should be placed on top of the appliance when in use or operation. ...
- Page 6 Always re-insert the crumb tray into the oven, beneath the heating elements. FOR HOUSEHOLD USE ONLY SAVE THESE INSTRUCTIONS NOTE You may smell a slight odor and smoke on first use. This is due to the production residue burning off the appliance and heating elements upon initial use.
- Page 7 _______________________________________________________________________________________ Oven rack Use for meat, bread, pizza, etc. Air fryer basket Use in conjunction with air fryer function to optimize your cooking results. Use for fries, chicken wings, onions, etc. It can also be used as a dehydrate basket. Baking pan Contains a non-stick coating that is PFOA free, and food grade compliant PTFE.
-
Page 8: Door Sensor
1. Please remove all packaging materials carefully and choose a flat area to place the appliance. Ensure all accessories are removed from the packaging before disposing packaging materials. 2. Clean all accessories with warm water, dishwashing liquid or soft lint. 3. - Page 9 1. APPLIANCE COOKING FUNCTIONS OVERVIEW Preset Default Default Time Temperature Time Range Temperature Range Air fry 200°C 10 mins 90 - 230°C Up to 2 hours Chips 230°C 18 mins 90 - 230°C Up to 2 hours Wings 230°C 18 mins 90 - 230°C Up to 2 hours Pizza...
- Page 10 Steak 230°C 7 mins 90 - 230°C Up to 2 hours Cookies 180°C 15 mins 90 - 230°C Up to 2 hours Snacks 200°C 18 mins 90 - 230°C Up to 2 hours Veggies 230°C 15 mins 90 - 230°C Up to 2 hours Toast* 1 ~ 7...
-
Page 11: Power On/Off
COOKING FUNCTION / MENU You can select the cooking function by rotating the menu knob. A clockwise or anti-clockwise rotation allows you to choose and select your desired cooking function. The cooking function that is flashing indicates your selection. Once you have selected the cooking function, press the menu knob to begin the cooking operation. -
Page 12: Light Switch
ROTISSERIE FORK It is used to cook food that requires rotation through the cooking process (e.g. rotisserie chicken, turkey, meat, etc.). After loading food onto the rotisserie fork: a. select the cooking function b. set the temperature / time, then c. - Page 13 Place on a stable, level, heat-resistant Remove all packaging around and inside surface, away from anything that can be the oven. damaged by heat. Keep at least 110mm distance between the electrical outlet and the wall, furniture, etc. Place on a stable, level, heat-resistant Remove the protective film from the surface, away from anything that can be control panel.
-
Page 14: Time / Temperature
Plug in, touch the POWER ON / OFF icon to turn on the appliance. The display will light up and the “AIR FRY” icon will flash. Rotate the menu knob to choose the cooking function you want. The default temperature and time will appear on the display. - Page 15 Touch the “PREHEAT” icon in order to preheat the appliance. When the internal temperature reaches 150°C, the “Add food” sign will appear. After pre-heating, put the food in the oven cavity and close the door, the program will start cooking automatically. Note: The Toast, Dehydrate, Proof, Defrost, Reheat and Warm programs do not require preheating.
- Page 16 Insert the accessories with food into the desired position Accessories Position then close the door. There are four shelf positions, use the above rack position diagrams to place the accessories. Note: If you need to use the rotisserie, fix the food and place it in the appliance.
- Page 17 Plug in, touch the POWER ON / OFF icon to turn on the appliance. The display will light up and the “AIR FRY” icon will flash. DUAL COOK Touch the DUAL COOK icon, five programs AIR FRY / BAKE / BROIL / ROAST / WARM will light up, rotate the menu knob to select the first program needed, e.g.
- Page 18 adjust to the desired time, finally touch the menu knob to confirm the first program AIR FRY. The remaining four icon will light up, repeat the above steps to adjust the second program Note: If you want to cancel the DUAL COOK program, you can touch the START / PAUSE icon, and then touch the DUAL COOK icon to return to the general menu.
- Page 19 Note: To use the rotisserie, touch the rotisserie icon after touch the START / PAUSE icon. Note: The display will continue to show “END” until the menu icon is pressed. After the cooking operation is complete, the fan will continue to run for 4 minutes in order to properly cool the appliance.
- Page 20 1: When cooking oily food (e.g. chicken wings) with the oven rack, air fryer basket or rotisserie, consider placing the baking pan in the slot underneath in order to prevent oil from dripping onto the stainless steel heating elements. 2: Note: After cooking oily food (e.g. chicken wings), there will be oil stains on the back plate and side plate of the oven, please clean it in time to avoid excessive accumulation of oil stains and leakage to the bottom of the appliance.
- Page 21 Consider using a cooking string to hold the chicken together during the roast cooking operation. When using a cooking string to hold the chicken together, be careful not to tie tightly, best to loosely hold the meat together with the tied string, so hot air can still circulate around the chicken for optimal cooking result.
- Page 22 Function Preheat Suggested Suggested Suggested Amount of Accessory Rack Food Position Air fry Based on food Air Fryer selected Basket Chips 550g Air Fryer Basket Wings 1,038g Air Fryer (28pcs) Basket Pizza 13 inches Baking Pan or Oven Rack Steak 190g Baking Pan or Oven Rack...
- Page 23 Function Preheat Suggested Suggested Suggested Amount of Accessory Rack Food Position Dehydrate Air Fryer Bkt Proof Baking Pan Based on the food you Defrost Baking Pan select Reheat Oven Rack Warm Baking Pan Function 1 Function 2 Preheat Suggested Suggested Suggested Amount of Accessory...
- Page 24 1. The use of the rotisserie rotating skewer accessory (OPTIONAL SPARE, NOT INCLUDED, PART NUMBER 543306-1) is as shown in the following section. Buy accessories from BridgePro Online Shop: www.bgepro.com/product-tag/30l-air-fryer/ 2. The use of the rotisserie rotating drum accessory is as shown in the following section.
- Page 25 1: Note: The upper heating elements will not turn orange / red during cooking operations – this is normal. The wattage of the top heating elements differs from the bottom heating elements to maintain an appropriate oven chamber temperature. CAUTION: ...
-
Page 26: Enviromental Protection
The appliance is designed for baking high temperature products. When operating the appliance, take caution to avoid placing it near curtains and other flammable objects. ENVIROMENTAL PROTECTION Your appliance has been designed to run for many years. However, when you decide to replace it, remember to think about how you can contribute to protecting the environment. - Page 27 Do not use hard cleaning tools. Do not use string cleaners This will damage the surface of the appliance and cause corrosion and rust. 27 | P a g e...
- Page 28 Attention: Be sure to unplug the appliance and allow it to cool completely before replacing the oven light. Specification: 25W Halogen Bulb 2. Remove the used bulb by pulling it 1. Rotate the light cover clockwise to directly. remove it. 4.
- Page 29 Attention: Be sure to cool down the glass door completely before disassembly. 1. Turn the screw anti-clockwise using a screwdriver. 2. Use the silicone suction cup to lift up the glass, and then take out the glass from its housing using your hands. 3.
- Page 30 Before cleaning, remove the power plug from the power outlet. Allow the appliance and the accessories to cool completely before disassembling and cleaning. Clean the outer body and door. Wipe the outer body with a soft, damp sponge. A non-abrasive liquid cleaner or mild spray solution may be used to avoid build-up of stains.
- Page 31 a soft, damp sponge or cloth along the length of the heating element. Do not use any type of cleanser or cleaning agent on the heating elements. Let all surfaces dry throughout prior to inserting the power plug into a power outlet and turning the appliance on.
- Page 32 Possible Problem Possible Cause Solution The oven does not The appliance is not Make sure the oven is work plugged in. plugged in. You have not turned Touch the POWER ON/ OFF on the oven. icon to power on. The door is not closed Make sure the door is closed.
- Page 33 or the heating elements components are property contain an excess cleaned after use with non- amount of oil residue abrasive cleaning agents. from previous use and Avoid abrasive or acidic require cleaning. cleaning agents (e.g. containing any amount of hydrochloric or sulphuric acid, bleach, or chlorine, vinegar, and such liquids) Dark smoke is coming...
- Page 34 adjusted within the be hot. shelf levels. Foods are not crispy Ingredients with high Spraying or brushing a small after air frying moisture. amount of oil evenly on high moisture food can increase crispiness. Display shows Error There is a short circuit Remove the power cord from code “E1”...
- Page 35 _______________________________________________________________________________________ BridgePro Management Ltd ("BPM"). Limited Warranty: This product is guaranteed for 12 months from the date of original purchase. This guarantee is valid in the UK only. If any defect arises due to faulty materials or workmanship, the faulty products must be returned to the place of purchase.
- Page 36 Product Type Product Part Number BridgePro 30L Digital Air Fryer Air Fryer Oven 543302-1 Oven Note: Serial number is stated on each product rating label. The object of the declaration as described above is in conformity with the relevant Union harmonisation...
- Page 37 _______________________________________________________________________________________ 37 | P a g e...
Need help?
Do you have a question about the 543302-1 and is the answer not in the manual?
Questions and answers