
Related Manuals for Med-Fit Combo 3


Summary of Contents for Med-Fit Combo 3
- Page 1 Pain Relief TENS Machine Muscle Stimulation Massage Quick Start Guide Combo Electrotherapy TENS, Muscle Stimulation and Massage Tel: 0161 429 7330 email: sales@med-fit.co.uk 2460...
-
Page 2: Product Overview
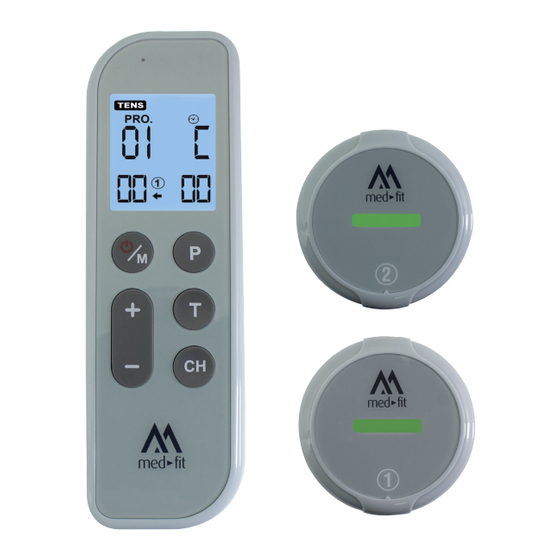
Product Overview No Function description Charging light. LCD Display. ON/OFF Button and treatment mode selection button. [+] Button - press the [+] button to increase the intensity [-] Button - press the [-] button to decrease the intensity Charging Port [P] Button - press the [P] button to select the treatment programme [T] Button - press the [T] button to change the treatment time. - Page 3 Intensity Channel 1 Channel Arrow Channel 1 - Indicates which module has been chosen Treatment Time - 10 - 90 minutes and continuous [C] Channel 2 Symbol Intensity Channel 2 Channel Arrow Channel 2 - Indicates which module has been chosen www.med-fit.store...
-
Page 4: Getting To Know Your Device
Getting to know your device What's in the box The Med-Fit Combo 3 stimulator is supplied with the following: 1 x Remote control. 2 x Receiver modules. 2 x Self-adhesive electrode pads 15cm x 10cm. -
Page 5: How To Operate
This term refers to when the remote and one or both modules are turned on. To operate and set features of the remote control, you must also turn on one or both modules you are now in standby mode. www.med-fit.store... - Page 6 Setting your device ready for use We recommend you start the first treatment with one module only (module number 1). To do this turn on your remote control and module number 1. Once both are turned on press the [CH] button and select channel 1, adjust the timer to the required setting, adjust the programme button to the required programme.
- Page 7 The timer will count down in minute intervals during your treatment session. At the end of the treatment session remove the self-adhesive pad from the back of the module and place it onto the plastic film. Turn off your remote and module. www.med-fit.store...
- Page 8 Electrode Instructions Please read these instructions It is important to smear warm water over the gel side of the pad every 3rd or 4th application allowing 5 minutes for the water to be absorbed before re-applying the electrode. This process re-rejuvenates the hydrogel and increases the longevity of your electrodes. Skin Patch Test It is recommended that you carry out a patch test before applying your first treatment.
-
Page 9: Special Features
Self-adhesive pad Smear water on the gel side of the self-adhesive pad after the 3rd or 4th application. Allow 5 minutes for the water to be absorbed before applying the electrode to the skin. www.med-fit.store... -
Page 10: Which Programme Should I Use
We always recommend you start with programme 1, as already mentioned in your step-by-step guide. The Combo 3 Wireless has a total of 9 TENS programmes. Each programme has been shown to reduce and block pain in a wide range of conditions. It is very difficult to know which programme is best for you. - Page 11 Long-term TENS use, the major benefit of these programmes is reducing the risk of accommodation to the TENS stimulation. As a result long-term TENS treatments can be applied to the same area of the body, on a daily basis to control pain. www.med-fit.store...
- Page 12 Treatment Programmes Guidelines The following conditions benefit from using programmes 1, 2, 3 and 4. Conventional TENS Programme 1 This is the most common programme (80Hz Constant) used by NHS pain clinics. It is ideal for your first TENS treatment, for both acute, chronic and long-term use. Suitable Conditions Neck Pain - Shoulder Pain - Knee Pain - Lower Back Pain - Sciatica - Arthritic Pain.
- Page 13 This offers superior pain relief on most areas of the body. Joint Pain, Fracture Pain Programme 9 This programme is ideal for all common areas of joint pain, with this treatment we recommend that the stimulation is increased to a stronger level than the pain itself. www.med-fit.store...
- Page 14 Treatment Programmes Guidelines EMS muscle stimulation programmes 10-14 Programmes 10, 11, 12, 13, & 14 Five muscle stimulation programmes are available offering: 1. Muscle Re-education. 2. Muscle Training. 3. Muscle Strengthening. 4. Muscle Tone / Relaxation. Programmes 11 & 12 Muscle Training &...
- Page 15 If you are using one module, place the electrode directly onto the painful area. The alternative method is to use two modules surrounding the painful area. See examples below. The complete area between the electrodes will now be treated when positioning the electrodes as shown. www.med-fit.store...
- Page 16 TENS Electrode Placement Frozen Shoulder Lower Back Pain Shoulder Pain Hip Neuralgia Degenerative Arthritis: Cervical and Lumbar Phantom Limb, Lower Extremity Chronic Hip Pain Sciatica Telephone: 0161 429 7330...
- Page 17 TENS Electrode Placement Low Extremity Pain Lower Leg Pain Degenerative Arthritis - Knee Pain Cervical Placement Carpal Tunnel Syndrome Chronic Cervical Strain Wrist, Elbow & Forearm Pain Knee Pain - Post-Op www.med-fit.store...
- Page 18 Introduction to EMS This EMS unit is used for muscle stimulation. The device is provided with controllable output channels, each independent of the other. A pair of electrodes can be connected to each output channel. An independent switch controls the intensity level and settings. Explanation of EMS Electrical Muscle Stimulation is an accepted and proven way of treating muscular injuries.
- Page 19 The muscle map of the human body comprises of a large number of muscles with wild names such as manducatory muscles or mime muscles, the thenar muscle, or even the gluteal muscles. www.med-fit.store...
- Page 20 EMS Electrode Placement Arms Deltoid Posterior Fascia Biceps Latissimus Deltoid Thigh Deltoid & Anterior Fascia Internal Thigh Telephone: 0161 429 7330...
- Page 21 EMS Electrode Placement Gluteals The Abdominals The Trapezius Muscle and Dorsals The Pectorals The Abdominals The Legs and Calves www.med-fit.store...
- Page 22 Treatment Programmes TENS & EMS Mode Prog No Phase Pulse Rate Hz Pulse Width µs Time Type Adjustable Continuous Adjustable Continuous Adjustable Continuous 2-60 260-160 Adjustable Modulation 2-60 260-160 Adjustable Modulation Adjustable Continuous 13-56 Adjustable Modulation TENS Adjustable Continuous Adjustable Continuous Adjustable Continuous...
- Page 23 30-220 Adjustable Modulation 30-220 Adjustable Modulation 30-220 Adjustable Modulation 30-220 Adjustable Modulation 30-220 Adjustable Modulation 30-220 Adjustable Modulation 30-220 Adjustable Modulation 30-220 Adjustable Modulation 30-220 Adjustable Modulation 30-220 Adjustable Modulation 30-220 Adjustable Modulation 30-220 Adjustable Modulation 30-220 Adjustable Modulation www.med-fit.store...
- Page 24 Med-Fit UK Ltd. Unit 8 Martel Court, S. Park Business Park, Hamilton Road, Stockport, SK1 2AF Telephone: 0161 429 7330 Email: sales@med-fit.co.uk | www.tensmachineuk.com Company registration number 08758741 | Vat registration number 308286105...
Need help?
Do you have a question about the Combo 3 and is the answer not in the manual?
Questions and answers