
Related Manuals for Behringer STEPS


Summary of Contents for Behringer STEPS
- Page 1 Quick Start Guide STEPS Multi-Source Modulation and Sequencer Module for Eurorack V 0.0...
-
Page 2: Legal Disclaimer
(incluyendo 6. Use only attachments/ Turbosound, TC Electronic, are trademarks or registered amplificadores) que accessories specified by TC Helicon, Behringer, Bugera, trademarks of Music Tribe Global generen calor. the manufacturer. Aston Microphones y Coolaudio Brands Ltd. © Music Tribe Global 6. -
Page 3: Garantie Limitée
Nähe von Wärmequellen wie Lake, Tannoy, Turbosound, marques appartiennent à leurs radiateurs, grilles de chaleur, Heizkörpern, Heizregistern, TC Electronic, TC Helicon, Behringer, propriétaires respectifs. Midas, cuisinières ou autres appareils Öfen oder anderen Geräten Bugera, Aston Microphones und Klark Teknik, Lab Gruppen, (y compris les amplificateurs) (einschließlich Verstärkern),... -
Page 4: Garantia Limitada
5. Não instale próximo a fontes Turbosound, TC Electronic, TC Electronic, TC Helicon, 5. Non installare vicino a fonti de calor, como radiadores, TC Helicon, Behringer, Bugera, Behringer, Bugera, Aston grelhas de calor, fogões ou di calore come termosifoni, Aston Microphones e Coolaudio... -
Page 5: Begränsad Garanti
Installeer enligt tillverkarens anvisningar. Tannoy, Turbosound, TC Electronic, andere informatie kunnen zonder volgens de instructies van TC Helicon, Behringer, Bugera, 5. Installera inte nära några voorafgaande kennisgeving Aston Microphones och Coolaudio de fabrikant. worden gewijzigd. Alle värmekällor som element,... -
Page 6: Ograniczona Gwarancja
、 Behringer Bugera Aston Turbosound, TC Electronic, くには取り付けないでく grzejniki, rejestratory ciepła, および Microphones Coolaudio TC Helicon, Behringer, Bugera, ださい。 kuchenki lub inne urządzenia は Music Tribe Global Brands Aston Microphones i Coolaudio (w tym wzmacniacze), które 6. メーカーが指定したアタ の商標または‑登録 Ltd. - Page 7 Klark Teknik, Lab Gruppen, Lake, Tannoy, Turbosound, TC Electronic, with EEE. At the same time, your cooperation in the correct disposal of 设备和配件。 不要堵塞任何 TC Helicon, Behringer, Bugera, this product will contribute to the efficient use of natural resources. For 通风口。按照制造商的说明 Aston Microphones Coolaudio 和...
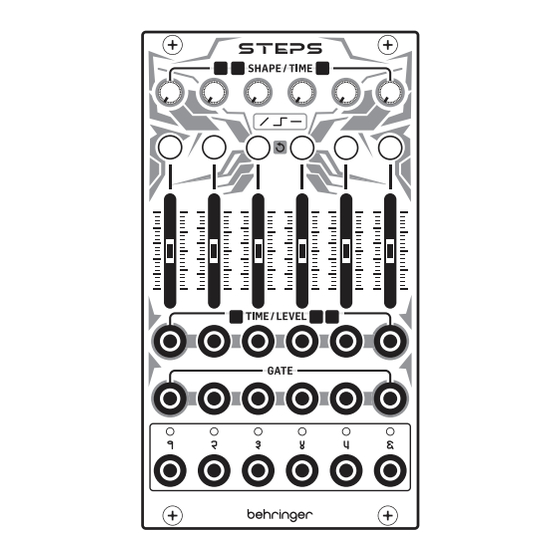
- Page 8 The STEPS is a six step modulation processor, whose steps can be used individually or chained in combination. Each of the six steps has an identical set of controls. It is also possible to chain up to six STEPS modules, allowing you to have up to 36 steps to work with.
-
Page 9: Combination Examples
GATE socket of It is advised to use steps to the right of the panel to make the next step to prevent combination stepping. -
Page 10: Firmware Update
Forward the linkage . . . • FIRMWARE UPDATE Backward As the STEPS does not have a USB port the firmware must be • Pendulum (Forward then Backward) updated using an audio source. Download the file from the • behringer.com product page and load it into a suitable audio Bouncing (1,2,1,3,1,4 etc) player. - Page 11 Red Stripe • The STEPS can be set up to act as an additive VCO, by linking the in and out headers or jack sockets together. HOT USED When it is set up in this way the voltage slider for step...
-
Page 12: Installation
STEPS Quick Start Guide Installation The necessary screws are included with the module for mounting in a Eurorack case. Connect the power cable before mounting. Depending on the rack case, there may be a series of fixed holes spaced 2 HP apart along the length of the case, or a track that allows individual threaded plates to slide along the length of the case. - Page 13 STEPS Quick Start Guide STEPS Controles El STEPS es un procesador de modulación de seis pasos, cuyos pasos pueden ser utilizados individualmente o encadenados en combinación. Cada uno de los seis pasos tiene un conjunto idéntico de controles. También es posible encadenar hasta seis módulos STEPS, permitiendo tener hasta 36 pasos con los...
- Page 14 Girar el control en sentido horario ralentiza el cambio y lo describe en USO DEL STEPS a continuación. suaviza. OUTPUTS – usa estos enchufes jack TS de 3.5 mm para Rojo –...
-
Page 15: Actualización De Firmware
Pendular (Adelante y luego atrás) otro uso del enlace . . . • ACTUALIZACIÓN DE FIRMWARE Rebote (1,2,1,3,1,4, etc.) Como el STEPS no tiene un puerto USB, el firmware debe • Aleatorio actualizarse usando una fuente de audio. Descarga el archivo •... -
Page 16: Consejos Y Trucos
úsalo para marcar otro paso o combinación de pasos. • El STEPS se puede configurar para actuar como un VCO aditivo, vinculando los encabezados de entrada y salida o los enchufes jack juntos. Cuando está configurado de esta manera, el deslizador de voltaje para el paso 1 actúa como un control de sintonización gruesa, con el... -
Page 17: Instalación
STEPS Quick Start Guide Conexión Eléctrica Dependiendo de la caja del bastidor, puede haber una serie de orificios fijos separados 2 HP a lo largo de la caja, o una pista que permita que las placas roscadas individuales se deslicen Red Stripe a lo largo de la caja. - Page 18 STEPS Quick Start Guide STEPS Réglages Le STEPS est un processeur de modulation à six segments, dont les segments peuvent être utilisées individuellement ou enchaînées en combinaison. Chacun des six segments possède un ensemble de contrôles identiques. Il est également possible de chaîner jusqu’à six modules STEPS, permettant ainsi d’avoir jusqu’à...
- Page 19 +8 V. La position du contrôle SHAPE détermine la rapidité comme décrit dans UTILISATION DU STEPS ci-dessous. avec laquelle la sortie change lorsque la tension change : complètement à gauche, elle produit un changement OUTPUTS –...
-
Page 20: Mise À Jour Du Firmware
MISE À JOUR DU FIRMWARE • Rebond Comme le STEPS n’a pas de port USB, le firmware doit être • Aléatoire mis à jour en utilisant une source audio. Téléchargez le fichier depuis la page du produit sur behringer.com et chargez-le •... -
Page 21: Conseils Et Astuces
à environ 50 % de sa course. Cela agit comme un contrôle de gain d’entrée. Rouge continu – carré • Allumez le STEPS tout en appuyant et en maintenant le Vert clignotant – dents de scie bouton de mode du dernier segment. Orange clignotant – impulsion de 25 % •... - Page 22 STEPS Quick Start Guide Connexion Électrique Installation Les vis nécessaires sont incluses avec le module pour le montage dans un boîtier Eurorack. Connectez le câble Red Stripe d’alimentation avant le montage. HOT USED Selon le cas de rack, il peut y avoir une série de trous fixes 200 mm ±...
- Page 23 Schritte einzeln oder in Kombination genutzt werden können. Jeder der sechs Schritte hat einen identischen Satz an Steuerungen. Es ist auch möglich, bis zu sechs STEPS-Module zu verbinden, wodurch bis zu 36 Schritte zur Verfügung stehen. (DE) Bedienelemente SHAPE/TIME – Verwenden Sie diese Steuerungen...
- Page 24 Gate die Funktion, wird, im Bereich von -8 V bis +8 V. Die Position des SHAPE- wie in der ANWENDUNG DES STEPS unten beschrieben. Reglers bestimmt, wie schnell die Ausgabe sich ändert, wenn die Spannung sich ändert: vollständig gegen den OUTPUTS –...
- Page 25 Ausgang aus der Ausgangsbuchse VERBINDEN MEHRERER STEPS MODULE des ersten Schritts kommt, die individuellen Ausgänge der Um zwei oder mehr STEPS-Module miteinander zu verbinden: nachfolgenden Schritte jedoch weiterhin an ihren jeweiligen Buchsen verfügbar sind. Jeder Schritt in einer Kombination •...
-
Page 26: Firmware Update
STEPS Quick Start Guide • verwenden Sie ein TRS-Kabel , andernfalls funktioniert die Der STEPS kann so konfiguriert werden, dass er als Verbindung nicht. additiver VCO fungiert, indem die Ein- und Ausgangs- Header oder Buchsen miteinander verbunden werden. Siehe auch TIPPS UND TRICKS unten für eine andere In diesem Fall fungiert der Spannungsschieber für... - Page 27 STEPS Quick Start Guide Netzanschluss Installation Die erforderlichen Schrauben sind im Lieferumfang des Red Stripe Moduls für die Montage in einem Eurorack-Gehäuse enthalten. Schließen Sie das Netzkabel vor der Montage an. HOT USED 200 mm ± 10 + 12V + 12V Abhängig vom Rack-Gehäuse kann es eine Reihe von festen...
- Page 28 STEPS Quick Start Guide STEPS Controles O STEPS é um processador de modulação de seis etapas, cujas etapas podem ser usadas individualmente ou encadeadas em combinação. Cada uma das seis etapas tem um conjunto idêntico de controles. Também é possível encadear até seis módulos STEPS, permitindo ter até...
- Page 29 Vermelho – a saída é derivada da combinação do controle descrito em USING THE STEPS abaixo. deslizante e do CV externo, com o controle TIME configurando o atraso antes que a voltagem mude quando o controle OUTPUTS –...
-
Page 30: Atualização De Firmware
• Pêndulo (para frente e depois para trás) ATUALIZAÇÃO DE FIRMWARE • Como o STEPS não possui uma porta USB, o firmware deve Saltando (1,2,1,3,1,4 etc) ser atualizado usando uma fonte de áudio. Baixe o arquivo • Aleatório da página do produto em behringer.com e carregue-o em... - Page 31 STEPS Quick Start Guide • Ligue o STEPS enquanto pressiona e segura o botão de Verde contínuo – seno modo da última etapa. Laranja contínuo – triângulo • Reproduza o arquivo de áudio. Os LEDs de saída atuam Vermelho contínuo – quadrado como um medidor VU: se todos estiverem acesos em vermelho, o nível de áudio é...
- Page 32 STEPS Quick Start Guide Conexão de Força Instalação s parafusos necessários estão incluídos com o módulo para montagem em uma caixa Eurorack. Conecte o cabo de Red Stripe alimentação antes da montagem. HOT USED Dependendo da caixa do rack, pode haver uma série de...
- Page 33 STEPS Quick Start Guide STEPS Controlli Il STEPS è un processore di modulazione a sei step, i cui step possono essere utilizzati individualmente o concatenati in combinazione. Ognuno dei sei step ha un set di controlli identico. È anche possibile concatenare fino a sei moduli STEPS, consentendo di avere fino a 36 step con cui lavorare.
- Page 34 Ruotare il controllo in senso orario rallenta gate modifica la funzione, come descritto in USO DEL il cambiamento e lo rende più fluido. STEPS di seguito. Rosso – l'uscita è derivata dalla combinazione del cursore OUTPUTS – utilizza queste prese jack TS da 3,5 mm per e del CV esterno, con il controllo TIME che imposta il ritardo l'uscita della tensione generata da ogni step.
-
Page 35: Aggiornamento Del Firmware
Pendolo (Avanti poi Indietro) AGGIORNAMENTO DEL FIRMWARE • Rimbalzare (1,2,1,3,1,4, ecc.) Poiché il STEPS non ha una porta USB, il firmware deve essere • aggiornato utilizzando una sorgente audio. Scaricare il file Casuale dalla pagina del prodotto su behringer.com e caricarlo in un •... -
Page 36: Consigli E Suggerimenti
STEPS Quick Start Guide • Accendere il STEPS tenendo premuto il pulsante di Verde continuo – seno modalità dell'ultimo step. Arancione continuo – triangolo • Riprodurre il file audio. I LED di uscita fungono da Rosso continuo – quadrato VU-meter: se sono tutti illuminati in rosso, il livello audio è... -
Page 37: Installazione
STEPS Quick Start Guide Connessione di Alimentazione Installazione Le viti necessarie sono incluse con il modulo per il montaggio in una custodia Eurorack. Collegare il cavo di alimentazione Red Stripe prima del montaggio. HOT USED A seconda del case del rack, potrebbero esserci una serie... - Page 38 De STEPS is een modulatieprocessor met zes stappen, waarvan de stappen individueel of gecombineerd kunnen worden gebruikt. Elke van de zes stappen heeft een identieke set knoppen. Het is ook mogelijk om tot zes STEPS-modules te koppelen, waardoor je tot 36 stappen hebt om mee te werken.
- Page 39 CV, in het bereik van -8 V in USING THE STEPS hieronder. tot +8 V. De positie van de SHAPE-knop bepaalt hoe snel de uitgang verandert wanneer de spanning verandert: volledig OUTPUTS –...
- Page 40 Vergeet niet dat MEERDERE KOPPELEN STEPS MODULES de gecombineerde uitgang van de uitgangsuitgang van de Om twee of meer STEPS-modules aan elkaar te koppelen: eerste stap komt, maar dat de individuele uitgangen van de daaropvolgende stappen nog steeds beschikbaar zijn op hun •...
- Page 41 50% van zijn bereik. Dit fungeert als een Groen knipperend – zaagtand invoerversterkingsregeling. Oranje knipperend – 25% puls • Schakel de STEPS in terwijl je de modusknoop van de laatste stap ingedrukt houdt. Rood knipperend – 10% puls • Speel het audiobestand af. De uitgangs-LED's fungeren...
- Page 42 STEPS Quick Start Guide Stroomaansluiting Installatie e benodigde schroeven worden bij de module geleverd voor montage in een Eurorack-koffer. Sluit de voedingskabel aan Red Stripe voor montage. HOT USED Afhankelijk van de rackbehuizing kan er een reeks vaste + 12V + 12V 200 mm ±...
- Page 43 Var och en av de sex stegen har en identisk uppsättning kontroller. Det är också möjligt att kedja upp till sex STEPS-moduler, vilket gör att du kan ha upp till 36 steg att arbeta med.
- Page 44 Röd – utgången härleds från kombinationen av reglaget individuellt förändrar gaten funktionen, som beskrivs i och den externa CV:n, med TIME-kontrollen som ställer in USING THE STEPS nedan. fördröjningen innan spänningen ändras när reglaget flyttas OUTPUTS – använd dessa 3,5 mm TS-jackutgångar eller den externa CV:n justeras.
-
Page 45: Uppdatering Av Firmware
3.5 mm TRS-jackkabel. AR ENVELOPE – två steg: grön, grön. • Om du länkar mer än två STEPS, upprepa ovanstående TRAPEZOID LFO – fyra steg: grön, röd, grön, röd; för varje länk. kombinationslooping. -
Page 46: Råd Och Tips
V till +5 V. • STEPS kan ställas in för att fungera som en additiv VCO genom att länka in- och utgångsheaderarna eller jack- ingångarna tillsammans. När den är inställd på detta sätt fungerar spänningsreglaget för steg 1 som en grov inställningskontroll, med SHAPE/TIME-kontrollen som... - Page 47 STEPS Quick Start Guide Strömanslutning Installation De nödvändiga skruvarna ingår i modulen för montering i ett Eurorack-fodral. Anslut strömkabeln före montering. Red Stripe Beroende på stativhöljet kan det finnas en serie fasta hål HOT USED som är åtskilda 2 hk längs höljets längd eller ett spår som...
- Page 48 łańcuchowo w kombinacji. Każdy z sześciu kroków ma identyczny zestaw kontrolek. Możliwe jest również łańcuchowe połączenie do sześciu modułów STEPS, co pozwala na uzyskanie do 36 kroków. (PL) Sterowanica SHAPE/TIME – użyj tych kontrolek w połączeniu z przyciskami trybu (2), aby ustawić...
- Page 49 Gdy kroki spowalnia zmianę i wygładza ją. są używane indywidualnie, bramka zmienia funkcję, jak opisano w USING THE STEPS poniżej. Czerwony – wyjście wynika z kombinacji suwaka i zewnętrznego CV, przy czym kontrolka TIME ustawia OUTPUTS –...
-
Page 50: Aktualizacja Oprogramowania
Aby połączyć dwie lub więcej modułów STEPS: tryb oddzielnie. • Każdy moduł STEPS ma dwa trzy-pinowe złącza i dwa PRZYKŁADY KOMBINACJI gniazda TRS 3,5 mm z tyłu swoich PCB. Gdy moduły ADSR ENVELOPE – cztery kroki: zielony, zielony, są... - Page 51 • STEPS można ustawić tak, aby działał jako addytywny kwadratowy z zmienną szerokością impulsu. Wyjście VCO, łącząc nagłówki lub gniazda wejściowe i wyjściowe VCO jest bipolarnie od -5 V do +5 V.
- Page 52 102 STEPS Quick Start Guide Podłączenie Zasilania Instalacja Do modułu dołączone są niezbędne śruby do montażu w skrzynce Eurorack. Podłącz kabel zasilający przed montażem. Red Stripe W zależności od obudowy szafy może występować szereg HOT USED stałych otworów rozmieszczonych w odstępach 2 HP na...
- Page 53 104 STEPS Quick Start Guide コントロール STEPS は 段階のモジュレーションプロセッサー STEPS であり、 それぞれのステップは個別に使用すること も、 組み合わせて連結することもできます。 つの ステップそれぞれに同一のコントロールセットが あります。 また、 最大 つの モジュールを連 STEPS 結することも可能で、 最大 ステップまで使用で きます。 コントロール (JP) – これらのコントロールをモード SHAPE/TIME ボタン ( ) と組み合わせて使用し、 選択した 修飾子に応じてステップの形状または時間を 設定します: 緑 – コントロールはランプの形状を設...
- Page 54 106 STEPS Quick Start Guide – これらの ジ TIME/LEVEL CV INPUTS 5 mm TS 数を設定する です。 形状コントロールを完全 ャックソケットを使用して、 各ステップに外 に反時計回り ( ) にすると鋸歯状波が生成さ 部 を入力します。 入力された はスライ れ、 中央で波形が三角波になり、 完全に時計回り ダー ( ) で設定された電圧に加算され、 最大 ) にすると台形波が生成されます。 周波数範 までとなります。 緑モードではランプの...
- Page 55 108 STEPS Quick Start Guide 組み合わせて バウンス ( など) • 複数のステップを組み合わせて使用するには、 最初 ランダム • の必要なステップの 入力を使用して、 それらの GATE 繰り返しなしのランダム 間のステップを制御します。 すべてのステップを使 • 用しない限り、 組み合わせを作成するためにパネル 切り替え • の右側のステップを使用することをお勧めします。 最初のステップでランプが使用された場合、 これにより、 左側の未使用のステップが独立して 出力は から 使用できるようになります。 必要なステップ数に応 じて、 複数の組み合わせを同時に作成できます。 の量子化されたものになります。 保持が使用された つのモジュールをデイジーチェーンで接続できる 場合、 量子化されていない...
- Page 56 STEPS Quick Start Guide 入力および出力ヘッダーまたはジャックソケッ リンクの別の使用方法については、 下記の • トを一緒に接続することで、 を加法 を参照してください... STEPS HINTS AND TIPS として設定できます。 このように設定される ファームウェアアップデート と、 ステップ の電圧スライダーは粗調整コン には ポートがないため、 ファームウェア STEPS トロールとして機能し、 コントロー SHAPE TIME はオーディオソースを使用して更新する必要があり ルは微調整として機能します。 入力は volt ます。 の製品ページからファイルをダ に追従します。 他のスライダーは高調波 behringer octave ウンロードし、 適切なオーディオプレーヤーにロー...
- Page 57 STEPS Quick Start Guide 取り付け 電源接続 必要なネジは、 ユーロラックケースに取り付けるた めのモジュールに付属しています。 取り付ける前に Red Stripe 電源ケーブルを接続します。 HOT USED ラックケースによっては、 ケースの長さに沿って + 12V + 12V 200 mm ± 10 GROUND GROUND 間隔をあけた一連の固定穴や、 個々のねじ板が - 12V - 12V ケースの長さに沿ってスライドできるトラックが存 在する場合があります。 自由に動くねじ板はモジュ Connect end P1 to the module socket Connect end P2 to the power supply ールの正確な位置を可能にするが、...
- Page 58 5 mm TS 使用这些 插 孔将外部 输入每个步骤, 该电压将与滑动 器 ( ) 设置的电压相加, 最高可达 + 。 在绿色 模式下, 这会影响达到斜坡峰值的时间, 在橙色 和红色模式下, 它会影响输出的水平。 范围为 至 + 。 GATE INPUTS – 当两个或多个步骤一起使用时, 向 组合步骤的第一个门插孔输入超过 + 的门 电压将使步骤前进。 当单独使用步骤时, 门电压 USING THE STEPS 会改变功能, 如下文 中所述。...
- Page 59 STEPS Quick Start Guide OUTPUTS – 5 mm TS 独立门控 使用这些 插孔输出每个 – GATE 步骤生成的电压。 当两个或多个步骤组合使用 绿色 只能与上述循环结合使用。 时, 第一个步骤的输出将携带组合输出, 其他输 – GATE 橙色 施加 会在前沿采样电压, 并在滑块和/ 出仅携带该步骤的电压。 每个插孔上方的 或外部 发生变化时改变输出。 指示输出状态, 正输出电压时为绿色, 负输出电 压时为红色。 – GATE 红色 没有循环时, 施加...
- Page 60 STEPS Quick Start Guide 复杂音序器 不要尝试将六个以上的模块连接在一起。 按顺序 要创建复杂的序列器, 将第一个步骤设置为绿色 从左到右连接模块, 否则操作将受损。 不要在模块 (斜坡) 或红色 (保持), 然后根据需要设置尽可能多的 通电时连接模块。 如果使用插孔进行连接, 请使用 后续步骤为橙色。 第一个步骤不会作为序列的一部 线, 否则连接将无法工作。 SHAPE 分播放, 但允许控制后续步骤的行为。 使用 HINTS AND TIPS 另请参阅下面的 以了解连接的其他 TIME 控件选择序列的播放方式: 用途... • 向前 固件更新 • 向后...
- Page 61 120 STEPS Quick Start Guide – 绿色连续 正弦波 – 橙色连续 三角波 – 红色连续 方波 – 绿色闪烁 锯齿波 – 25% 橙色闪烁 脉冲 – 10% 红色闪烁 脉冲 GATE 通过向 输入发送门信号, 可以强调各个谐波。 • 如果使用插孔进行连接, 请确保使用 线, 否 则连接将无法工作。 • MODE 按住其 按钮超过三秒钟, 可以将任何步...
- Page 62 122 STEPS Quick Start Guide 电源连接 安装 必要的螺丝包含在用于安装在欧洲拉克箱中的模 Red Stripe 块中。 安装前连接电源线。 根据机架外壳的不同, 可能会有一系列固定孔, 沿着 HOT USED + 12V + 12V 200 mm ± 10 2 HP 机箱的长度间隔 , 或允许单个螺纹板沿外壳长 GROUND GROUND - 12V - 12V 度滑动的轨道。 自由移动的螺纹板允许模块的精确 定位, 但在连接螺丝之前, 每个板应定位在与模块安...
-
Page 63: Specifications
124 STEPS Quick Start Guide Specifications 技术参数 Inputs 输入 3.5 mm TS jack, -8 V to + 8 V range, 5 mm TS 插孔, - 至 + Time/Level 时间/电平 impedance 50 kΩ x 6 50 kΩ x 6 范围, 阻抗... -
Page 64: Federal Communications Commission Compliance Information
126 STEPS Quick Start Guide • Connect the equipment into an outlet on a FEDERAL COMMUNICATIONS circuit different from that to which the receiver COMMISSION COMPLIANCE is connected. INFORMATION • Consult the dealer or an experienced radio/TV Behringer technician for help. - Page 65 We Hear You...
Need help?
Do you have a question about the STEPS and is the answer not in the manual?
Questions and answers