Advertisement
- 1 PACKAGE INCLUDES
- 2 PRODUCT OVERVIEW
- 3 SPECIFICATIONS
- 4 RGB LIGHT SETTING
- 5 WIRELESS CONNECTION FOR SWITCH/ANDROID
- 6 USB WIRED CONNECTION FOR SWITCH/PC
- 7 FACTORY RESET
- 8 SLEEP FUNCTION
- 9 CHARGING INDICATOR
- 10 HOW TO USE TURBO FUNCTION
- 11 MOTOR VIBRATION STRENGTH ADJUSTMENT
- 12 NOTES
- 13 CONTACT INFORMATION
- 14 Documents / Resources
PACKAGE INCLUDES
Controller for Switch x 1
USB Charging Cable x 1
User Manual x 1
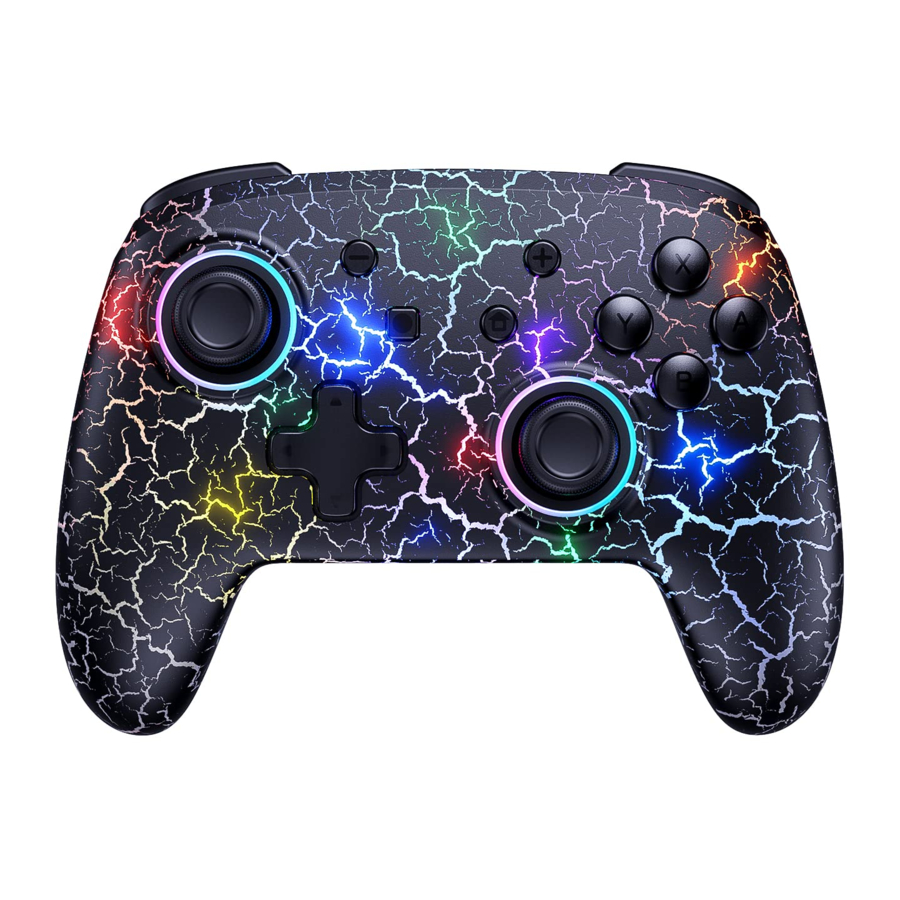
PRODUCT OVERVIEW


- Button
- Screenshot Button
- Home Button
- + Button
- RGB Lights
- X / Y / A / B Buttons
- Right Joystick / R3
- Left Joystick / L3
- D-Pad
- Player Indicator LEDs
- R Button
- ZR Button
- L Button
- ZL Button
- USB Type-C Charging Interface
- Pairing Button
- Turbo Button
SPECIFICATIONS
Battery Capacity: 600mAh
Charging Voltage: DC 5V  600mA
600mA
Playtime: 6 Hours
Connection Method: Wireless or Wired
RGB LIGHT SETTING
- To change the RGB light color press the Turbo button and click the L3 or R3 key at the same time. There are seven different colors to choose cyclically.

- Press the Turbo button and hold the L3 or R3 key to increase/decrease the brightness of the RGB lighting cyclically. During this time, holding the Turbo button for more than 6 seconds will reset any applied turbo functions. Ensure that you do not hold the button for more than 6 seconds if you wish to maintain your turbo settings.

- Press and hold the Turbo button and double click the L3 or R3 key at the same time to change the light mode. There are three different modes to choose from: a breathing light pattern, a colorful flowing light pattern, and lights off.


WIRELESS CONNECTION FOR SWITCH/ANDROID
BEFORE FIRST USE
Note: Please ensure that your device is powered on and has been updated to the latest version before pairing the controller.
- Place the Switch console in the dock.
- Connect the controller to the dock with the included USB cable.

- Then unplug the cable from the controller. The controller will automatically connect with the Switch console via wireless in 1-2 seconds. We recommend now calibrating your joystick if this is the first time you are connecting this device.

WIRELESS PAIRING FOR SWITCH CONSOLE
- Make sure the device you want to pair with is powered on. From the home menu in the Switch console select Controllers as shown below.

- Select Change Grip/Order on the Controllers menu page as shown below.

- Press and hold both the Y + Home buttons (or press and hold Pairing button) for more than two seconds to enter pairing mode with the Switch console.

- The Player Indicator LEDs on the controller will flash indicating that the pairing was successful and then the appropriate player indicator LEDs will illuminate. Pairing is now complete.


WIRELESS PAIRING FOR ANDROID
- Make sure the device you want to pair with is powered on. To connect on Android, enable Bluetooth on your Android device.
- Then, simultaneously press the Home and X buttons on the NS32 until Gamepad / Xbox Wireless Controller appears on the list of available devices.

- Select it from the list and accept the pairing request.
![]()


WIRELESS PAIRING FOR IOS
- To connect using iOS, enable Bluetooth on your iPhone.
- Then, simultaneously press the Home and B buttons on the NS32 until Xbox Wireless Controller appears on the list of available devices.

- Select it from the list to finish pairing your controller.
![]()
- The player indicator LEDs on the controller will flash indicating that the pairing was successful and then the appropriate player indicator LEDs will illuminate. Pairing is now complete.


TO DISCONNECT
- While in wireless connection mode, press and hold the Home button for three seconds. The controller will unpair from your device.


AFTER FIRST USE
- Press and hold the Home button for one second to wake up the controller.
- After being woken up the controller will automatically connect to the device it was last paired with.
USB WIRED CONNECTION FOR SWITCH/PC
- Use the provided cable to connect the controller to your device.
Note: A PC will provide charging to the controller while connected, the Switch console will not. - There are three different modes for wired connections. These can be switched between by pressing and holding the+ and - buttons at the same time for three seconds.

- DirectInput mode is the default mode for connecting to a PC. When using this mode the 2nd and 4th player indicator LEDs will remain permanently lit indicating this is the active mode.
- XInput mode is an alternate mode for connecting to a PC. This mode can be used if you find controller limitations in a game while using the DirectInput mode. When using this mode the 1st and 4th player indicator LEDs will remain permanently lit indicating this is the active mode.
- Switch mode for connecting with a Switch console. When using this mode only the player indicator LEDs for your controller position will remain permanently lit indicating this is the active mode.
- After switching to a wired connection the wireless connection will automatically disconnect.
- After unplugging the wired connection the controller will automatically attempt to reconnect to the last paired device.

FACTORY RESET

To reset the controller, press and hold the Home button for at least ten seconds. The controller will be powered off and will then reset itself. You need to re-pair the controller to your devices using the methods outlined above.
SLEEP FUNCTION
- The controller will automatically go to sleep if the wireless connection is unsuccessful after ten seconds.
- To prolong battery life the controller will automatically go to sleep after five minutes if no buttons are pressed.
CHARGING INDICATOR
- The built-in player indicator LEDs will rapidly flash when the battery is low. Please charge the controller when you see this signal.
- If the charge level drops too low the controller will automatically go into sleep mode to preserve the battery.
- The player indicator LEDs will slowly flash while charging, and when fully charged will remain illuminated and stop flashing. The lights will turn off after a few minutes when the controller is fully charged and is not being used.
HOW TO USE TURBO FUNCTION
Many of the buttons on this controller can be set to turbo functionality. The buttons capable of using the turbo function are: A/B/X/Y/R/L/ZL/ZR.

TURBO FUNCTION TUTORIAL
- Press the A and the Turbo button at the same time and release. The A key will now be in Turbo mode.

- Press the A and the Turbo button at the same time again to turn off the Turbo mode.

- Press and hold the Turbo button for five seconds to clear all turbo settings.


TURBO SPEED ADJUSTMENT
- Press the Turbo button and the - button at the same time to decrease the turbo speed.

- Press the Turbo button and the + button at the same time to increase the turbo speed.

- Turbo speed can be adjusted in three levels.
- Continuous burst at 5 times per second (Fast)
- Continuous burst at 12 times per second (Faster)
- Continuous burst at 20 times per second (Fastest)
- When adjusting the speed the controller lights will flash to indicate what the current speed setting is. This flashing indicator is slow for the slowest speed and increases in frequency as the speed of the turbo increases.


MOTOR VIBRATION STRENGTH ADJUSTMENT
- Press the Turbo button and the Down button at the same time to decrease the haptic feedback vibration strength.

- Press the Turbo button and the Up button at the same time to increase the haptic feedback Vibration strength.

- The controller motor vibration has four adjustment levels:
- 0% - Turns the vibration motors off completely. This can also be done in settngs for many games.
- 30% - The lightest setting. This provides minimal feedback.
- 75% - The default setting. This setting provides noticeable feedback.
- 100% - The maximum setting. This setting provides significant feedback.
- After choosing a vibration level the motor will vibrate at the chosen level for 0.5 seconds to indicate that choice.


NOTES
- When not in use, it is recommended that you store the controller and do not leave it plugged in for long periods.
- To ensure the longevity and lifespan of the unit, protect it from dust and do not place other objects on it.
- If the controller is inoperable but does not show signs of damage, please exercise the warranty or dispose of the item.
- Keep away from small children due to potential hazards.
- Do not give to children under three years of age.
- Do not charge the controller using a frayed or damaged USB cable.
- Do not touch the device, power adaptor, or USB cable with wet hands. Keep this product dry.
- Do not attempt to repair, disassemble, or modify the controller under any circumstance.
- Do not place the controller near fire, heat sources, or in direct sunlight.
- Do not apply strong impact or weight on the product.
- Do not pull roughly or bend the cable of the product.
- If product needs cleaning, use only a soft dry cloth. Do not use any chemical agents like benzene or thinner.
CONTACT INFORMATION
Website: www.nexigo.com;
Manufacturer: Nexight INC
Email: cs@nexigo.com
Tel: +1(458) 215-6088
Address: 11075 SW 11th St, Beaverton, OR, 97005, US
If you have any problems please contact us at cs@nexigo.com anytime for further assistance. Make sure to register your purchase at nexigo.com/warranty within 14 days of the delivery date to extend your warranty coverage to TWO Years!

Register to get EXTRA ONE year warranty

@LetsNexiGo Online Support
Documents / Resources
References
Download manual
Here you can download full pdf version of manual, it may contain additional safety instructions, warranty information, FCC rules, etc.
Advertisement


Need help?
Do you have a question about the NS32 and is the answer not in the manual?
Questions and answers