Table of Contents
Advertisement
Advertisement
Table of Contents

Related Manuals for Nexigo NS32


Summary of Contents for Nexigo NS32
- Page 1 Wireless Game Controller NS32 User Manual User Manual Installation Video...
-
Page 2: Contact Information
14 days of the delivery date to extend your warranty coverage to TWO Years! From all of us here at NexiGo, we want to welcome you again to the family. We thank you deeply for your trust and for your business. We know you'll love it here. -
Page 3: Product Introduction
Controller for the Switch gaming console. Providing all of the normal functionality you would expect from an Switch Pro Controller, the NexiGo NS32 also features a Turbo button so you can preset your buttons to turbo fire, making it great for repetitive tasks or games that require button mashing. -
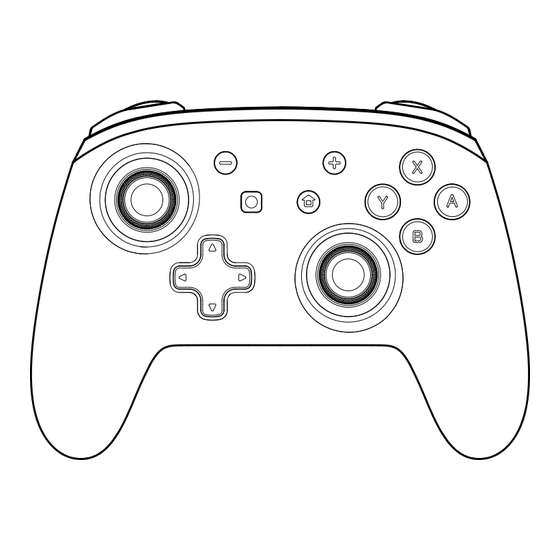
Page 4: Product Overview
PRODUCT OVERVIEW... -
Page 5: Specifications
1. - Button 10. Player Indicator LEDs 2. Screenshot Button 11. R Button 3. Home Button 12. ZR Button 4. + Button 13. L Button 5. RGB Lights 14. ZL Button 6. X / Y / A / B Buttons 15. - Page 6 RGB LIGHT SETTING 1. To change the RGB light color press the Turbo button and click the key at the same time. There are seven different colors to choose cyclically. Click the 2. Press the Turbo button and hold the to increase/decrease the brightness of the RGB lighting cyclically.
- Page 7 Hold the 3. Press and hold the Turbo button and double click key at the same time to change the light mode. There are three different modes to choose from: a breathing light pattern, a colorful flowing light pattern, and lights off. Double click the...
- Page 8 WIRELESS CONNECTION (FOR SWITCH/ANDROID) BEFORE FIRST USE Note: Please ensure that your device is powered on and has been updated to the latest version before pairing the controller. 1. Place the Switch console in the dock. 2. Connect the controller to the dock with the included USB cable.
- Page 9 USB Charging Cable WIRELESS PAIRING (SWITCH CONSOLE) 1. Make sure the device you want to pair with is powered on. From the home menu in the Switch console select Controllers as shown below. 2. Select Change Grip/Order on the Controllers menu page as shown below.
- Page 10 3. Press and hold both the Home buttons (or press and hold Pairing button) for more than two seconds to enter pairing mode with the Switch console. (or press and hold Pairing button)
- Page 11 4. The Player Indicator LEDs on the controller will flash indicating that the pairing was successful and then the appropriate Player Indicator LED will illuminate. Pairing is now complete. WIRELESS PAIRING (ANDROID) 1. Make sure the device you want to pair with is powered on.
- Page 12 4. The player indicator LEDs on the controller will flash indicating that the pairing was successful and then the appropriate player indicator LEDs will illuminate. Pairing is now complete. TO DISCONNECT 1. While in wireless connection mode, press and hold Home button for three seconds.
- Page 13 USB WIRED CONNECTION (FOR SWITCH/PC) 1. Use the provided cable to connect the controller to your device. Note: A PC will provide charging to the controller while connected, the Switch console will not. 2. There are three different modes for wired connections.
-
Page 14: Factory Reset
limitations in a game while using the DirectInput mode. When using this mode the 1st and 4th player indicator LEDs will remain permanently lit indicating this is the active mode. Switch mode for connecting with a Switch console. When using this mode only the player indicator LED for your controller position will remain permanently lit indicating this is the active mode. -
Page 15: Sleep Function
SLEEP FUNCTION 1. The controller will automatically go to sleep if the wireless connection is unsuccessful after ten seconds. 2. To prolong battery life the controller will automatically go to sleep after five minutes if no buttons are pressed. CHARGING INDICATOR 1. - Page 16 TURBO FUNCTION TUTORIAL 1. Press the and the Turbo button at the same time and release. The key will now be in Turbo mode. 2. Press the A and the Turbo button at the same time again to turn off the Turbo mode.
- Page 17 3. Press and hold the Turbo button for five seconds to clear all turbo settings. TURBO SPEED ADJUSTMENT 1. Press the Turbo button and the key at the same time to decrease the turbo speed.
- Page 18 2. Press the Turbo button and the key at the same time to increase the turbo speed.
- Page 19 3. Turbo speed can be adjusted in three levels. a. Continuous burst at 5 times per second (Fast) b. Continuous burst at 12 times per second (Faster) c. Continuous burst at 20 times per second (Fastest) 4. When adjusting the speed the controller lights will flash to indicate what the current speed Setting is.
- Page 20 2. Press the Turbo button and the key at the same time to increase the haptic feedback Vibration strength. 3. The controller motor vibration has four adjustment levels: - Turns the vibration motors off completely. This can also be done in settngs for many games. - The lightest setting.
-
Page 21: Fcc Requirement
FCC REQUIREMENT Any changes or modifications not expressly approved by the party responsible for compliance could void the user's authority to operate the equipment. This device complies with Part 15 of the FCC Rules. Operation is subject to the following two conditions: (1) this device may not cause harmful interference, (2) this device must accept any interference received, including interference that may cause undesired... - Page 22 – Increase the separation between the equipment and receiver. – Connect the equipment into an outlet on a circuit different from that to which the receiver is connected. – Consult the dealer or an experienced radio/TV technician for help. Scan the QR code to download the latest manual for more FAQ details.
Need help?
Do you have a question about the NS32 and is the answer not in the manual?
Questions and answers