Advertisement
- 1 Product Introduction
- 2 Product Overview
- 3 Package Includes
- 4 Specifications
- 5 How to Pair the Product to Switch/Switch OLED
- 6 How to calibrate the Joysticks
- 7 Mapping the Rear Buttons
- 8 How to Map the Back Buttons
- 9 How to Remove the Mapped Buttons
- 10 Notes
- 11 Contact Information
- 12 Documents / Resources
Product Introduction
This NexiGo 1125 Controller is an enhanced controller for Switch / Switch OLED gaming consoles. With four additional back mapping buttons that can help you get to the next level. Made from a tough ABS material the NexiGo 1125 Controller is durable and designed to last. It features many additional functions like an ability to take screenshots, a six axis gyroscope, dual-motor vibration and upgradeable firmware. This controller supports the original Switch / Switch OLED power adapter or a standard 15V PD protocol power adapter for charging
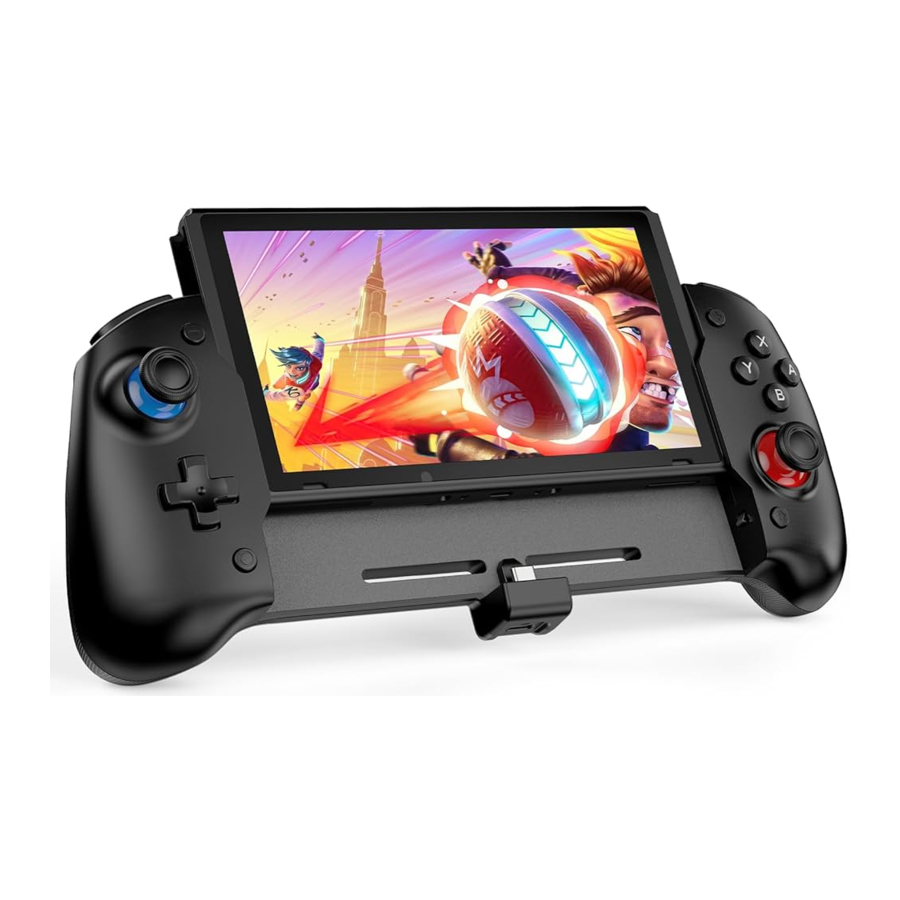
Product Overview

- + Button
- Button
- Left Joystick/L3 Button
- D-pad
- Screenshot Button / LED Indicator
- Type-C Charging Power Port
- HOME Button
- Right Joystick / R3 Button
- X/Y/A/B Buttons
- Reset Cavity
- Mapping Buttons M1/M2
- ZR Button
- R Button
- L Button
- ZL Button
- Mapping Buttons M3 / M4
Package Includes
1 x Controller for Switch / Switch OLED
1 x User Manual
2 x Sliders for Switch Console
Specifications
Input Voltage / Current: DC 15V/1.5A
Working Current: ≤ 60mA
Working Temperature: -20~40°C
Storage Temperature: -40~70°C
How to Pair the Product to Switch/Switch OLED
- Please enable the Pro Controller Wired Communication setting in the Switch / Switch OLED console itself. You can do this by going to System Settings > Controller and Sensors Pro Controller Wired Communication. Set Pro Controller Wired Communication to On.

- Plug the Switch / Switch OLED console into the controller.

- After you have plugged the console into the controller, press the A Button on the controller to connect to the console.
- Finally, please calibrate the Joysticks before first use.


Note: Do not touch the joysticks or other keys when installing and plugging in the console. This prevents automatic calibration. If the joysticks are deviating during use, please unplug the console from the controller and reinsert it, or go to the Settings menu on the console and attempt Joystick Calibration again.
How to calibrate the Joysticks
Note: These instructions must be performed on the Switch / Switch OLED console.
- Press the HOME Button to return to the console home page and select System Settings.

- Select the heading Controllers and Sensors and then select Calibrate Control Sticks.

- Follow the instructions as shown below to calibrate the joysticks.

- Follow the onscreen prompts to redo the calibration process if the joystick is not working as expected. Otherwise, your joystick will now be fully calibrated.


Mapping the Rear Buttons
- Many of the buttons on this controller can be mapped to the rear buttons. The mappable buttons are: A/B/X/Y/R/L/ZL/ZR/+/-/ D-pad/R3/L3.

- The rear buttons that you can map to are: M1 / M2 / M3 / M4

- Mapping a front button to the rear buttons allows you to duplicate the function of the front button on the rear button.


How to Map the Back Buttons
- Press and hold the + Button and one of the Mapping Buttons (M1 / M2 / M3 / M4) you wish to map at the same time to enter mapping mode. The LED Indicator will flash slowly to indicate that you are in mapping mode.

- Press one of the Mappable Buttons you wish to map, the LED Indicator will fast flash to indicate that button input is successful.

- Press one of the Mapping Buttons (M1 / M2 / M3 / M4) again, the LED Indicator will always be on to indicate that the process was successful. One of the Mapping Buttons (M1 / M2 / M3 / M4) now will have the same functionality as the button you chose to map to it.


Note: There is no mapping button combinations function.
How to Remove the Mapped Buttons
- Remove the single mapped botton:
Press and hold the - Button and one of the Mapping Buttons (M1 / M2 / M3 / M4) you want to remove at the same time to enter removing the mapped button mode. The LED Indicator will always be on and be off briefly when the mapped button is removed. The respective button will be cleared of any programmed inputs. - Remove all mapped buttons:
Press and hold the + Button for five seconds, the LED Indicator will be off when all mapped buttons are removed.
Notes
- Only use the original Switch / Switch OLED power adapter or a standard 15V PD protocol power adapter for charging. Using any other power adapter or cable may cause damage to the product.
- To ensure the longevity and lifespan of the controller please keep it. Clean do stack heavy objects on it.
- If the controller is inoperable but does not show of please exercise the or dispose of the item.
- Keep away from small children due to potential hazards.
- Do not give to children under three years of age.
- Do not charge the controller using a frayed or damaged USB cable.
- Do not touch the device, power adaptor, or USB cable with wet hands. Keep this product dry.
- Do not attempt to repair, disassemble, or modify the controller under any circumstance.
- Do not place the controller near fire, heat sources, or in direct sunlight.
Contact Information
Website: www.nexlgo.com
Manufacturer: Nexight NC
Email: cs@nexigo.com
Tel: +1(458) 215 6088
Address: 11075 SW 11th St, Beaverton, OR 97005, US

facebook.com/nexigo1
Get in touch with FREE online services

If you have any problems please contact us at cs@nexigo.com any time for further assistance. Make sure to register your purchase at nexigo.com/warranty within 14 days of the delivery date to extend your warranty coverage to TWO Years!
Documents / Resources
References
Download manual
Here you can download full pdf version of manual, it may contain additional safety instructions, warranty information, FCC rules, etc.
Advertisement


Need help?
Do you have a question about the 1125 and is the answer not in the manual?
Questions and answers