Advertisement
Quick Links
Advertisement

Related Manuals for Spod Mini6

Summary of Contents for Spod Mini6
- Page 1 Mini6 GET TO KNOW THE...
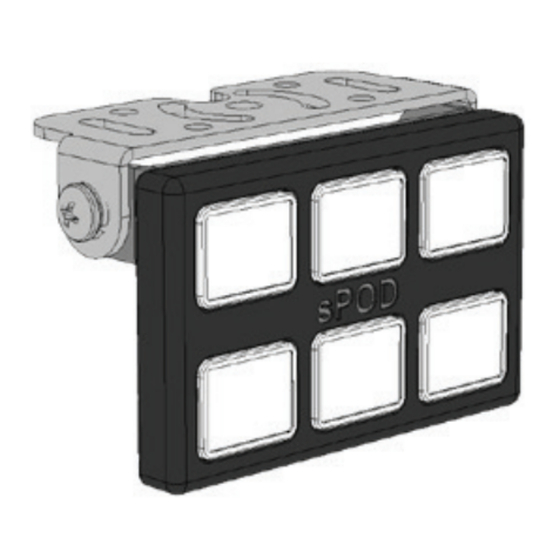
- Page 2 Mini6 Control Panel 2.062” W x 3.750” L x .375” D Programmable modes: Momentary/Latch Backlight brightness level Visual feedback circuit ON indicator light for each button Includes one sheet of 72 standard legends Power-saving Deep Sleep Mode: Deactivates after 6 hours of...
-
Page 3: Components Included
COMPONENTS INCLUDED 1. Mini6 control panel 2. Mounting bracket assembly 3. Installation hardware: 2 sheet metal screws, 2 machine screws with 2 machine nuts 4. Control cable 5. Sheet of legend labels TOOLS REQUIRED • 7/16 Socket or opened end wrench •... -
Page 4: Mounting Options
MOUNTING LOCATION IDEAS Sheet metal screws Machine screws The Mini6 has a standard 1/4-20 threaded stud on the back for additional mounting options. NOTE: The items shown below can be purchased separately. - Page 5 OPERATING INSTRUCTIONS Out of the box, the Mini6 is ready to operate. Plug the cable into the back and it will power up. Once the white backlights are on, your Mini6 is ready. that was left on after 6 hours of non-usage.
- Page 6 2950 NORMAN STRASSE RD. SAN MARCOS, CA 92069 661-775-7799 SALES@4X4S-POD.COM INSTRUCTIONAL VIDEOS ALSO AVAILABLE ON OUR WEBSITE...
Need help?
Do you have a question about the Mini6 and is the answer not in the manual?
Questions and answers