Advertisement
What's in the Box?
1 x NexiGo Sunrise Alarm Clock
1 x Power Adapter
1 x USB Type-C Charging Cable
1 x Quick Start Guide
1 x User Manual
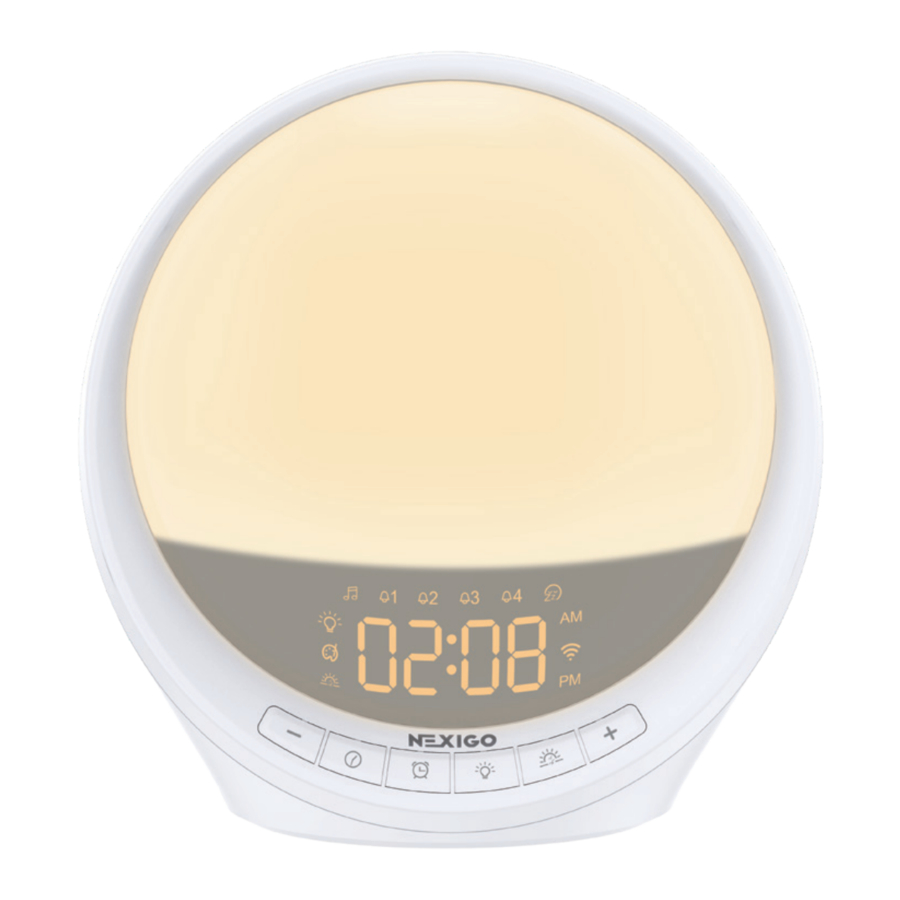
Product Diagram

![]() Brightness - Button
Brightness - Button![]() Time Settings Button
Time Settings Button ![]() Alarm Settings Button
Alarm Settings Button ![]() Light Adjustment Button
Light Adjustment Button ![]() Sleep Settings Button
Sleep Settings Button ![]() Brightness + Button
Brightness + Button ![]() Snooze Button
Snooze Button
 Brightness - Button
 Time Settings Button
  Alarm Settings Button
  Light Adjustment Button
  Sleep Settings Button
  Brightness + Button
  Snooze Button
 Note: Power the smart light via the provided DC 5V/2A adapter before first use. Using any other power adapter may cause damage to the product.
Specifications
| Product Name | NexiGo Sunrise Alarm Clock |
| Model No. | LT10S |
| Input | AC 100-240V 50/60Hz |
| Output | DC 5V/2A |
| LED Power | 5W |
| Speaker Power | 2W |
| LED Type | RGB LED light: SMD5050 White LED light: SMD2835 |
| Color Rendering Index | >80Ra |
| Color Temperature | 2700K-5700K |
| Network | Wi-Fi IEEE802.11b/g/n (2.4GHz)+ BLE |
| Materials | ABS, PP, Silicone |
| Weight | 540g/19 oz |
| Dimensions | 7.40 x 3.15 x 7.83 inches |
Physical Controls
Button Usage Instructions: Buttons will have different effects depending on what settings you are working with. It is recommended to use the app to change settings as not all settings can be changed using the physical buttons.
- Brightness Adjustment:
![]()
- To dim the light press the Brightness- Button (There are 20 total brightness levels, numbered 1-20).
- Single press: Dim one level
- Long press: Continuous dimming until you release the button or hit the minimum brightness.
- To increase the brightness of the light press the Brightness + Button.
- Single press: Brighten one level
- Long press: Continuous increase until you release the button or hit the maximum brightness.
- To dim the light press the Brightness- Button (There are 20 total brightness levels, numbered 1-20).
- Time Setting Mode:
![]()
- To enter Time Setting Mode, press and hold the Time Settings Button.
- While in Time Setting Mode, to switch between hours and minutes single press the Time Settings Button.
- While in Time Setting Mode, to adjust the time press the + or- Buttons. You can also press and hold for larger adjustments.
- To exit Time Setting Mode, press and hold the Time Settings Button.
- Alarm Settings:
![]()
- To enter Alarm Settings Mode, press and hold the Alarm Settings Button.
- While in Alarm Setting Mode, to switch between hours and minutes single press the Alarm Settings Button.
- There are four alarms that can be set. While in Alarm Setting Mode, you can switch between alarms by pressing the Alarm Settings Button twice to move to the next alarm in the cycle. This will be noted with an identifier on the display.
- While in Alarm Setting Mode, to adjust the time press the + or- Buttons. You can also press and hold for larger adjustments.
- While in Alarm Setting Mode, to either turn on or off a particular alarm, while that alarm name is flashing press the Snooze Button. The Alarm name will stop flashing indicating it is off. Press it again to turn it back on.
- To Snooze the alarm, press the Snooze Button. (This will pause the alarm for ten minutes.)
- To exit Alarm Setting Mode, press and hold the Alarm Settings Button.
![warning]() Note: When triggered, alarms will sound for 30 minutes before automatically turning off. You can turn off an active alarm by tapping any button on the Sunrise Alarm Clock.
Note: When triggered, alarms will sound for 30 minutes before automatically turning off. You can turn off an active alarm by tapping any button on the Sunrise Alarm Clock.


- Light Adjustments:
![]()
- To turn the light on or off press the Light Adjustment Button.
- To enter Light Adjustment Mode, press and hold the Light Adjustment Button.
- While in Light Adjustment Mode, to switch between the various color temperatures press the + or- Buttons (There are three color temperatures to choose from).
- While in Light Adjustment Mode, to switch to RGB colors press the Light Adjustment Button again.
- While in Light Adjustment Mode, to switch between the various RGB color options press the + or- Buttons while RGB colors are selected (There are seven individual colors + one dynamic display that cycles through the colors).
- To exit Light Adjustment Mode, press and hold the Light Adjustment Button.
- Sleep Music Settings:
![]()
- To turn on sleep music press the Sleep Settings Button. To turn it off press it again.


- Snooze Button Functions:
![]()
- To turn the LTIOS on press the Snooze Button.
- To turn the LTIOS off press and hold the Snooze Button for ten seconds.
- When the LTIOS is turned on, to adjust the brightness of the clock face press the Snooze Button (There are five total brightness levels for the clock face).

Screen Icon Explanations
![]()
- Brightness
![]()
- Adjust the brightness level. The screen will display the current brightness (Minimum 1, Maximum 20).
- Time
![]()
- Digital Clock Display
- Time Format
![]()
- In 24-hour time format AM/PM will not be shown.
- Alarm Clock
![]()
- The alarm icon will show when the corresponding alarm is set.
- When you are setting the alarm or the alarm has sounded, the corresponding alarm icon will flash.


- White Light
![]()
- The White Light Icon will be displayed when the white light is on.
- While you are setting the White Light Color, the icon will flash.
- RGB
![]()
- The RGB Icon will be displayed when the RGB light is on.
- While you are setting the RGB Light Color, the icon will flash.
- Sleep Mode
![]()
- The Sleep Icon will be displayed when Sleep Mode is on.
- Snooze Mode
![]()
- While an alarm is on Snooze, the icon will flash.
- Connect Wi-Fi
![]()
- While attempting to connect to Wi-Fi, the icon will flash.
- When the connection is successful, the icon will display without flashing.
- If the connection fails, the icon will turn off.
- Music Mode
![]()
- While playing music, the icon will be displayed. Only usable in the app.


App Control
Step 1: Download App
Method 1: Search "NexiGo Home" from the App Store

or Google Play

to download the app.
Method 2: Scan the QR code below to download the "NexiGo Home" App.

Step 2: Register and Log In

Step 3. Turn on Wi-Fi and Bluetooth on Your Devices
- Ensure that both Wi-Fi and Bluetooth on your device are turned on before pairing.
- The Sunrise Alarm Clock only supports 2.4 GHz Wi-Fi and does not function with 5 GHz Wi-Fi.

Step 4: Connect the Sunrise Alarm Clock
- Turn on the Sunrise Alarm Clock, then press and hold the
![]() button for 5 to 10 seconds and the
button for 5 to 10 seconds and the ![]() icon will begin to flash.
icon will begin to flash.

 button for 5 to 10 seconds and the
  icon will begin to flash.
- Tap the "+" button on the "NexiGo Home" App to add the Sunrise Alarm Clock.


- The following interface will pop up automatically.


- Enter the 2.4GHz Wi-Fi network name and password, and tap "Next"

- Connect completed.


Voice Control with Amazon Alexa & Google Assistant
Connect Steps
- While in the NexiGo Home App, tap Me and then select the Third-Party Voice Service you wish to use (Alexa or Google Assistant).
- This will open the application and connect the smart device to receive voice commands. Follow the prompts until Alexa or Google Home have established the connection and the voice command feature will be enabled.
![]()

Voice Command Prompts
Saying "Alexa" or "Google" first, depending on the software you use, you can then follow up with the following commands, such as:
- Turn on/off the bedroom light.
- Set bedroom light to 50 percent.
- Brighten bedroom light/dim bedroom light.
- Set bedroom light to green.
- Set bedroom light warm white.
Notes:
- ONLY use a DC 5V/2A adapter with the provided USB cable to power the unit. Using any other power adapter or cable may cause damage to the product.
- To use the intended smart app control and voice control functions, the Sunrise Alarm Clock must be connected to the "NexiGo Home" app.
- This Sunrise Alarm Clock only supports 2.4 GHz Wi-Fi.
- When this unit is not in use or when fully charged, it is recommended that you unplug it from the power source.
- Please use a lint-free dry cloth to clean the product. Do not clean the product with water or alcohol. Ensure the unit is unplugged and powered off before cleaning.
- Do not charge the light using a frayed or damaged USB cable.
- Do not touch the device, power adaptor, or USB cable with wet hands. Keep this product dry.
- DO not attempt to repair, disassemble, or modify the light under any circumstance.
- Do not place the light near the fire, heat sources, or direct sunlight.
- Ensure that this product has enough ventilation for general use.
- Only use on a flat, horizontal surface.
- To ensure the longevity and lifespan of the unit, protect it from dust and do not place other objects on it.
Contact Information
Tel: +1(458) 215-6088
Website: www.nexigo.com
If you have any problems please contact us at cs@nexigo.com at any time for further assistance.
Register to get an EXTRA ONE year warranty.
Only valid if registering within 14 days of product delivery.

nexigo.com/warranty
Get in touch with FREE online services

facebook.com/nexigo1
Documents / Resources
References
![www.apple.com]() App Store - Apple
App Store - Apple![play.google.com]() Google Play
Google Play![www.nexigo.com]() NexiGo | Home Theater Projectors & Video Collaborations
NexiGo | Home Theater Projectors & Video Collaborations![nexigo.com]() NexiGo Warranty Registration | NexiGo
NexiGo Warranty Registration | NexiGo
Download manual
Here you can download full pdf version of manual, it may contain additional safety instructions, warranty information, FCC rules, etc.
Advertisement

Need help?
Do you have a question about the LT10S and is the answer not in the manual?
Questions and answers