Table of Contents
Advertisement
Quick Links
PLEASE READ
This manual is provided as a free service
by Projector.com.
We are in no way responsible for the
contents of the manual. We do not guarantee
its accuracy and we do not make any claim
of copyright. The copyright remains the
property of their respective owners.
ABOUT PROJECTOR.COM
Projector.com (http://www.projector.com) is
your review and buying guide resource for
DLP and LCD video projectors.
Visit the site to read the latest projector
news and reviews, read and comment on
projector specifications, download user
manuals and much more.
Advertisement
Table of Contents

Related Manuals for Hitachi CP-X385WT


Summary of Contents for Hitachi CP-X385WT
- Page 1 PLEASE READ This manual is provided as a free service by Projector.com. We are in no way responsible for the contents of the manual. We do not guarantee its accuracy and we do not make any claim of copyright. The copyright remains the property of their respective owners.
- Page 2 Liquid Crystal Projector CP-X385W ENGLISH USER'S MANUAL Vol.1 Basic DEUTSCH Please read this user's manual thoroughly to ensure correct usage through understanding. BEDIENUNGSANLEITUNG Teil 1 Grundlagen Bitte lessen Sie diese Benutzerhandbuch zugunsten der korrekten Bedienung aufmerksam. MANUEL D'UTILISATION Vol.1 Fondements FRANÇAIS Nous vous recommandons de lire attentivement ce manuel pour bien assimiler le fonctionnement de l'appareil.
-
Page 3: Table Of Contents
LCD Projector CP-X385W USER'S MANUAL USER'S MANUAL Vol.1 (Basic) Thank you for purchasing this projector. WARNING • Please read the accompanying manual “SAFETY INSTRUCTIONS” and this “USER'S MANUAL” thoroughly to ensure correct usage through understanding. After reading, store this instruction manual in a safe place for future reference. -
Page 4: Projector Features
This liquid crystal projector is used to project PROJECTOR various computer signals as well as NTSC / PAL / FEATURES SECAM video signals onto a screen. Little space is required for installation and large images can easily be realized. Ultra High Brightness Keystone Distortion Correction Crisp, ultra-bright presentations is achieved Quick correction of distorted images electrically... -
Page 5: Insert The Batteries Into The Remote Control
WARNING Precautions to observe in regards to the power cord: Please use extra caution when connecting the projector's power cord as incorrect or faulty connections may result in FIRE AND/OR ELECTRICAL SHOCK. Please adhere to the following safety guidelines to insure safe operation of the projector: •... -
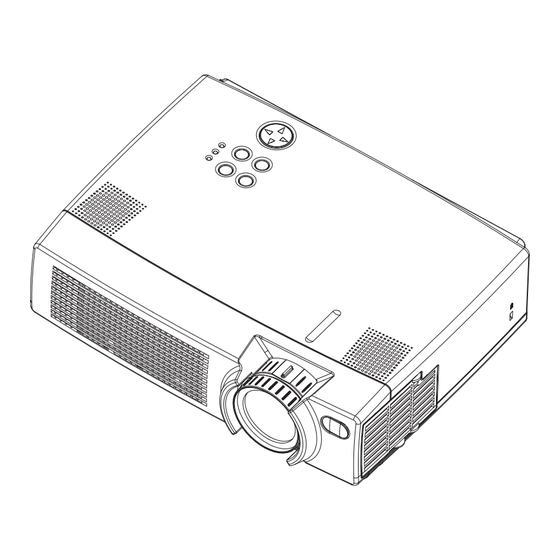
Page 6: Part Names
THE PROJECTOR PART NAMES Indicates the corresponding reference page Speaker Zoom Ring Focus Ring Handle Hook Remote Control Sensor Power Switch Lens AC Inlet (to the Power Cord) Lens Cap Ventilation Openings Foot Adjuster (Intake) INPUT Button STANDBY/ON Button KEYSTONE Button LAMP Indicator TEMP Indicator POWER Indicator... - Page 7 THE REMOTE CONTROL LASER button BLANK STANDBY/ON STANDBY/ON BLANK button LASER button VIDEO VIDEO button RGB button Disk Pad MOUSE / RIGHT Button AUTO button AUTO KEYSTONE button MENU KEYSTONE MENU button ENTER button ENTER RESET button Cursor buttons RESET POSITION FREEZE button POSITION button...
-
Page 8: Setting Up The Projector
SETTING UP THE PROJECTOR CAUTION • Install the projector in a suitable environment according to instructions of the accompanying manual “SAFETY INSTRUCTIONS” and this manual. • If you press the elevator buttons without holding the projector, the projector might crash down, overturn, smash your fingers and possibly result in malfunction. To prevent damaging the projector and injuring yourself, ALWAYS HOLD THE PROJECTOR whenever using the elevator buttons to adjust the elevator feet. -
Page 9: Adjusting The Screen Size And Projection Distance
Adjusting the Screen Size and Projection Distance Refer to the illustrations and tables below to determine the screen size and projection distance. The values shown in the table are calculated for a full size screen a:Distance from the projector to the screen (±10%) b:Distance from the lens center to the bottom of the screen (±10%) c:Distance from the lens center to the top of the screen (±10%) If 4:3 aspect ratio... -
Page 10: Connecting Your Devices
CONNECTING YOUR DEVICES Devices You Can Connect to the Projector (Refer to this section for planning your device configuration to use for your presentation.) CAUTION • Incorrect connecting could result in fire or electrical shock. Please read this manual and the separate “SAFETY INSTRUCTIONS”. ATTENTION Precautions to observe when connecting other devices to the projector •... -
Page 11: Ports And Cables
Ports and Cables Refer to the table below to find out which projector port and cable to use for connecting a given device. Use this table for determining which cables to prepare. Function Projector Port Connection Cables RGB IN 1 Accessory RGB cable or optional RGB RGB input RGB IN 2... -
Page 12: Connecting To A Computer
CONNECTING YOUR DEVICES (continued) Connecting to a Computer ATTENTION Whenever attempting to connect a laptop computer to the projector, be sure to activate the laptop's RGB external image output (set the laptop to CRT display or to simultaneous LCD and CRT display). For details on how this is done, please refer to the instruction manual of the corresponding laptop computer. -
Page 13: Connecting To A Dvd Player
Connecting to a DVD Player A A A RGB IN AUDIO IN VIDEO IN S-VIDEO IN B B B AUDIO AUDIO OUT RGB OUT CONTROL S-VIDEO cable If using a S-video connection If using an audio/video If using a component connection video connection DVD player Connecting to a VCR RGB IN AUDIO IN VIDEO IN S-VIDEO IN... -
Page 14: Connecting To A Display Monitor
CONNECTING YOUR DEVICES (continued) Connecting to a Display Monitor RGB IN AUDIO IN VIDEO IN S-VIDEO IN AUDIO AUDIO OUT RGB OUT CONTROL Display monitor... -
Page 15: Using The Remote Control
USING THE REMOTE CONTROL Putting batteries into the remote control unit CAUTION Precautions to observe in regards to the batteries Always handle the batteries with care and use them only as directed. Improper use may result in battery cracking or leakage, which could result in fire, injury and/or pollution of the surrounding environment. •... -
Page 16: Turning On The Power
Precautions NING he power is ON, a strong light is emitted. Do not look into the Make sure that the power cord is firmly and correctly connected to the projector and outlet Turn on the projector's power Set the power switch to [ | ] (ON). The projector will go to STANDBY mode and the POWER indicator will light to solid orange. -
Page 17: Selecting An Input Signal
Selecting an Input Signal Using the remote control Using the projector's control panel If selecting RGB input Press the INPUT button As illustrated below, each time you Press the RGB button press the INPUT button, the projector Press this button to toggle between the switches between its input signal devices connected to RGB IN 1 and 2. -
Page 18: Turning Off The Power
TURNING OFF THE POWER Press the STANDBY/ON button (control panel or remote control) BLANK STANDBY/ON The message "Power off?" will appear on the screen for approximately 5 seconds. LASER STANDBY/ON VIDEO Press the STANDBY/ON button again (control panel or remote control) Press the STANDBY/ON button again while the "Power off?"... -
Page 19: Adjusting The Volume
ADJUSTING THE VOLUME Press the VOLUME button VOLUME As illustrated on the right, a dialog will BLANK STANDBY/ON LASER appear on the screen to aid you in adjusting the volume. VIDEO VOLUME Press the buttons to adjust the volume AUTO Press the VOLUME button again to close the dialog and MENU KEYSTONE... -
Page 20: Adjusting The Position
ADJUSTING THE POSITION Press the POSITION button As illustrated on the right, a dialog will appear on the screen STANDBY/ON BLANK LASER to aid you in adjusting the position. VIDEO POSITION POSITION AUTO MENU KEYSTONE Use the buttons to adjust the position ENTER When you want to initialize the position, press the RESET... -
Page 21: Using The Automatic Adjustment Feature
USING THE AUTOMATIC ADJUSTMENT FEATURE Press the AUTO button BLANK STANDBY/ON AUTO LASER VIDEO Automatic Adjustment for RGB Input Horizontal position (H. POSIT), vertical position (V. POSIT), clock phase (H. PHASE) and horizontal size (H. SIZE) are automatically adjusted. Make sure that the application window is set to its maximum size prior to attempting to use this feature. -
Page 22: Correcting Keystone Distortions
CORRECTING KEYSTONE DISTORTIONS Press the KEYSTONE button KEYSTONE As illustrated on the right, a dialog will appear BLANK STANDBY/ON LASER on the screen to aid you in correcting the distortion. VIDEO KEYSTONE KEYSTONE Use the buttons to select the AUTO direction of distortion to correct ( MENU KEYSTONE... -
Page 23: Using The Magnify Feature
USING THE MAGNIFY FEATURE Press the MAGNIFY (ON) button MAGNIFY MAGNIFY BLANK STANDBY/ON The projector enters MAGNIFY mode. LASER VIDEO Press the POSITION button, then use the buttons to select the area to enlarge and then press the POSITION button again to confirm your selection POSITION POSITION... -
Page 24: Signal Searching
SIGNAL SEARCHING Press the SEARCH button RESET POSITION When you press the SEARCH button, the projector begins ASPECT FREEZE searching for input signals. If it detects an input signal, the search will cease and the projector will project the detected MUTE MAGNIFY signal. -
Page 25: Using The Menu Functions
USING THE MENU FUNCTIONS Press the MENU button MENU The menu display appears on the screen. The BLANK STANDBY/ON LASER projector has the following menus: MAIN, PICTURE-1, PICTURE-2, INPUT, SCREEN, and VIDEO OPTION. Select a menu using the buttons. The current settings of the items that can be manipulated via the selected menu appear. -
Page 26: Operating The Pc Screen
OPERATING THE PC SCREEN You can use the remote control as a simplified mouse or keyboard. CAUTION Caution: Mistaken use of the mouse/keyboard control could damage your equipment. • Only connect to a PC. • Before connecting, read the manuals of the device you will connect. •... -
Page 27: The Lamp
THE LAMP HIGH VOLTAGE HIGH TEMPERATURE HIGH PRESSURE Before replacing the lamp, check the serial number of the replacement lamp bulb (sold separately: DT00431), then contact your local dealer. Before replacing the lamp, turn off the power, and unplug the power cord, then wait at least 45 minutes, in order to ensure that the lamp is properly cooled. Removing the lamp bulb while it is still hot could cause burns, or cause the lamp bulb to burst. -
Page 28: Replacing The Lamp
THE LAMP (continued) Replacing the lamp All projector lamps will wear out eventually. If used for long periods of time, the image could become darkened, and the color contrast could be impacted as well. We recommend that you replace your lamps early. -
Page 29: The Air Filter
THE AIR FILTER Caring for the air filter The air filter should be cleaned about every 100 hours. If the LAMP indicator and TEMP indicator blink red simultaneously, or a message prompts you to clean the air filter when you turn on the unit, the filter needs to be cleaned. (See "Related Messages"... -
Page 30: Replacing The Air Filter
THE AIR FILTER (continued) Replacing the air filter If the soiling will not come off the air filter, or it becomes damaged, then it needs to be replaced. Please contact your local dealer, after confirming the model of your separately sold replacement air filter. (See "Optional Parts" on Vol.2 Turn off the projector, and unplug the power cord. -
Page 31: The Handle
THE HANDLE Fixing the Handle Fix the enclosed handle if you need. Raise up the handle hook, and pass one end of the handle through the hole of handle hook. Buckle the end of the handle, as the right drawing. Fix the other end of the handle to the other handle hook in the same way. - Page 32 LCD Projector CP-X385W USER'S MANUAL USER'S MANUAL Vol.2 (Extended) Thank you for purchasing this projector. WARNING • Please read the accompanying manual “SAFETY INSTRUCTIONS” and this “USER'S MANUAL” thoroughly to ensure correct usage through understanding. After reading, store this instruction manual in a safe place for future reference.
-
Page 33: Multifunctional Settings
MULTIFUNCTIONAL SETTINGS This device has 6 separate menus: MAIN, PICTURE 1, PICTURE 2, INPUT, SCREEN, OPTION. Each of these menus is operated using the same methods. The basic operations of these menus are as follows. Menu screen display : Press the "MENU" button. Menu selection : Choose a menu name using the button, and press the... - Page 34 MENU PICTURE 1 Menu MAIN COLOR BAL R PICTURE-1 COLOR BAL B PICTURE-2 SHARPNESS INPUT COLOR With the PICTURE 1 menu, the five items shown in the Table SCREEN TINT OPTION below can be performed. Perform each operation in accordance with the instructions in the : SELECT Example : PICTURE1 Menu Table.
- Page 35 MULTIFUNCTIONAL SETTINGS (continued) MENU INPUT Menu MAIN AUTO EXECUTE PICTURE-1 VIDEO PICTURE-2 HDTV INPUT SYNC ON G With the INPUT menu, the four items shown in the Table below can be SCREEN OPTION performed. With inputting of RGB IN 1 and RGB IN 2 signals, the horizontal and vertical frequencies of the signals will be displayed on the : SELECT Example : INPUT Menu...
- Page 36 MENU SCREEN Menu MAIN BLANK MyScreen PICTURE-1 START UP ORIGNAL PICTURE-2 MyScreen INPUT MyScreen Size With the SCREEN menu, the five items shown in the Table below can be performed. SCREEN MyScreen Lock OPTION Please perform each operation in accordance with the instructions in the Table. : SELECT Example : SCREEN Menu SCREEN Menu...
- Page 37 MULTIFUNCTIONAL SETTINGS (continued) MENU OPTION Menu MAIN VOLUME PICTURE-1 AUTO OFF PICTURE-2 WHISPER INPUT LAMP TIME With the OPTION menu, the five items shown in the Table below SCREEN FILTER TIME OPTION can be performed. Please perform each operation in accordance with the instructions : SELECT Example : OPTION Menu in the Table.
-
Page 38: Related Messages
WHAT TO DO WHEN YOU THINK A MACHINE DEFECT HAS OCCURRED Related Messages When the unit's power is ON, messages such as those shown below may be displayed. When any such message is displayed on the screen, please respond as described below. Message Description CHANGE THE LAMP... -
Page 39: Regarding The Indicator Lamps
Regarding the Indicator Lamps Lighting and flashing of the POWER indicator, the LAMP indicator, and the TEMP indicator have the meanings as described in the Table below. Please respond in accordance with the instructions within the Table. POWER LAMP TEMP Description indicator indicator... -
Page 40: Phenomena That May Easily Be Mistaken For Machine Defects
WHAT TO DO WHEN YOU THINK A MACHINE DEFECT HAS OCCURRED (continued) Phenomena That May Easily Be Mistaken for Machine Defects Before requesting repair, check in accordance with the following chart. If the situation cannot be corrected, then contact your dealer. Reference Phenomenon Cases not involving a machine defect... -
Page 41: Specification
SPECIFICATIONS • NOTE This specifications are subject to change without notice. Item Specification Product name Liquid crystal projector Panel size 2.3 cm (0.9 type) Liquid crystal Drive system TFT active matrix panel Pixels 786,432 pixels (1024 horizontal x 768 vertical) Lens Zoom lens F=1.7 ~ 2.1 f=36.8 ~ 47.8 mm Lamp... -
Page 42: Warranty And After-Service
WARRANTY AND AFTER-SERVICE If a problem occurs with the equipment, first refer to the “WHAT TO DO WHEN YOU THINK A MACHINE DEFECT HAS OCCURRED” section and run through the suggested checks. If this does not resolve the problem contact your dealer or service company. They will tell you what warranty condition is applied. -
Page 43: Signal Connector Pin Assignment
TECHNICAL TECHNICAL SIGNAL CONNECTOR PIN ASSIGNMENT RGB IN [1]/[2] S-VIDEO RGB OUT D-sub 15-pin Shrink Mini Din 4-pin Mini Din 4-pin Pin No Signal Pin No Signal Pin No Signal Video input Red Color: Video input Green Ground 0.286Vp-p (NTSC, burst signal), Video input Blue 75Ω... -
Page 44: Example Of Computer Signal
EXAMPLE OF COMPUTER SIGNAL Resolution fH (kHz) fV (Hz) Rating Signal mode Display mode H × × V 720 × 400 37.9 85.0 VESA TEXT Zoom in 640 × 480 31.5 59.9 VESA VGA (60Hz) Zoom in 640 × 480 35.0 66.7 Mac13"mode... - Page 45 INITIAL SET SIGNALS The following signals are used for the initial settings. The signal timing of some computer models may be different. In such case, refer to adjust the V.POSIT and H.POSIT of the menu. Back porch b Front porch d Back porch b Front porch d Display interval c...
-
Page 46: Serial Mouse
CONNECTION TO THE MOUSE CONTROL Projector Computer ADB Mouse ( POWER ON ) DATA Mouse jack CONTROL Terminal Mini DIN 4-pin D-sub 15-pin shrink jack ! " # % & ' ! " # Serial Mouse Projector Computer CONTROL Terminal Mouse jack... -
Page 47: Communications Setting
RS-232C COMMUNICATION (1) Turn off the projector and computer power supplies and connect with the RS-232C cable. (2) Turn on the computer power supply and after the computer has started up, turn on the projector power supply. Projector Computer RS-232C jack D-sub 9-pin Control jack D-sub 15-pin shrink jack... - Page 48 RS-232C COMMUNICATION (continued) Requesting projector status (Get command) (1) Send the request code Header + Command data (‘02H’+‘00H’+ type (2 bytes) +‘00H’+‘00H’) from the computer to the projector. (2) The projector returns the response code ‘1DH’+ data (2 bytes) to the computer. Changing the projector settings (Set command) (1) Send the setting code Header + Command data (‘01H’+‘00H’+ type (2 bytes) + setting code (2 bytes)) from the computer to the projector.
-
Page 49: Command Data Chart
Command data chart Command data Names Operation type Header Action Type Setting code Blue BE EF 06 00 CB D3 01 00 00 30 03 00 White BE EF 06 00 6B D0 01 00 00 30 05 00 Black BE EF 06 00 9B D0... - Page 50 Command data chart (continued) Command data Names Operation type Header Action Type Setting code H.Position Reset Execute BE EF 06 00 IC D3 06 00 03 70 00 00 H.Size Reset Execute BE EF 06 00 68 D2 06 00 04 70 00 00 Color Balance...
- Page 51 Command data Names Operation type Header Action Type Setting code BE EF 06 00 FD D3 02 00 04 20 00 00 Contrast Increment BE EF 06 00 9B D3 04 00 04 20 00 00 Decrement BE EF 06 00 4A D2 05 00 04 20...
- Page 52 Command data chart (continued) Command data Names Operation type Header Action Type Setting code BE EF 06 00 49 73 02 00 03 22 00 00 Tint Increment BE EF 06 00 2F 73 04 00 03 22 00 00 Decrement BE EF 06 00...
- Page 53 6740 Campobello Road, Mississauga, Ontario Spain L5N2L8, Canada Tel: +34-3-330-8652 Fax: +34-3-339-7839 Tel: +1-905-821-4545 Fax: +1-905-821-1101 Hitachi Home Electronics Asia, (S) Pte Ltd. Hitachi Home Electronics (Europe), Ltd. 16 Collyer Quay #20-00 Hitachi Tower Singapore Dukes Meadow, Millboard Road, Bourne End , 049318, Singapore...
- Page 54 PLEASE READ This manual is provided as a free service by Projector.com. We are in no way responsible for the contents of the manual. We do not guarantee its accuracy and we do not make any claim of copyright. The copyright remains the property of their respective owners.
Need help?
Do you have a question about the CP-X385WT and is the answer not in the manual?
Questions and answers