Advertisement
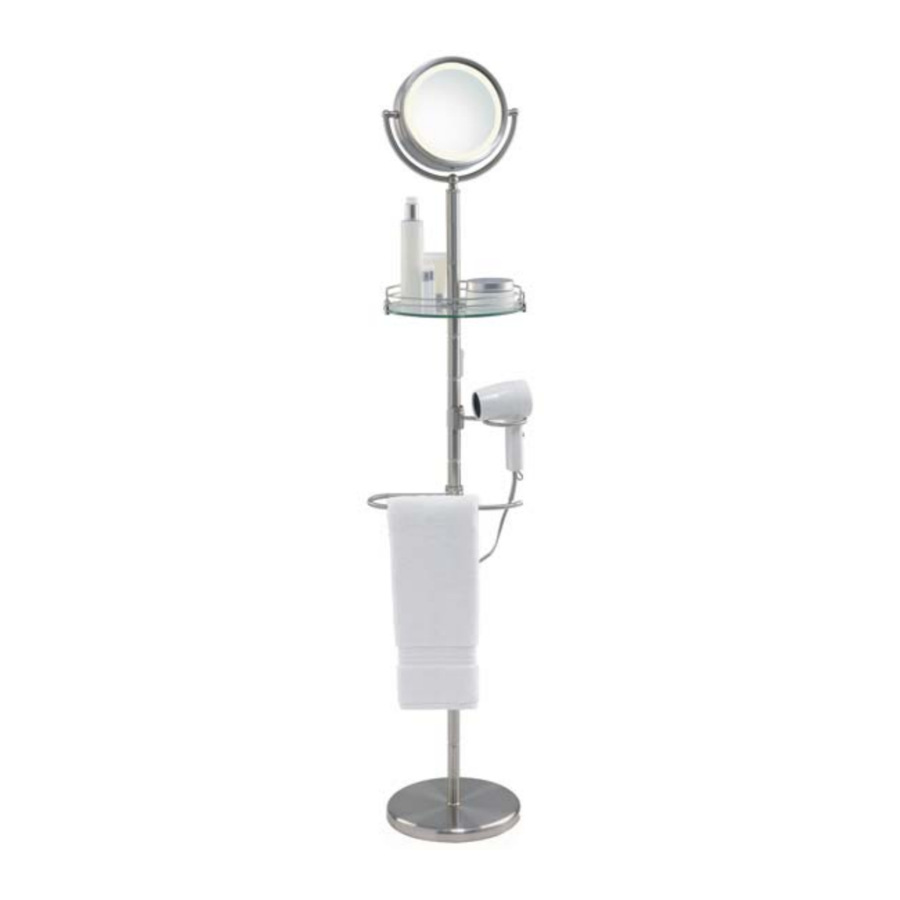
Illuminated Styling Center Features
Illuminated Floor Stand Mirror
- Incandescent Light – Soft glare-free & shadow-free viewing
- 7x/1x Magnification – Two-sided mirror with normal and 7x magnification
- 8.5" Diameter
- Fog free
- Satin nickel finish
- Includes one replacement light bulb
Styling Center
- Tempered glass vanity tray for convenient accessory storage
- Towel bar holder
- Hair dryer caddy
- Built-in hair dryer outlet
- Adjustable height – Choose from 63" and 70"
Assembly Instructions
- Carefully remove all contents from the packaging and inspect the product to make sure all components have been received, and identify the pieces for use in assembly.
STYLING CENTER COMPONENTS

- Base
- Extension Pole
- Extension Pole
- Cord
- on/off switch
- internal electrical connection
- built-in outlet
- Adjustable Height Extension Pole
- Cord Clips (3)
- Glass Vanity Tray
- Illuminated Beauty Mirror
- internal electrical connection
- Hair Dryer Caddy
- Towel Bar Holder
- Attachment Clips (2)
- Wrench
- Place the Base
![]() on an even and sturdy surface to begin assembly.
on an even and sturdy surface to begin assembly. - (Fig. 1) Insert Extension Pole
![]() into the thread on the Base
into the thread on the Base ![]() and turn clockwise until secure.
and turn clockwise until secure.

- (Fig. 2-optional) You can increase the height of the floor stand mirror to 70". If you choose to do this, insert the thread of the Adjustable Height Extension Pole
![]() into Extension Pole
into Extension Pole ![]() and turn clockwise until secure.
and turn clockwise until secure.

Fig.2 (optional) - (Fig. 3) Insert the thread of Extension Pole
![]() into
into
Extension Pole![]() , or the Adjustable Extension Pole
, or the Adjustable Extension Pole ![]() , (if you have increased the height) and turn clockwise until secure.
, (if you have increased the height) and turn clockwise until secure.

- (Fig. 4) Insert the thread on the bottom of the GlassVanity Tray
![]() into Extension Pole
into Extension Pole ![]() and turn clockwise until secure. At the same time, thread the Internal Electrical Connection
and turn clockwise until secure. At the same time, thread the Internal Electrical Connection ![]() up through the center of the Glass Vanity Tray
up through the center of the Glass Vanity Tray ![]() . To secure the metal rack on the Glass Vanity Tray, use the wrench
. To secure the metal rack on the Glass Vanity Tray, use the wrench ![]() to tighten the screw located on the bottom of the posts.
to tighten the screw located on the bottom of the posts.

Fig.4 - (Fig. 5) Holding the Illuminated Beauty Mirror
![]() firmly, connect the Internal Electrical Connection
firmly, connect the Internal Electrical Connection ![]() with the Internal Electrical Connection
with the Internal Electrical Connection ![]() , matching up the up arrows on the connectors as illustrated.
, matching up the up arrows on the connectors as illustrated.

- (Fig. 6) Insert the thread of the Illuminated Beauty Mirror
![]() onto the Glass Vanity Tray
onto the Glass Vanity Tray ![]() and turn clockwise until secure.
and turn clockwise until secure.

Fig.6 - (Fig. 7) Clip the Built-In Outlet
![]() into the groove on the pole.
into the groove on the pole.

Now you can begin attaching accessories and securing the cord into place. - Please note the following steps can be completed in any order and you may place the clips and accessories in any of the grooves you choose below the glass vanity tray. The diagram shown is a representation of one way you may choose to set up your floor stand mirror.

- (Fig. 8) Select the position on the stand where you want your Hair Dryer Caddy to be located [step 1]. Snap an Attachment Clip
![]() [step 2] onto the groove in the pole. Slide the Hair Dryer Caddy
[step 2] onto the groove in the pole. Slide the Hair Dryer Caddy ![]() over the Clip [step 3], ensure the groove is facing upwards when doing so. The Caddy is securely in place when you can no longer see the Attachment Clip from the top or bottom of the Caddy.
over the Clip [step 3], ensure the groove is facing upwards when doing so. The Caddy is securely in place when you can no longer see the Attachment Clip from the top or bottom of the Caddy. - To attach the Towel Bar Holder repeat [step 1,2,3] (Fig. 8a).
- (Fig. 9) To secure the Cord to the pole, snap the three Cord Clips
![]() into the pole grooves, spacing them apart as shown. Slide the Cord into the three Clips at each location until each is held securely in place (Fig. 9a).
into the pole grooves, spacing them apart as shown. Slide the Cord into the three Clips at each location until each is held securely in place (Fig. 9a).

- Remove the protective plastic coating from mirror face.
 on an even and sturdy surface to begin assembly.
 into the thread on the Base
 into Extension Pole
 into
into , or the Adjustable Extension Pole
  , (if you have increased the height) and turn clockwise until secure.
 into Extension Pole
  and turn clockwise until secure. At the same time, thread the Internal Electrical Connection
  up through the center of the Glass Vanity Tray
  to tighten the screw located on the bottom of the posts.
 firmly, connect the Internal Electrical Connection
  with the Internal Electrical Connection
 and turn clockwise until secure.
 into the groove on the pole.

 [step 2] onto the groove in the pole. Slide the Hair Dryer Caddy
  over the Clip [step 3], ensure the groove is facing upwards when doing so. The Caddy is securely in place when you can no longer see the Attachment Clip from the top or bottom of the Caddy.
  into the pole grooves, spacing them apart as shown. Slide the Cord into the three Clips at each location until each is held securely in place (Fig. 9a).
Instructions for Use
- (Fig. 10) Adjust the mirror to either normal or magnified viewing. To do so, swivel the mirror to the viewing side of your preference. You may also adjust the angle of the mirror by tilting it up and down or swiveling it from side to side.

- Plug unit into a 120Vhousehold outlet.
- (Fig. 10) Turn the On/Off switch
![]() to the ON position to turn the mirror on.
to the ON position to turn the mirror on. - (FIG.10) When finished using the mirror turn the switch to the OFF position
![]() .
.

 to the ON position to turn the mirror on.
 NOTE: DO NOT EXCEED 6 POUNDS ON THE GLASS VANITY TRAY.
NOTE: NEVER leave a plugged in appliance unattended. DO NOT exceed 12 amps on the electrical outlet.
To Replace Bulb

Before replacing the bulb, always turn mirror off and allow it to cool for at least 5 minutes.
- (Fig. 11) Remove the three screws on the side of the mirror with a Phillips screwdriver.

- (Fig. 12) Take off the mirror casing by gently pulling apart at the seam.

- (Fig. 12) Unscrew light bulb and replace with a new one. Light bulb is 120v, 25 Watt Type T. For your convenience, one replacement bulb is included.
- Replace the mirror casing and line up the screw holes. Screw back into place.


Maintenance
To Store
You may leave the mirror on display in a cool, dry place.
- NEVER leave the mirror in a position where it can reflect direct sunlight. This may cause a fire.
- Allow to cool to room temperature before storing.
- Do not wrap cord around the mirror.
To Clean
Always unplug before cleaning the mirror. Never use liquids or abrasive cleaners to clean, use only a damp cloth with a mild cleanser.
- Clean the mirror with only a commercial glass cleaner or water. Do not submerge the mirror or use excessive water while cleaning.
- Do not plug mirror in until it is completely dry.
SERVICE & WARRANTY
Mail To:
HoMedics
Service Center Dept. 168 3000 Pontiac Trail
Commerce Township, MI 48390
e-mail: cservice@homedics.com
TWO YEAR LIMITED WARRANTY (Valid in USA only)
To obtain warranty service on your HoMedics product, either hand deliver or mail the unit and your dated sales receipt (as proof of purchase), postpaid, along with check or money order in the amount of $15.00 payable to HoMedics, Inc. to cover handling.
For more information regarding our product line in the USA, please visit: www.homedics.com
IMPORTANT SAFETY INSTRUCTIONS
THIS APPLIANCE IS INTENDED FOR HOUSEHOLD USE. WHEN USING ELECTRICAL PRODUCTS, ESPECIALLY WHEN CHILDREN ARE PRESENT, BASIC SAFETY PRECAUTIONS SHOULD ALWAYS BE FOLLOWED, INCLUDING THE FOLLOWING:

TO REDUCE THE RISK OF BURNS, ELECTROCUTION, FIRE OR INJURY TO PERSONS:
Read all instructions before using this appliance.
- To protect against electrical hazards, do not use while bathing or in the shower.
- Close supervision is necessary when any appliance is used by or near children, invalids, or disabled persons.
- Unplug the appliance from outlet when not in use and before cleaning.
- Do not leave appliance unattended when it is plugged in. Keep cord away from heated surfaces.
- Do not operate this appliance with a damaged cord or plug or if the appliance malfunctions or has been dropped or damaged in any manner, or dropped into water. Return appliance to HoMedics Service Center for examination, electrical or mechanical adjustment, or repair. No repairs should be attempted by the consumer.
- Use appliance only for intended use as described in this instruction book. The use of attachments not recommended or sold by HoMedics may cause hazards.
- Do not use outdoors or operate where aerosol (spray) products are being used, or where oxygen is being administered.
- Be sure mirror is not in a position where it can reflect sunlight; reflected sunlight can cause fire.
- Do not use on a soft surface such as a bed, where openings maybe blocked. Keep the air openings free of lint, hair, and the like.
- Turn switch to "OFF" position and unplug cord before replacing light bulbs.
- Do not place or store appliance where it can fall or be pulled into a tub or sink.
- Do not place in or drop into water or other liquid.
- If an appliance falls into water, unplug it immediately. Do not reach into the water.
- Bulb gets HOT quickly. Touch only the base when turning off.
- DO NOT touch hot bulb, guard, or enclosure.
- Use on any 120 volt 60 hertz AC electric outlet (ordinary house current). Do not use it on any other electrical outlet. There is an electrical outlet on the cord; do not plug any appliance over 12 amps into this outlet.
- Never drop or insert any object into any opening.
- To disconnect, turn all controls to the off position, then remove plug from outlet.
- Do not exceed six pounds on the glass vanity tray.
SAVE THESE INSTRUCTIONS
SPECIAL WARNINGS
- Place lamp where cord will not be in walkway, route cord away from walking areas.
- Keep children away from extended cord.
- Never pull on the cord of an appliance that is plugged into the receptacle, grasp the plug when unplugging an appliance that is plugged into the receptacle.
- DO NOT reach for an appliance that has fallen into water. Unplug it immediately.
- DO NOT place in or drop into water or other liquid.
- Use appliance on a sturdy or level surface.
To reduce the risk of electric shock, this appliance has a polarized plug (one blade is wider than the other). This plug will fit in a polarized outlet only one way. If the plug does not fit fully in the outlet, reverse the plug. If it still does not fit, contact a qualified electrician to install the proper outlet. Do not change the plug in any way.
Documents / Resources
References
Download manual
Here you can download full pdf version of manual, it may contain additional safety instructions, warranty information, FCC rules, etc.
Advertisement


Need help?
Do you have a question about the Spa REFLECTIVES M-8101F and is the answer not in the manual?
Questions and answers