Advertisement
Quick Links
Advertisement

Related Manuals for aosu V8P

Summary of Contents for aosu V8P
- Page 1 说明书制作要求 材质: 105g哑粉 成品尺寸: 110x134mm, 共112P 印刷: CMYK 装订方式: 胶装或其他合适的方式, 按照顺序装订 页码单数为左侧, 双数为右侧...
- Page 2 Video Doorbell Pro and Wi-Fi HomeBase (Battery Powered) Quick Start Guide...
- Page 3 Powering on the Wi-Fi HomeBase Setting up the System Charging Your Doorbell Finding a Mounting Spot Mounting the Bracket Mounting the Doorbell Detaching the Doorbell Recharging the Doorbell Notice P15-P18 Please download the "aosu"App and then add devices before installing doorbell.
- Page 4 What's Included Video Doorbell Pro Mounting Bracket Screw Hole Positioning-Card Doorbell Detaching Pin Wi-Fi HomeBase Phillips-Head Screwdriver USB-C Charging Security Sticker Screw Packs Cable Wi-Fi HomeBase Quick Start Guide Power Pin...
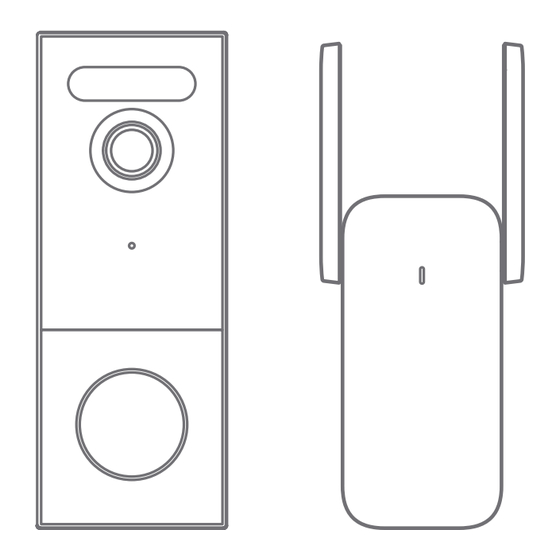
- Page 5 Product Overview Video Doorbell (Battery or Hardwired) Operation How-to Power on the doorbell Press and release the SYNC button Power off the doorbell Press and hold the SYNC button for 3 seconds. Reset the doorbell Press and hold the SYNC button for 10 seconds. Connect to Wi-Fi network Press and hold the SYNC button until you hear a beep...
- Page 6 Wi-Fi HomeBase Wi-Fi Antennas SYNC Button Status LED Speaker Micro SD Card Slot Power Pin...
- Page 7 How The System Works How the System Works The video doorbell system includes 2 parts: • The video doorbell at your door • The Wi-Fi Homebase in your house The video doorbell detects motion at your porch and allows you to answer the door any time and anywhere.The Wi-Fi Homebase stores video clips on a microSD card (user provides it) and works as an indoor digital chime.When someone rings the doorbell,people in the house will be notified.
- Page 8 Powering on the Wi-Fi Doorbell Chime 1. Fix the power connector to Wi-Fi Homebase 1.1 Place the power connector over Wi-Fi Homebase in the direction the arrows indicate. 1.2 Align the raised slots of the power connector with the notch on the base of the Wi-Fi Homebase.
- Page 9 1. Download the aosu App from the App Store (iOS devices) or Google Play (Android devices). 2. Scan the QR code below or search "aosu" in the App Store or Google Play. Register or log into the App. Add Video Doorbell and scan the QR code for later...
- Page 10 Charging Your Doorbell The doorbell comes with an 80% battery level for safe transportation. Fully charge it before mounting the doorbell at your front door. 4-6months USB-C Notice : The battery life varies depending on usage. In most common cases, a doorbell may have up to 10 events per day and each recording lasts 20 seconds on average.
- Page 11 Finding a Mounting Spot Take the Video Doorbell to your front door and check the live view on the aosu App at the same time. Find a position where you can get the desired field of view. Consider the below factors: 1.
- Page 12 Mounting the Bracket 1. If you’re mounting the doorbell on a surface made out of hard materials, like brick, concrete, stucco, drill 2 holes through the Screw Hole Positioning Card with 15/64”(6mm) drill bit. 2. Insert the provided anchors, and then use the provided long screws to secure the Mounting Bracket on the wall.
- Page 13 Mounting the Doorbell Align the doorbell with the top of the mount and then snap the bottom into place. You’re all set! If you want to detach the doorbell or recharge it, please refer to the following sections.
- Page 14 Detaching the Doorbell 1. Use the doorbell detaching pin provided if you wish to detach the doorbell from the Mounting Bracket. 2. Insert and press the detaching pin into the hole on the bottom of the doorbell and then lift to take the bottom of the doorbell o . What is required: Doorbell Detaching Pin What is required: Doorbell...
- Page 15 Recharging the Doorbell Charge the doorbell with universal USB chargers that deliver 5V 1A/2A output. USB-C Charging: The blue light flashes LED indication Fully charged: Solid blue Charging time 6 hours from 0% to 100%...
- Page 16 Notice FCC Statement This device complies with Part 15 of the FCC Rules. Operation is subject to the following two conditions: (1) this device may not cause harmful interference, and (2) this device must accept any interference received, including interference that may cause undesired operation. Warning: Changes or modifications not expressly approved by the party responsible for compliance could void the user's authority to operate the equipment.
- Page 17 This product complies with the radio interference requirements of the European Community. Declaration of Conformity Hereby, Glazero Limited declares that this device is in compliance with the essential requirements and other relevant provisions of Directive 2014/53/EU. For the declaration of conformity, visit the Web site:https://www.aosulife.com/.
- Page 18 This product is designed and manufactured with high quality materials and components, which can be recycled and reused. This symbol means the product must not be discarded as household waste, and should be delivered to an appropriate collection facility for recycling.
- Page 19 Customer Service Warranty 12-month limited warranty(The actual warranty period shall be implemented according to the requirements of local laws and regulations) Email Us Customer Support: support@aosulife.com Call Us United States: 1-866-905-9950 Mon-Fri 9AM-5PM United Kingdom: +44 20 3885 0830 Mon-Fri 9AM-5PM (GMT) Germany: +49 32 221094692 Mon-Fri 9:00-17:00 Facebook:@aosulife Twitter:@aosulife...
Need help?
Do you have a question about the V8P and is the answer not in the manual?
Questions and answers