Advertisement
Quick Links
Advertisement

Related Manuals for Siemens Quick 60


Summary of Contents for Siemens Quick 60
- Page 1 Operating and installation instructions Quick 60 Quick 60...
- Page 2 If you need an English user manual, please contact our local CS center/station specified in the "Washing Machine CS network" in your washing machine package or call our customer service free hotline (8008289828) for free supply. Thanks. Web site: http://www.siemens - ha.com.cn Email: Careline.China@BSHG.com Address: 66.
- Page 3 Contents Page Important information Notes on disposal Your new machine s packaging ......3 Your old machine .
- Page 4 11 12...
- Page 5 Notes on disposal Safety precautions and warnings The new machine s packaging ! The washing machine must be installed and ! Dispose of packing materials in a respon- operated in a room with the drain. sible manner. ! Make sure that the power supply system ! Keep packing materials out of reach of (voltage;...
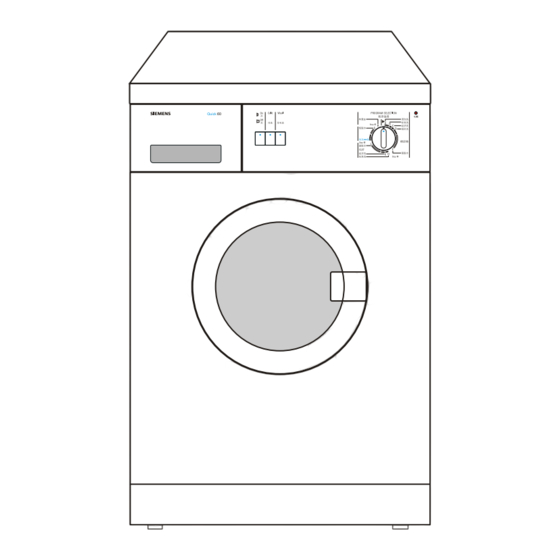
- Page 6 Safety precautions and Getting to know your machine warnings Please look at figures 1 , 2 , 3 and 4 in these operating instructions. The item Taking care of your machine: numbers mean the following: ! Do not climb onto the machine. ! Do not lean against the opened door.
- Page 7 Programme selector Function buttons (ON/OFF and additional functions) Fig. Fig. The programme selector is used to set the machine to required programme, before the ON / OFF ON/OFF button is pressed, by turning As soon as this button is pressed, the machine it clockwise until it reaches the required starts the selected programme.
- Page 8 Programme table Detergent Additional Always follow the and fabric functions manufacturers on the softener care label. Programme Prewash 5 kg Cold/40 5 kg Normal Cold/40 5 kg Cold/40 Light 5 kg Short Cold/40 Spin 5 kg Cold/40 Normal 1.5 kg Light 1.5 kg Cold/40...
- Page 9 Detergents and fabric-care additives Fig. 10 , 11 Frequent use of insufficient detergent will even- tually become noticeable as follows: You can use detergent which is suitable for - washing appears grey or not properly clean front loading automatic washing machines. - grey-brown stains (grease marks) appear on ! Never use detergents for impeller type as the washing...
- Page 10 Preparing laundry for washing Sorting the laundry Practical tips Sort the laundry according to the symbols Remove any loose items or metal objects, on the fabric care labels. such as safety pins, paper clips, etc. from the laundry. ! Knitted garments or garments with a wool content can only be washed in the machine Brush sand, coins etc.
- Page 11 Opening the door / loading the First wash cycle machine / closing the door Carry out the first wash cycle without laundry to remove any water left over from the factory Open the door tests. 1. Check that the transit bolts have been Pull the handle on the door towards you removed from the back of the machine (Fig.
- Page 12 Setting the programme / End of washing programme / Starting the programme / Switching the machine OFF Programme sequence / Altering the programme All programmes end automatically after the spin cycle. Switching the machine OFF 1. When the programme ended, press the Setting the wash programme ON/OFF button, the power indication lamp will turn off, the machine is shut down.
- Page 13 Cleaning / Maintenance / Frost Protection Cleaning the pump Before you begin any maintenance work, unplug the machine or switch off the fuse. Fig. 14 , 15 , 16 Turn the tap off. The pump must be cleaned: Cleaning your machine if the pump has been blocked by some foreign object, such as a button or paper ! Never use solvents, as these can damage...
- Page 14 Cleaning / Maintenance / Frost Protection Cleaning the filters in the water inlet Frost protection Fig. 17 If the machine is located in a room which is The filters in the water inlet must be cleaned if exposed to freezing temperatures, any residual water in both the pump and the water inlet no or insufficient water flows into the machine hose must be drained immediately every time...
- Page 15 Troubleshooting ! Only qualified technicians are permitted to repair electrical appliances. Repairs done by unauthorized persons can lead to considerable damage. Problems Possible causes / remedies The power indicator light - The plug is not correctly, or only loosely, inserted into the socket. does not illuminate - A fuse has blown in the domestic wiring.
- Page 16 Customer Service Technical specifications Width 59.5 cm Before calling the Customer Service, see Height 85.0 cm if you can correct the problem yourself. Depth 56.0cm (To do this, refer to Troubleshooting ). Weight approx. 70 kg Capacity see Programme If a service engineer is called out and no table (page 6) fault is found with the machine, a call-out Connection voltage...
- Page 17 Built-under or built-in Installing the machine appliance installation ! When installing and connecting the ma- chine, special attention must be paid to the The appliance must be built under or built in safety advice and warnings which have prior to connecting the power supply. been identified with an exclamation mark! The appliance can be built into or under a kitch- Always comply with all regulations issued by...
- Page 18 Align the machine Water supply - cold only Fig. 7 Fig. 18 , 20 , 21 ! The machine must be perfectly level with all For the water connection a standard cold four feet standing on the floor. It must not water line with a minimum water pressure rock from side to side.
- Page 19 Water Supply Installation Drainage If you use Chinese type water inlet pipe, ! When installing the machine, do not bend the water connections see fig. 18 , 20 , 21 . drain hose or pull on it. Please observe the following install steps ! When draining into a sink, the drain hose must not slip out of the sink and fall carefully.
- Page 23 Contents of this brochure could be changed without written notice. Product Standard: GB 4706.1-1998 GB 4706.24-2000 GB 4706.26-2000 Part No.: 5120003358 Version: Valid date: 2003.1...
Need help?
Do you have a question about the Quick 60 and is the answer not in the manual?
Questions and answers