Advertisement
Available languages
Available languages
Quick Links
!
OK!
EN 50419 :2006 LOGO
NOT OK
WARRANTY CONDITIONS
This product is guaranteed against faults caused by defects in manufacturing or the
materials used for a period of two years, starting from the date of purchase.* This
EN
warranty does not cover defects or damage caused by failure to install the device
correctly, incorrect use of the product, or excessive wear and tear.
*proof of purchase required.
CONDITION DE GARANTIE
Ce produit est garanti pour une période de 2 ans à partir de la date d'achat*, contre
toute défaillance résultant d'un vice de fabrication ou de matériau. Cette garantie ne
FR
couvre pas les vices ou les dommages résultant d'une mauvaise installation, d'une
utilisation incorrecte ou de l'usure anormale du produit.
*sur présentation du ticket de caisse.
GARANTIEVOORWAARDEN
Dit product wordt gegarandeerd voor een periode van 2 jaar vanaf de aankoopdatum*,
voor elke storing die het gevolg is van een fabricagefout of het materiaal. Gebreken of
NL
schade door slechte installatie, onjuist gebruik of abnormale slijtage van het product
worden niet gedekt door deze garantie.
*op vertoon van kassabon.
CONDICIONES DE GARANTÍA
El certificado de garantía de este producto tiene una duración de 3 años a partir de la
fecha de compra* que se limita a los defectos de fabricación y averías del material.
ES
Se excluyen de la garantía deficiencias o daños originados por una mala instalación,
errores en la manipulación o por un uso inadecuado.
*previa presentación del comprobante de compra.
ELECTRO DEPOT
1 route de Vendeville
59155 FACHES-THUMESNIL - FRANCE
OK
08/2024-V2
2/2
Coffee Maker
Machine à café
Koffiezetapparaat
Cafetera
992833 - PUMPCOFFEE M1
INSTRUCTIONS FOR USE
....................02
CONSIGNES D'UTILISATION
....................12
GEBRUIKSAANWIJZINGEN
....................24
INSTRUCCIONES DE USO
....................36
Advertisement

Related Manuals for VALBERG PUMPCOFFEE M1

Summary of Contents for VALBERG PUMPCOFFEE M1
- Page 1 CONDICIONES DE GARANTÍA El certificado de garantía de este producto tiene una duración de 3 años a partir de la 992833 - PUMPCOFFEE M1 fecha de compra* que se limita a los defectos de fabricación y averías del material. Se excluyen de la garantía deficiencias o daños originados por una mala instalación, errores en la manipulación o por un uso inadecuado.
- Page 2 What’s in the box / Contenu de l’emballage / Wat zit er in de verpakking / Contenido de la caja UNLOCK Preheat / Préchauffage / Voorverwarmen / Precalentar LOCK...
- Page 4 Make coffee / Préparation du café / Koffie zetten / Hacer café UNLOCK LOCK...
- Page 6 Make hot water / Préparation d’eau chaude / Heet water maken / Preparar agua caliente...
- Page 7 PRESS...
- Page 8 Froth milk / Moussage du lait / Melk opschuimen / Espumar leche...
- Page 9 20 - 25 C 100 ml / Ø 70 mm Milk...
- Page 10 2 cm...
- Page 11 Cleaning / Nettoyage / Reinigen / Limpieza...
- Page 12 Single/Double coffee cup | Une tasse/Deux tasses | Eén kopje koffie/twee kopjes koffie | Taza de café individual/doble Max 60 ml Min 25 ml...
- Page 13 Thank you! T h a n k y o u f o r c h o o s i n g t h i s VA L B E R G p ro d u c t . V A L B E R G p r o d u c t s a r e c h o s e n , t e s t e d , a n d recommended by ELECTRO DEPOT, so you can be sure y o u a re g e t t i n g a t o p - q u a l i t y, e a s y - t o - u s e p ro d u c t t h a t w o n ’...
- Page 14 Table of Contents Parts Product overview Product usage Specifications Before first use Product usage Auto power off Making espresso Making hot water Heating/frothing milk Cleaning and maintenance Cleaning and Descaling the coffee maker maintenance Troubleshooting Storage...
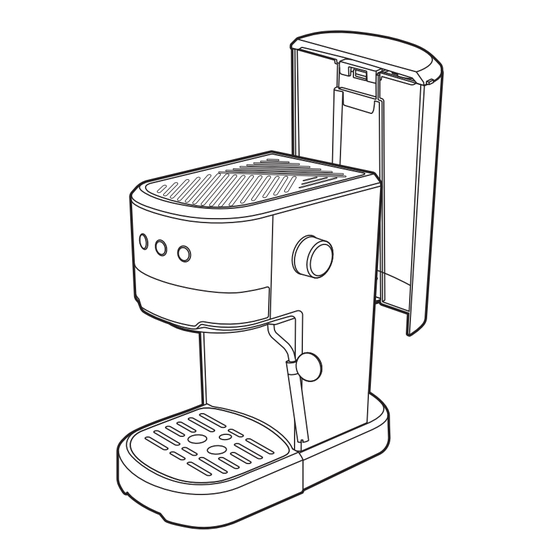
- Page 15 Product overview Before using the unit, carefully read both the Manual and Regulatory Warnings booklet. Keep these instructions for future reference and pass them onto any new owners of the unit. Parts Control panel ON/OFF button with indicator light Brew button with indicator light Steam button with indicator light Steam control knob Frothing pipe...
- Page 16 It is intended for household use only and should not be used for commercial purposes. Any other use may damage the product or cause injury. Specifications Model: 992833 - PUMPCOFFEE M1 Supply voltage: 220-240V~, 50-60Hz Power consumption:...
- Page 17 Product usage Before first use Remove all packaging before use (Fig. 1). • Place the unit on a stable, level, non-slip, heat-resistant surface. • Do not position the unit near the edge of a countertop where it could accidentally fall off. •...
- Page 18 Product usage NOTE: • After preheating, you can check and make sure the water is preheated by pressing the brew button, and when the water comes out from the spout, press the brew button again to stop (Fig. 18 to Fig. 20). The coffee maker is ready to start brewing your coffee.
- Page 19 Product usage WARNING! • Never turn the steam control knob rapidly, as the steam will accumulate rapidly in a short time. This may increase the potential of the risk of explosion (Fig. 52). • Test if the temperature is too high in the coffee maker: After using the “Steam” function for frothing milk, press the brew button and if the brew button ( indicator light and the steam button ( ) indicator light blink fast together,...
- Page 20 Cleaning and maintenance Cleaning and maintenance Follow the steps in Fig. 68 to Fig. 73 to clean the appliance. WARNING! • To prevent the risk of electrocution, unplug the appliance from the mains supply before cleaning. • Allow the appliance to cool down completely before cleaning.
- Page 21 Cleaning and maintenance After about 500 coffee cycles, all indicator lights will flash quickly to alert you that the coffee maker requires descaling. This alert will keep appearing each time you turn on the coffee maker until it is descaled. 1.
- Page 22 Cleaning and maintenance Troubleshooting Problem Possible Cause Solution Water leaks from • There is too much • Empty and clean the drip tray. If this the bottom of the water in the drip does not resolve the issue, contact coffee maker. tray.
- Page 23 Merci ! M e rc i d ’ a v o i r c h o i s i c e p ro d u i t VA L B E R G . Choisis, testés et recommandés par ELECTRO DEPOT, le s p ro d u i t s d e l a m a rq u e VA L B E R G v o u s a s s u re n t u n e u t i l i s a t i o n s i m p l e , u n e p e r f o r m a n c e f i a b l e e t u n e q u a l i t é...
- Page 24 Table des matières Pièces Aperçu de l’appareil Utilisation prévue Spécifications Avant la première utilisation Utilisation de Arrêt automatique l’appareil Préparation d’un expresso Préparation d’eau chaude Chauffage/moussage du lait Nettoyage et entretien Nettoyage et Détartrage de la machine à café entretien Guide de dépannage Rangement Les notices sont aussi disponibles sur le site...
- Page 25 Aperçu de l’appareil Avant d’utiliser cet appareil, lisez attentivement le mode d’emploi et le livret d’avertissements réglementaires. Conservez ces instructions pour vous y reporter ultérieurement et transmettez-les à tout nouveau propriétaire de l’appareil. Pièces Panneau de commande Bouton Marche/Arrêt avec voyant Bouton de préparation du café...
- Page 26 à aucune autre fin. Cet appareil est conçu exclusivement pour un usage domestique et ne doit pas être utilisé à un usage commercial. Toute autre utilisation est susceptible d’endommager l’appareil ou de provoquer des blessures. Spécifications Modèle : 992833 - PUMPCOFFEE M1 Tension : 220-240 V~, 50-60 Hz Consommation électrique : 1 100 W Capacité...
- Page 27 Utilisation de l’appareil Avant la première utilisation Retirez tous les matériaux d’emballage avant l’utilisation (Fig. 1). • Placez l’appareil sur une surface stable, plane, antidérapante et résistant à la chaleur. • Ne posez pas l’appareil à proximité du rebord du plan de travail, car il pourrait accidentellement tomber.
- Page 28 Utilisation de l’appareil Préparation d’un expresso Préchauffage Avant de préparer une tasse de délicieux expresso chaud, nous vous recommandons de faire préchauffer à chaque fois la machine à café, y compris le porte-filtre, le panier de porte-filtre et la tasse, en les rinçant à l’eau chaude afin que le café ne soit pas affecté par la froideur de ces pièces.
- Page 29 Utilisation de l’appareil Chauffage/moussage du lait En ajoutant de la mousse de lait sur l’expresso, vous obtenez une tasse de café latte ou de cappuccino. Pour faire mousser le lait, il vous faut un pichet à lait. Ne remplissez pas trop le pichet à...
- Page 30 Utilisation de l’appareil REMARQUE : • Pendant l’utilisation, le voyant du bouton de vapeur s’allume et s’éteint tandis qu’il maintient la température souhaitée (Fig. 51). • Remplissez le pichet à lait d’environ 100 ml de lait pour une tasse de cappuccino. Nous vous recommandons d’utiliser du lait entier sortant tout juste du réfrigérateur (Fig. 55).
- Page 31 Nettoyage et entretien Nettoyage et entretien Suivez les étapes illustrées par les images Fig. 68 à Fig. 73 pour nettoyer l’appareil. AVERTISSEMENT ! • Pour éviter tout risque d’électrocution, débranchez l’appareil de la prise secteur avant de le nettoyer. • Laissez l’appareil refroidir complètement avant de le nettoyer.
- Page 32 Nettoyage et entretien Après environ 500 cycles de préparation de café, tous les voyants clignoteront rapidement pour vous avertir que la machine à café doit être détartrée. Cette alerte continuera d’apparaître chaque fois que vous allumerez la machine à café jusqu’à ce qu’elle soit détartrée.
- Page 33 Nettoyage et entretien • Vous pouvez également suivre les étapes ci-dessus et nettoyer la machine à café avec une solution de vinaigre composée de 3 tasses de vinaigre blanc et de l’eau en quantité suffisante pour atteindre le repère MAX (Fig. 4). Guide de dépannage Problème Cause possible...
- Page 34 Nettoyage et entretien Rangement AVERTISSEMENT : Avant de ranger l’appareil, débranchez- le de la prise secteur et laissez-le refroidir complètement. • Si vous ne prévoyez pas d’utiliser l’appareil avant une longue période, nous vous recommandons de le nettoyer et de le ranger dans son emballage d’origine dans un endroit frais et sec, à...
- Page 35 Proficiat met uw keuze voor een product van VALBERG. De selectie en de testen van de toestellen van VALBERG g e b e u re n v o l le d i g o n d e r c o n t ro le e n s u p e r v i s i e v a n E L E C T R O D E P O T.
- Page 36 Inhoudstafel Onderdelen Overzicht van het Productgebruik toestel Specificaties Voor ingebruikname Gebruik van het Automatisch uitschakelen toestel Espresso zetten Heet water maken Melk verwarmen/opschuimen Reiniging en onderhoud Reiniging en Het koffiezetapparaat ontkalken onderhoud Probleemoplossing Opslag...
- Page 37 Overzicht van het toestel Lees de handleiding en waarschuwingen grondig voordat u dit apparaat gebruikt. Bewaar deze instructies voor toekomstig gebruik en geef ze door aan eventuele nieuwe eigenaars van het apparaat. Onderdelen Bedieningspaneel AAN/UIT-knop met controlelampje Brouwknop met controlelampje Stoomknop met controlelampje Stoomregelaar Opschuimpijp...
- Page 38 Het is alleen bestemd voor huishoudelijk gebruik en mag niet voor commerciële doeleinden worden gebruikt. Elk ander gebruik kan het product beschadigen of verwondingen veroorzaken. Specificaties Model: 992833 - PUMPCOFFEE M1 Voedingsspanning: 220-240 V~, 50-60 Hz Stroomverbruik: 1100 W...
- Page 39 Gebruik van het toestel Voor ingebruikname Verwijder alle verpakking voor gebruik(Afb. 1). • Plaats het apparaat op een stabiel, vlak, hittebestendig antislip-oppervlak. • Plaats het apparaat niet bij de rand van een aanrecht waar het per ongeluk zou kunnen vallen. •...
- Page 40 Gebruik van het toestel Espresso zetten Voorverwarmen Telkens voordat u een kopje goede hete espressokoffie zet, raden we u aan om het koffiezetapparaat op te warmen, inclusief de portafilter, het portafilter-bakje en het kopje. Spoel ze bijvoorbeeld met heet water, zodat de koude onderdelen geen invloed hebben op uw koffie.
- Page 41 Gebruik van het toestel Melk verwarmen/opschuimen U bekomt een kopje latte of cappuccino als u de espresso afwerkt met opgeschuimde melk. Voor het opschuimen hebt u een melkkannetje nodig. Vul de kan met melk niet te veel, het melkvolume neemt toe wanneer u stoom toevoegt om het te verwarmen en op te schuimen. Gebruik een grote kop dat groot genoeg is voor de espresso met de opgeschuimde melk.
- Page 42 Reiniging en onderhoud Reiniging en onderhoud Volg de stappen in Afb. 68 tot Afb. 73 om het apparaat schoon te maken. WAARSCHUWING! • Om het risico op elektrocutie te voorkomen, moet u de stekker van het apparaat uit het stopcontact trekken voordat u het schoonmaakt.
- Page 43 Reiniging en onderhoud Na ongeveer 500 koffiebeurten knipperen alle controlelampjes snel om aan te geven dat het koffiezetapparaat ontkalkt moet worden. Deze waarschuwing verschijnt telkens als u het koffiezetapparaat inschakelt, totdat het ontkalkt wordt. 1. Vul het waterreservoir tot aan de MAX-markering op het reservoir ( (Afb.
- Page 44 Reiniging en onderhoud • U kunt ook de bovenstaande stappen volgen en het koffiezetapparaat reinigen met een azijnoplossing bestaande uit 3 kopjes witte azijn en vervolgens aanlengen met water tot aan de MAX-markering (Afb. 4). Probleemoplossing Probleem Mogelijke oorzaak Oplossing Er lekt water uit •...
- Page 45 Reiniging en onderhoud Opslag WAARSCHUWING: Haal de stekker uit het stopcontact voordat u het apparaat opbergt en laat het volledig afkoelen. • Als u van plan bent het apparaat langere tijd niet te gebruiken, raden wij u aan het apparaat schoon te maken en het vervolgens in de oorspronkelijke verpakking op een koele, droge plaats op te bergen, uit de buurt van direct zonlicht, overmatig vuil en stof, en buiten het bereik van kinderen of huisdieren.
- Page 47 ¡Muchas gracias! M u c h a s g r a c i a s p o r h a b e r e le g i d o n u e s t ro p ro d u c t o VA L B E R G .
- Page 48 Índice Partes Descripción del Uso del producto aparato Especificaciones Antes del primer uso Utilización del Apagado automático aparato Preparar un espresso Preparar agua caliente Calentar/espumar leche Limpieza y mantenimiento Limpieza y Descalcificar la cafetera mantenimiento Solución de problemas Almacenamiento...
- Page 49 Descripción del aparato Antes de utilizar el aparato, lea atentamente tanto el Manual como el folleto de advertencias normativas. Guarde estas instrucciones para futuras consultas y entrégueselas a los nuevos propietarios del aparato. Partes Panel de control Botón de encendido/apagado con luz indicadora Botón de café...
- Page 50 Está destinado únicamente a un uso doméstico y no deberá utilizarse para fines comerciales. Cualquier otro uso podría dañar el producto o provocar lesiones. Especificaciones Modelo: 992833 - PUMPCOFFEE M1 Tensión de alimentación: 220-240 V~, 50-60 Hz Consumo de energía: 1100 W Capacidad del depósito:...
- Page 51 Utilización del aparato Antes del primer uso Retire todo el embalaje antes de usar (Fig. 1). • Coloque el aparato sobre una superficie estable, plana, antideslizante y resistente al calor. • No coloque el aparato cerca del borde de una encimera donde podría caerse accidentalmente. •...
- Page 52 Utilización del aparato Preparar un espresso Precalentamiento Le recomendamos que, cada vez que vaya a preparar una taza de buen café espresso caliente, antes precaliente la cafetera, lo que incluye el portafiltro, la cesta del portafiltro y la taza, por ejemplo, enjuagándolos con agua caliente para que su café...
- Page 53 Utilización del aparato Calentar/espumar leche Conseguirá una taza de café con leche o un capuchino coronando el espresso con espuma de leche. Necesitará una jarra de leche para hacer espuma. No llene excesivamente la jarra de leche, ya que el volumen de la leche aumenta cuando se añade vapor para calentarla y espumarla.
- Page 54 Limpieza y mantenimiento Limpieza y mantenimiento Siga los pasos de la Fig. 68 a la Fig. 73 para limpiar el aparato. ¡ADVERTENCIA! • Para evitar el riesgo de electrocución, desenchufe el aparato de la red eléctrica antes de limpiarlo. • Deje que el aparato se enfríe completamente antes de limpiarlo.
- Page 55 Limpieza y mantenimiento Después de unos 500 ciclos de preparación de café, todas las luces indicadoras parpadearán rápidamente para avisarle de que hay que descalcificar la cafetera. Este aviso seguirá apareciendo cada vez que encienda la cafetera hasta que la descalcifique. 1.
- Page 56 Limpieza y mantenimiento • O bien, también puede seguir los pasos anteriores y limpiar la cafetera con una solución de vinagre compuesta por 3 tazas de vinagre blanco a la que añadirá agua hasta la marca MAX (Fig. 4). Solución de problemas Problema Posible causa Solución...
- Page 57 Limpieza y mantenimiento Almacenamiento ADVERTENCIA: Antes de guardar el aparato, desenchúfelo de la toma de corriente y deje que se enfríe por completo. • Si no tiene previsto utilizar el aparato durante un periodo prolongado de tiempo, le recomendamos que lo limpie y lo guarde en su embalaje original en un lugar fresco y seco, alejado de la luz directa del sol, de la suciedad y el polvo excesivos, y fuera del alcance de los niños y los animales domésticos.
Need help?
Do you have a question about the PUMPCOFFEE M1 and is the answer not in the manual?
Questions and answers