Table of Contents
Advertisement
Quick Links
Advertisement
Table of Contents

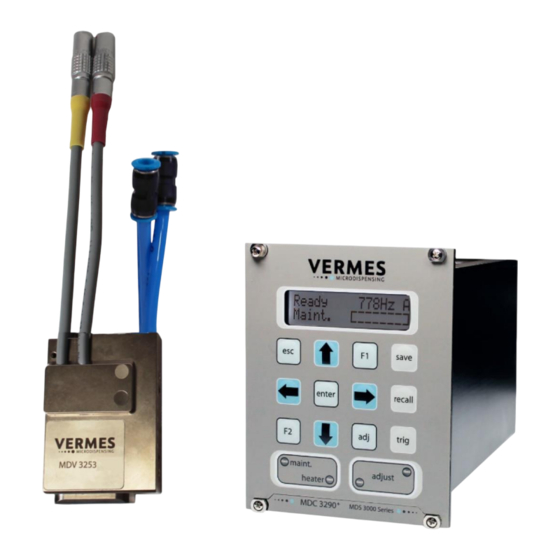
Summary of Contents for Vermes MDV 3253
- Page 1 VTK-TR-BA-119e-1 Quick Reference Guide MDV 3253...
-
Page 2: Table Of Contents
Adjust .................................. 12 The Normal Adjust ............................12 The Initial Adjust ............................13 Disassembling the Valve ............................. 16 Dismounting the Valve ..........................16 Cleaning ................................18 Dimensional Drawing MDV 3253 ........................20 Further Reading ..............................21 VTK-TR-BA-119e-1 Quick Reference Guide MDV 3253... -
Page 3: General Introduction
1. General Introduction This manual shows you how to set up an application for high frequency dispensing with an MDV 3253. The MDV 3253 is best suited for high frequency applications, since it allows increased air cooling. CAUTION! (High temperatures) The heaters can reach temperatures of up to 180 °C. -
Page 4: Abbreviations
Heat Conductive Body for MDFH-TA 1014123 Cartridge holder TA 30 ccm (with screws) 1014057 MFC 3000 1014981 Adapter Cable MFC, MDC and Sensor 1013997 FCV Assembly-HF 7.0 bar 1015214 Switching power supply 48 V 4 A M12 1014983 VTK-TR-BA-119e-1 Quick Reference Guide MDV 3253... -
Page 5: Necessary Tools
MDT 308 - Adjust Tool TA 1014284 Handle combined with: 1. Bit Hexagon Socket, size 7 1014204 2. Bit Adaptor ¼” – Outer Square to Outer Hexagon 1014214 MDT 323 - Nozzle Insert – 1014283 Squeezing Out Tool TA VTK-TR-BA-119e-1 Quick Reference Guide MDV 3253... - Page 6 200 (orange) 1010379 size 300 (yellow) 1012208 size 400 (red) 1012209 size 500 (gray) 1015396 Set - NI Cleaning Reamers 1014627 MDT 324- Nozzle Insert 1014310 Cleaning Holder MDT 316 - Nozzle Insert 1013324 Cleaning Tool VTK-TR-BA-119e-1 Quick Reference Guide MDV 3253...
-
Page 7: Torques
(hexagon socket, size 2) 1013374 Fluid box connector Luer-Lock (hexagon screw, size 8) 1013296 Tightening screw (gearing VM-A) 1013372 Tappet guidance H (gearing VM-B) 1013372 Tappet guidance PEEK (gearing VM-B) 1013371 Tappet centering screw (gearing VM-C) VTK-TR-BA-119e-1 Quick Reference Guide MDV 3253... -
Page 8: Assembling The Valve
Screw in the two screws on top of the fluid box body. Step 4 (Mount cartridge base) Mount the cartridge base to the fluid box body using the tightening screw. Screw in the tightening screw using MDT 327 (torque 120- 140 cN.m). VTK-TR-BA-119e-1 Quick Reference Guide MDV 3253... - Page 9 Screw it tight with the 2 screws for the cartridge holder (torque 40 – 50 cN.m). You need a hexagon socket key size 2. Hook the heater connection of the fluid box into the cartridge holder (see arrow). VTK-TR-BA-119e-1 Quick Reference Guide MDV 3253...
-
Page 10: Wiring Of The Mds 3253
Set the temperature(s) and turn on the heater channel(s): Select the heater channels (in the diagram: Ch1 and Ch2). See above (No. 3) how to change the settings. Set Temp: Set your target temperature (same as the operating temperature). VTK-TR-BA-119e-1 Quick Reference Guide MDV 3253... - Page 11 Wait until the temperature is settled. Wait 20 minutes, until the system is heated up. Caution: System is hot. Do not touch the parts. Proceed the Adjust (Adjust value: 0.0 – 1.0 %, detailed information please refer to chapter 4). VTK-TR-BA-119e-1 Quick Reference Guide MDV 3253...
-
Page 12: Adjust
After a few seconds, the initial message disappears from the display. Instead, the following message appears: “-40 % slowly Adjust Screw IN”. Screw the adjust screw slowly inward (clockwise). The adjust value shown in the display moves towards 0.0 %. VTK-TR-BA-119e-1 Quick Reference Guide MDV 3253... -
Page 13: The Initial Adjust
If you do not reach step 4 of the initial adjust after approx. two minutes, the initial adjust is cancelled. You have to start the initial adjust from the beginning. The initial adjust needs the same preparations as the adjust. Make sure that the nozzle fixation nut is absolutely tight. VTK-TR-BA-119e-1 Quick Reference Guide MDV 3253... - Page 14 If you do not reach this process step after approx. two minutes, the initial adjust will be cancelled. You have to start again at the beginning. Screw open the adjust screw completely (screw counter-clockwise to open). VTK-TR-BA-119e-1 Quick Reference Guide MDV 3253...
- Page 15 1.0 %. With an adjust value of more than 59 % (without adjust offset), a warning message appears in the display (“Adjust Screw OUT”), but you should avoid reaching this far. Otherwise, the tappet or the nozzle insert could get damaged. VTK-TR-BA-119e-1 Quick Reference Guide MDV 3253...
-
Page 16: Disassembling The Valve
MDT 327 - Multi-Function Tool. Take off the nozzle fixation nut. Step 4 (Take out the cartridge base) Screw open the tightening screw on the fluid box using MDT 327 - Multi-Function Tool. Take out the cartridge base. VTK-TR-BA-119e-1 Quick Reference Guide MDV 3253... - Page 17 MDT 323 through the bore on top of the sealing. Step 8 (Screw out the tappet) Screw out the tappet using MDT 310 - Tappet Changing Tool. Important Note! Do not break the tappet! VTK-TR-BA-119e-1 Quick Reference Guide MDV 3253...
-
Page 18: Cleaning
IMPORTANT! Make sure the electronics (the left circle on the picture) get not in touch with the solvent and the plug (the right circle on the picture) stays outside of the ultrasonic bath. VTK-TR-BA-119e-1 Quick Reference Guide MDV 3253... - Page 19 N-27 and N-28) with a MDT 316. You can use the Nozzle Insert Cleaning Holder MDT 324 with all Vermes nozzle inserts. With it, you can safely keep the nozzle insert in place during cleaning and drying with compressed air.
-
Page 20: Dimensional Drawing Mdv 3253
7. Dimensional Drawing MDV 3253 VTK-TR-BA-119e-1 Quick Reference Guide MDV 3253... -
Page 21: Further Reading
DVD, which came with your MDS delivery, or you can download them from the VERMES Microdispensing homepage at www.vermes.com. To download a manual you will need a password which you can obtain by contacting our support via email (support@vermes.com) or via phone (+49 (0) 80 24 6 44-26). •...

Need help?
Do you have a question about the MDV 3253 and is the answer not in the manual?
Questions and answers