
Related Manuals for Lindy 38364


Summary of Contents for Lindy 38364
- Page 1 SDVoE Controller User Manual English No. 38364 lindy.com © LINDY Group - FOURTH EDITION (December 2024)
- Page 2 Additional support is available at lindy.com. Warning: Keep out of reach of children. LINDY products and accessories are not toys and should not be handled by young children, as they may cause injury or damage Suffocation Hazard: For products containing or supplied in plastic bags, keep bags away from babies and children to prevent suffocation.
- Page 3 Handling: Handle your LINDY product with care. The product may be damaged if dropped, punctured, or exposed to liquid. If damage is suspected, stop using the product to prevent potential hazards.
- Page 4 Thank you for purchasing the SDVoE Controller. This product has been designed to provide trouble free, reliable operation. It benefits from both a LINDY 2-year warranty and free lifetime technical support. To ensure correct use, please read this manual carefully and retain it for future reference.
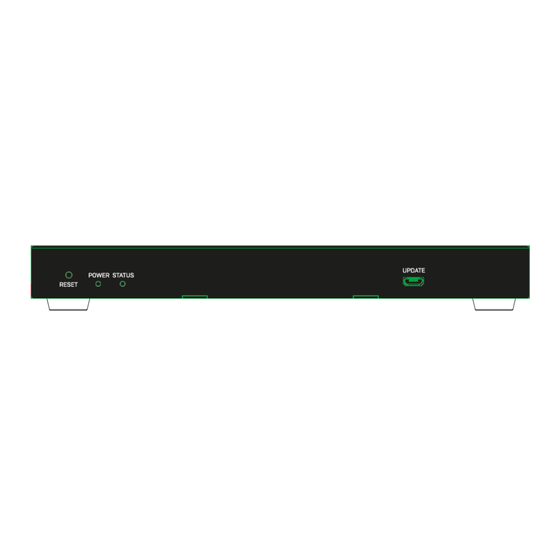
- Page 5 User Manual English Installation Front 1. RESET Button: Press and hold this button for 10 seconds when the unit is powered-on until the STATUS LED starts flashing to restore the default settings. 2. POWER LED: Indicates power. 3. STATUS LED: This will flash yellow/green every second until the unit boots up completely and control LAN is ready, then it will stay on.
- Page 6 User Manual English Operation Web GUI This Controller can be managed via the built-in Web GUI. Please follow the below steps. Input the Controller’s default IP address (Control LAN: 192.168.6.100, Video LAN: 169.254.8.100) or the URL (http://controller.local) into the Web browser address bar on the PC to enter the Web GUI login interface: Select the default username (admin) and password (admin) on the above login interface.
- Page 7 User Manual English On this interface, you need to set the IP mode of Video LAN. Mode 1: Automatically managed by Controller Box The IP addresses of the Video LAN port, Encoders and Decoders are assigned by the Controller automatically. Click on Next button and wait for the completion to enter the interface as shown below: Select Automatically add Encoders and Decoders to project and click on Next button to enter the Device page, the system starts to search for devices.
- Page 8 User Manual English Mode 3: Static IP mode by manual settings Manually set the IP Address, Subnet Mask and Gateway of the Video LAN port. It’s recommended to use different IP network domain from Control LAN port. Then please follow the same steps shown in Mode 1 operation. Device Page On this page is possible to to check the information of the Encoders and Decoders in the system, such as ID, name, MAC address, IP address, Firmware version, Online/Offline Status, Up Time, RX Link,...
- Page 9 User Manual English A/V Settings EDID: Click the drop-down menu to select the EDID for the Encoder. Copy EDID: Click the drop-down menu to select a Decoder for EDID copy. Audio: Click the drop-down menu to select the audio source (HDMI®/L/R IN). When HDMI® is selected, Encoder HDMI®...
- Page 10 User Manual English Decoder Basic Settings Name: change the name of the Decoder (maximum length is 16 characters, special characters are not supported). Source: Click the drop-down menu to select signal source for the Decoder. Change ID: set the ID of the Decoder (ID range: 1-762). Both ID and name cannot be duplicated. DEC Led: “Show me”...
- Page 11 User Manual English Locked Signal Routing Different signals can be independently routed between Encoders and Decoders, including Video, Audio, IR, RS-232 and USB; click the drop-down menus and select Follow to assign the corresponding signal from the current Encoder. RS-232 and other Settings RS-232 Command Relay: Click the drop-down menu to select On/Off to turn on/off the RS-232 command relay function.
- Page 12 User Manual English Matrix Shows all the Encoders and Decoders with previews if available, it’s possible to switch in the following ways: One-to-one and one-to-many switching: Left-click the Encoder preview and drag it to one or multiple Decoder, then release the mouse. One-to-all switching: Left-click the Encoder preview and drag it to All Decoders, then release the mouse.
- Page 13 User Manual English Besides, is possible to save the current matrix selection by clicking on Save as button in Matrix window. To recall saved matrix presets, just click on Load button, select the preset and click Apply. Video Wall On this page is possible to create and configure video wall applications. Click on Create, the following pop-up window will be shown: Set the Video Wall ID, Name, Row Number and Column Number.
- Page 14 User Manual English Click on Class Preset to enter the class configuration page, then click each screen to select the corresponding Class as required (the same class name will form a video wall, it’s possible to create a regular or irregular video wall by Class Preset). Then click on Apply. Besides, click the drop-down menu icon behind the preset name to switch different presets (the selected preset will be high-lighted in Settings), click on Create Preset to create up to 9 configurations for different application scenarios, click on Clear to clear and reset video wall class settings, or click on...
- Page 15 User Manual English To delete a video wall, just select the video wall on the “Video Wall List”, then click “Remove”. A prompt window will pop up and you can delete it after clicking “Yes”. Notes: - Each Decoder can be set into a part of a video wall array. Each system can contain multiple video walls with different sizes.
- Page 16 User Manual English 3. Click to select a window in the Encoder Assignment, click and drag an Encoder from the Encoder List to the window, then the corresponding signal source will be displayed on the window. Select a signal source for each window in the same way. Finally, click on Apply to take effect. 4.
- Page 17 User Manual English 5. Now is possible to see the Multiview preview in Multiview Source page. Under the drop-down menu of Multiview/PIP Configuration there are all the different Multiview or PIP configurations previously setted up. Besides, directly drag Encoders to the multiview to change signal sources.
- Page 18 User Manual English To delete the multiview configurations you set before, just check to select the multiview or click All to select all the multiview presets, then click the Delete button. Click Yes button from the pop-up window to confirm. PIP Configuration To create a PIP configuration, enter in the Create PIP Layout tab, click Add button and set the Multiview PIP ID and Name from the pop-up window, then click on Create.
- Page 19 User Manual English Click the drop-down menu to select the resolution of background, then click to select a window in the Window Assignment to be the foreground, finally click Apply to take effect. Click on the PIP Configuration tab, then click on Add button to create a PIP multiview preset.
- Page 20 User Manual English Select a Decoder in the Decoder List, or click All to select all the Decoders, then click on the Apply button on the right. The configured PIP Multiview will be applied on the selected Decoders, now is possible to switch between different Multiview/PIP Configuration from the main Multiview page in the drop-down menu or drag directly Encoders to the PIP Multiview to change the signal source of the foreground/background.
- Page 21 User Manual English User Page Here is possible to add new user accounts with different permissions. Click on Create button to start the configuration of one User. Add User Name and Password from the following pop-up window, then click on Go to create the User. Please note that the Password requires from a minimum of 6 to a maximum of 12 characters, special characters are not supported.
- Page 22 User Manual English Controller Settings Page System Configuration Click Save to save the current configuration; click Load to load the system configuration JSON file and replace the current system configurations (it’s strongly recommended to save the current configurations before loading); click Clear to clear system configurations already created and configured in the controller to set up the system again.
- Page 23 User Manual English Video Network Shows the network port configuration of the Controller connected to the same network of the Encoders and Decoders. If DHCP is set to Off, is possible to set up manually the IP Address, Subnet Mask and Gateway as required, then click on Apply to take effect.
- Page 24 • • Disable unregistered multicast flooding Enable fast leave support • Lindy tested this SDVOE Extender with a Netgear XSM4316S Switch, the following Netgear Switches are recommended and optimized for SDVOE AV over IP applications: XSM4216F-100NAS M4250-16XF MANAGED SWITCH XSM4316PA-100NES...
- Page 25 User Manual English Infrared Pinout Troubleshooting The Controller has two LAN ports, Video LAN and Control LAN; the purpose of this design is to isolate audio/video (AV) network from control network to avoid direct access to the units from control network directly, it's for bringing network security and avoiding AV network traffic flowing into the network in which the controls and managements are established.
- Page 26 Recycling Information WEEE (Waste of Electrical and Electronic Equipment), Recycling of Electronic Products Europe, United Kingdom In 2006 the European Union introduced regulations (WEEE) for the collection and recycling of all waste electrical and electronic equipment. It is no longer allowable to simply throw away electrical and electronic equipment.
- Page 27 Recycling Information Datenschutz-Hinweis Altgeräte enthalten häufig sensible personenbezogene Daten. Dies gilt insbesondere für Geräte der Informations- und Telekommunikationstechnik wie Computer und Smartphones. Bitte beachten Sie in Ihrem eigenen Interesse, dass für die Löschung der Daten auf den zu entsorgenden Altgeräten jeder Endnutzer selbst verantwortlich ist.
- Page 28 Standard IEC 62368-1. LINDY Herstellergarantie – Hinweis für Kunden in Deutschland LINDY gewährt für dieses Produkt über die gesetzliche Regelung in Deutschland hinaus eine zweijährige Hersteller- garantie ab Kaufdatum. Die detaillierten Bedingungen dieser Garantie finden Sie auf der LINDY Website aufgelistet bei den AGBs.
Need help?
Do you have a question about the 38364 and is the answer not in the manual?
Questions and answers