Advertisement
Quick Links
E-mail: us@gtplayer.com
Web: www.gtplayer.com
READ THIS MANUAL
Before using this manual, please read it carefully to
understand its contents. Please keep it properly so
that users can read it at any time. This manual is
applicable to product assembly and use.
Installation QR
Please understand that the design of the product in the
photos may differ from the actual product.
If you have any questions about the product, please
contact us through the contact information on the left.
We will strive to resolve your problem within 24 hours
on business days.
Version 24.05.22
Advertisement

Related Manuals for Ace GTPLAYER GTS228-BLK-140


Summary of Contents for Ace GTPLAYER GTS228-BLK-140
- Page 1 READ THIS MANUAL Before using this manual, please read it carefully to understand its contents. Please keep it properly so that users can read it at any time. This manual is applicable to product assembly and use. Installation QR Please understand that the design of the product in the photos may differ from the actual product.
- Page 2 SAFETY INFORMATION CAUTION Read all instructions and using this desk. - Save these instructions 1. Close supervision is necessary when this furnishing is used by, or near children, invalids, or disabled persons. 2. Use this furnishing only for its intended use as described in these instructions. Do not use attachments not recommended by the manufacturer.
- Page 3 Thank you for your purchase of the GTPLAYER Product! To ensure your and others' safety, please read and follow the instructions in this user manual carefully and thoroughly before and during use. CALL US FIRST!!! DO NOT RETURN TO STORE For immediate help with assembly or product information,...
- Page 4 The installation position of the main accessories ◆ Please check and ensure all the things are in the package. Please contact us if something is not included. We will reply within 24 hours and try our best to solve it. �...
- Page 5 PARTS AND ACCESSORIES ◆ Avoid using sharp objects such as a knife to cut open packing as you may accidentally damage the product. 1. Main Parts ➍x1 ➊x1 ➋x1 ➌x1 Lift Column Lift Column Center Rail Crossbar ➎x2 ➏x2 ➐x2 ➑x1 Side Bracket Corner Brace...
- Page 6 ⓱x 1 Set ⓲x1 ⓳x2 ⓴x1 Threadholder Power Strip Drawer Slide Drawer Bottom Board Drawer Back Panel Drawer Outer Drawer Outer Drawer Front Panel Side Panel Side Panel Drawer Inner Drawer Inner Monitor Stand Monitor Stand Side Panel Side Panel Top Board Middle Panel Monitor Stand...
- Page 7 Monitor Stand Pothook Mouse Pad Fixing Clip Bottom Side Panel This part contains: • Light Strip x1 • Controller x1 • IR Remote x1 • Double-sided Tape x1 Screwdriver • Power Cord x1 Light Strip • Fixing Clip x1 2. Screws and Other Parts Other Parts Name Other Parts...
- Page 8 Spare Parts Name Spare Parts Name �� �� 2PCS Cam Bolt φ8x40 Wood Pin �� �� Cam Lock M6x8 Screw �� �� M6x14 Screw M6.3X50 Screw �� �� ST4x10 Screw M6x8 Screw �� �� 2PCS φ6x40 Wood Pin M6x32 Screw ��...
- Page 9 ASSEMBLY INSTRUCTIONS CAUTION: At least two adults are required to safely assemble this Other item. lifting attempts may risk back safety due to large and heavy part(s). Install the desk boards with �� and �� ��. �� x6 � �� �...
- Page 10 � Install the control unit on the lift column with and ��. � �� �� x2 � ➊ � � � �� � Note: Insert the crossbar until it reaches the bump position.
- Page 11 Install the center rail on the lift columns with ��. �� x6 ➋ �� ➌ ➌ ➊ Install the side brackets on the lift columns with ��. �� �� x4 ➎ ➎ �� ➋ ➎ �...
- Page 12 Install the side brackets on the desk boards with ��. ➋ �� x8 �� ➊ �� Install the threadholders on the desk board with ��. �� ⓱ �� x4 ⓱ � �� ⓱ � �...
- Page 13 Install the corner brace on the connecting rod and desk board with �� and ��. �� x2 �� x4 �� �� ➏ 100% 100% �� �� �� ➏ ②. Tighten screw �� ③. Tighten screw �� ①. Position screw �� completely.
- Page 14 Install the crossbar ➍ into the lift column ➋ and then secure the crossbar ➍ to the motor rod �. First Install ➍ Second ➍ ➍ � ②. Secure the crossbar ➍ ①. Insert the crossbar ➍ into to the motor rod �. the lift column ➋.
- Page 15 Install the bases on the lift columns with �� and the pads on the bases. �� x8 �� ➐ � �� � ➐ �...
- Page 16 Install the control unit ➓ on the desk board � and power adapter ➑ on the desk board � with ➒. �� �� x2 ➓ �� � ➓ ➒ ➑ � � � ➒ ➑ ➒ ➑ ➒ � � �.
- Page 17 Connect and organize the cables. � � is a fixing clip, stick it on the bottom of the desk board to organize � the cables. ➓ ➓ �...
- Page 18 Install the pothook and cam bolts �� on the desk board � and Insert the wood pins �� the desk board �. �� x4 �� x2 �� x4 �� �� �� � � �� �� �� �� �� �� �.Insert the wood pins �� �.Install the cam bolts �...
- Page 19 Attach the side panels to the desk board �. �� x4 �� �� �� �. Lock the cam locks as �. Insert the cam locks shown. into the side panel. �...
- Page 20 Separate the drawer slides. ⓳ ⓳ ⓳ �. Hold the button and continue pull out the slide rail. �. Pull out the slide rail. �. Now successfully separated the drawer slides. Install the cam locks on the drawer front panel ��...
- Page 21 Attach the drawer side panels to the drawer front panel. �� �� x2 Insert �� �� Lock Install the drawer bottom board and the drawer back panel. �� x4 ⓴ �� �� ⓴ �...
- Page 22 Install the drawer slides on the drawer side panels. ⓳ �� �� x4 ⓴ ⓳ �� ⓳ Install the drawer slides on the drawer side panels. ⓳ �� x4 �� ⓳ �� �...
- Page 23 Attach the drawer to the desk and then install the power strip and wood pins �� on the desk board �. �� ⓲ �� �� x2 �� x2 � �� �� �� ⓲ �...
- Page 24 Install the upper monitor stand. �� �� �� �� x3 �� x6 �� �� �� �� �� �� �� �� �� �� �� �� x6 �� �� �� �� �...
- Page 25 �� Install the lower monitor stand. �� �� �� �� x3 �� x6 �� �� �� �� �� �� �� �� �...
- Page 26 �� x6 Flip Vertical �� �� �� �� �� �� �� �� �. Lock the cam locks as �. Insert the cam locks shown. into the side panel. �...
- Page 27 �� �� �� �� x2 �� x4 �� �� �� �� �� �� �� �� x4 �� �� �� �� �...
- Page 28 Install the light strip on the bottom of the lower monitor stand board. ➊ ➍ ➎ ➋ ➊. Cleaning the installation surface. Make sure the surface smooth,dry and clean. ➋. Stick light strip to the installation surface. ➌. Stick the light strip tightly with your hands. ➌...
- Page 29 Install the monitor stand on the desk board �. �� x4 � �� �� � �� �...
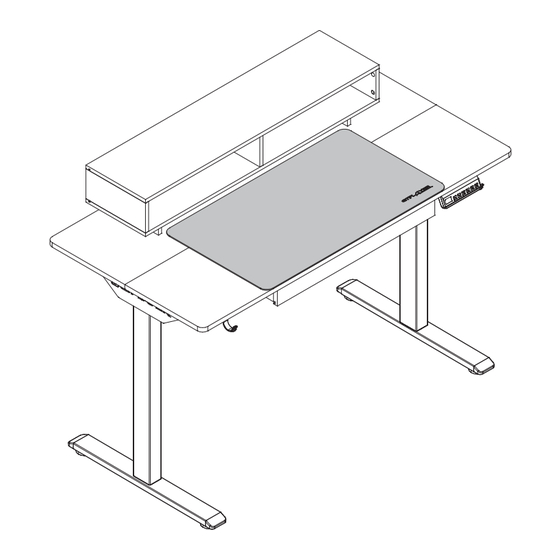
- Page 30 Put on the mouse pad. Assembly is complete. NOTE: Before first using or repowering the desk, please RESET to ensure that both lift columns are at the same height, as they may have slight variations. (See P31 “6.Reset” step for operation.) �...
- Page 31 HAND CONTROLLER MANUAL A. Hand Controller Number / Memory Button ➓ Settings Button Down / Next option Up / Previous option B. Settings � Up or Down Operation Hold down the button “ ” or “ ” to adjust the height up or down with the height displayed on the display during operation.
- Page 32 � Change the measurement units(inch / centimeter) Hold down the button “S” for about 3 seconds, when the display shows “S--” and starts flashing, release the button “S”. Press the button “S” again to enter the setting mode. Press the button “...
- Page 33 LIGHT STRIP INSTALLATION AND OPERATION � Light Strip Set Connection Method ⑤ ③ ① ① Light Strip ② Controller ② ③ Power Cord ④ Data Cord ⑤ IR Receiver ④ ⑥ ⑥ IR Remote � Usage of Light Strip � ◆...
- Page 34 � Light Strip IR Remote Control Manual � Light Strip Bluetooth control APP Scan the APP QR Code via your phone to download APP to achieve phone operation. APP QR CODE �...
- Page 35 WARNING! Improper operation of the system may result in personal injury and cause damage to objects! • Unplug the power cord in case of smoke, smell, or unusual noise. • Make sure no objects or parts of the body get caught when operating the motor. •...
- Page 36 Dear Customer, Thank you for choosing us. Has been implementing its brand and design concept “BE COOL BE FREE", GTPLAYER is dedicated to enriching gaming and shopping experience for customers. For safe use, please read this manual before installation, and keep it for after use. Please feel free to email us if you have any concerns about our products. We‛ll reply within 24 hours. The following are the things you need to pay attention to so that we can provide you with services when you encounter problems during the installation and use of the product: • When the product is damaged due to courier problems, please contact our customer service in time for verifcation. • We will rectify the issue as soon as possible; • We give a 365-day quality assurance; We offer product explanations, installation instructions, product maintenance and maintenance methods. If you feel satisfied with our product and service, •...
Need help?
Do you have a question about the GTPLAYER GTS228-BLK-140 and is the answer not in the manual?
Questions and answers