
Related Manuals for Kaixin W3

Summary of Contents for Kaixin W3
- Page 1 KAIXIN B Mode Ultrasonic Diagnostic Instruments (Vet) User’s Manual Xuzhou Kaixin Electronic Instrument Co., Ltd.
- Page 2 Contents Introduction ................................ I Statement ................................I Warranty and repair service ..........................I Manufacturer’s Information ..........................I 1 Product Overview ............................1 1.1 Introduction ..............................1 1.2 Introduction of main unit ..........................1 2 Product Specifications ........................... 2 2.1 Power supply ..............................2 2.2 Operation environment ..........................2 2.3 Storage and Transportation ...........................2 2.4 Dimensions and weight ..........................2...
- Page 3 Kaixin was considered responsible for the safety, reliability and performance in case of meeting all the following requirements: All repairs are all performed by professionals recognized by Kaixin; all replacement parts and accessories, consumables involved repairs are Kaixin company. Warranty and repair service Purchased the product warranty, sees the company's service policies.
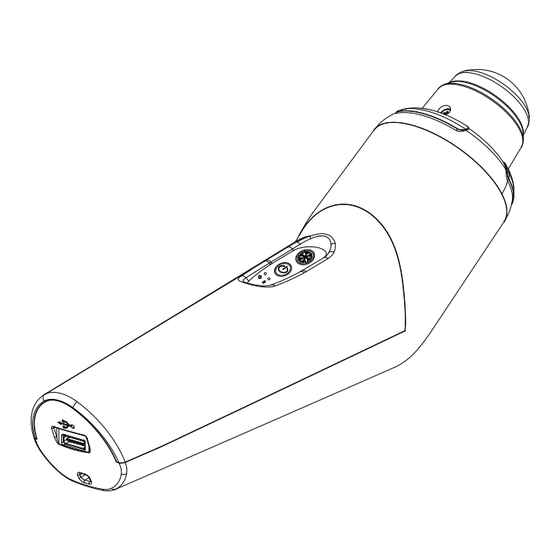
- Page 4 1 Product Overview 1.1 Introduction W3 B Mode Ultrasonic Diagnostic Instruments (Vet) are composed of main unit, ultrasound APP and mobile terminal. Equipped with a 3.5MHz mechanical sector probe, it is connected to a tablet or smartphone with an ultrasound APP via WiFi to form an ultrasound diagnostic instrument for ultrasound examination.
- Page 5 2 Product Specifications 2.1 Power supply Power supply input: 100V-240V~, 50Hz/60Hz Main unit power input: DC5.0V 3.0A Internal supply voltage: DC3.6V-4.2V 2.2 Operation environment Ambient temperature: 10℃-40℃ Relative humidity: 30%-75% (without condensation) Atmospheric pressure: 700hPa-1060hPa 2.3 Storage and Transportation 2.3.1 Storage and transportation environment Ambient temperature: -20℃-55℃...
- Page 6 3 System Configuration 3.1 Standard configuration Main unit 1 unit Ultrasound APP software 1 PC cable 1 PC Data Phone wristband 1 PC Lanyard 1 PC...
- Page 7 Warning: 1. When the instrument works abnormally, do stop working, turn off the power and check the reason, then contacts the Kaixin company about it. 2. Turn off power after ultrasonic diagnostic operation. 4.1 Place the instrument Please carefully read through and fully understand the safety cautions before moving and placing the instrument.
- Page 8 3. If the charger is wet, soaked or severe moisture, please stops using and contact the Kaixin or agents. 4. Do not use the instrument while charging, may cause a safety risk. 5. Use unapproved or incompatible power supply, charger or battery, which may cause...
- Page 9 APP” is suitable for Android phones or Pad. W3 APP supports landscape or portrait display. All the icons on the APP may be different due to the display screen of the phone or Pad; the display interface may be slightly different, the actual products shall govern.
- Page 10 3. In the available WLAN list, select W3 network ID, such as “W36666667”, connect to it; 4. After connected successfully, tap the W3 APP icon “ ” to enter the ultrasound interface, prompt “The initialization data ends!”, the wireless signal icon “...
- Page 11 6 Functional Operation 6.1 Power on/off Power on: Hold down the power switch for 3-5 seconds, and release the switch when the power supply indicator light is on; Power off: Hold down the power switch and release the switch when the power supply indicator light is off.
- Page 12 6.2.4 Set the probe protect time 1. In the Setting dialog box, tap the probe protect time input box and input the probe protection time, the probe protection time can be set within “0 ~ 99” " minutes; 2. Click Cancel, exit the Setting dialog box; 3.
- Page 13 6.5.2 Near field gain adjustment In real-time state, click the arrow on either side of the “Near” key to adjust the near field gain of the image. Click the right arrow to increase the near field gain; click the left arrow to decrease the near field gain, so as to control the near field gain.
- Page 14 4. Click Save Image or Save Video, the screen appears “Save Success” prompt. Note: 1. The saved images/videos are stored in the folder of the phone or pad by default. 2. View or delete path: Files/Phone/Android/data/com.kx.w3 folder. 6.8 Play back and Measurement Play back ...
- Page 15 4. If you want to modify the contents during the note, move the cursor “ | ” to the character need to be modified, delete the character or re-enter it; 5. Click “Note” key again to complete the note entry; 6.
- Page 16 7 Measurement 7.1 General measurement In the frozen state, click “Meas” key to pop up measurement menu, showing three measurement methods Distance, Ellipse or Punctuation. Click the different measurement methods to enter the corresponding measurement interface, as shown below: Attention: The accuracy of software measurement: distance measurement ≤...
- Page 17 7.1.2 Ellipse measurement Function: measure the volume of the subject. 2-Axis method only needs to measure the vertical section of the subject. Formula of 2-axis method: (π/6) * A * B Where, A is the major axis of the ellipse; B is the minor axis of the ellipse. Operation steps: 1.
- Page 18 2. Measure fat thickness. Slide the green mark “ ” with your finger to the endpoint, now the mark can only move vertically, the fat thickness value is displaying on the right side of the screen in real-time, tap the Confirm key , the fat thickness value is displayed on the right side of the screen;...
- Page 19 8 System Maintenance The system maintenance should be performed by the user. Users shall be in full charge of maintenance and operation of the system after purchasing the product. Please check the status of the machine regularly and perform a preventive check for the system. Warning : The following maintenance must not be performed when inspecting.
- Page 20 1. Only use battery provided by KaiXin company. 2. Do not remove the built-in rechargeable battery to avoid damage to the battery or the instrument. The battery should be replaced only by Kaixin company authorized service personnel. 8.2.2 The maintenance for the rechargeable battery 1.
- Page 21 To ensure normal operation, users are recommended to prepare a proper maintenance plan. If the following problems occur after turned on the instrument, try to make corrections following the methods in the table. If the problem remains unsolved, please contact Kaixin company for support.
- Page 22 Troubles Correction Power supply indicator does not 1. Check power supply. light when powering on the 2. Check whether the instrument is powered on. machine. 1. Check whether the instrument is connected to the Character and gray scale are WLAN. displayed, but no ultrasonic image 2.
- Page 23 KAIXIN ELECTRONIC XUZHOU KAIXIN ELECTRONIC INSTRUMENT CO., LTD. Kaixin Mansion, C-01, Economic Development Zone, Xuzhou, Jiangsu, China Zip Code: 221004 Tel: +86-516-87732932/87733758 Fax: +86-516-87732932/87792848 Website: http://www.kxele.com E-mail: info@kxele.com Information contained in this manual is subject to change without further notice.
Need help?
Do you have a question about the W3 and is the answer not in the manual?
Questions and answers