Advertisement
Quick Links
Advertisement

Related Manuals for VPixx Technologies SOUNDPixx


Summary of Contents for VPixx Technologies SOUNDPixx
- Page 1 SOUNDPixx (VPX-ACC-8100) User Manual Version 2.0 Vision Science Solutions www.vpixx.com...
- Page 2 SOUNDPixx User Manual IMPORTANT VPixx Technologies Inc. reserves the right to modify or otherwise update this document without notice as required by a constantly evolving marketplace, client requests or to adapt to new progress or constraints in engineering or manufacturing technology. The information contained in this document may change without prior notice.
- Page 3 Bass and treble control ..............................17 AUX1, AUX2 and AUX3 selector ............................. 17 Mixing / Pager switch ..............................18 Control room output ..............................18 Maintenance ..................................19 Cleaning the SOUNDPixx..............................19 Warranty .................................... 20 Copyright © 2018 VPixx Technologies Inc. All Rights Reserved...
- Page 4 FIGURE 10 MRI COIL HEADSETS / MAIN TUBING HEADSETS INTERFACE ..................... 15 FIGURE 11 SOUNDPIXX AMPLIFIER ..............................15 FIGURE 12 SOUNDPIXX AMPLIFIER FRONT PANEL CONTROLS ......................17 FIGURE 13 SOUNDPIXX AMPLIFIER REAR PANEL CONNECTORS AND SWITCH ..................18 Table of Tables TABLE 1 MR ROOM SAFETY SYMBOLS ..............................4 TABLE 2 INCLUDED HARDWARE ................................
- Page 5 For technical questions or product support information, do not hesitate to contact the VPixx support team by phone or by sending an E-mail to support@vpixx.com. By creating your MyVPixx account on the VPixx Technologies website, you will have access to additional product documentation, demos, source code examples and the latest firmware and software drivers.
- Page 6 SOUNDPixx User Manual Product overview The SOUNDPixx is a complete MRI audio system that includes everything you need to get the benefits of MRI-compatible audio entertainment, while also allowing you to perform cross-modal research when used with our PROPixx or our DATAPixx system. The system will give you microsecond-precise audio stimulation when driven by VPixx hardware.
- Page 7 Included hardware Immediately after receiving your SOUNDPixx system, verify that no components are missing. Consult the following table: Table 2 Included hardware MR room safety Item Name Quantity Symbol Amplifier Power supply (for amplifier) Power cord 10-foot Molded 3.5mm Male to 2 x RCA Male...
- Page 8 SOUNDPixx User Manual Transducer* Transducer pneumatic tubing (12-foot) MRI coil headset Replacement plugs 260 pairs MRI headset Industrial Velcro (*): Conditionally MR safe, but refer to installation procedure The transducer contains a finite amount of magnetic material and should be kept 3ft away from the magnet’s...
- Page 9 General specifications The SOUNDPixx stereo system kit allows you to stimulate a subject with precise audio waveforms. The system’s MRI- compatible transducer has been designed to be introduced into an MRI environment without adversely affecting test data while the system’s amplifier, which is NOT MRI-safe, is installed and manipulated from the operator control room.
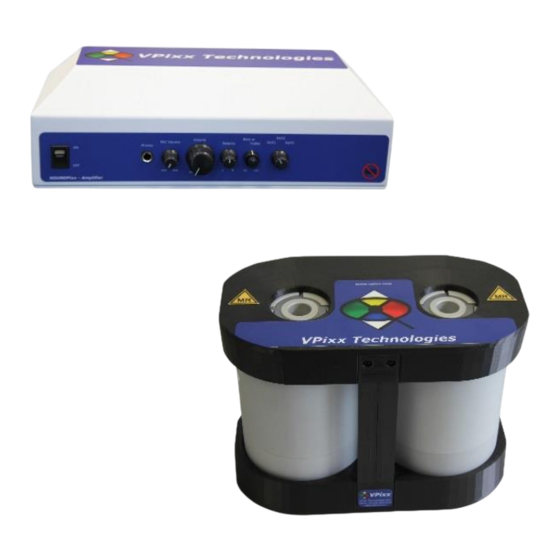
- Page 10 Frequency response: 20 Hz to 20 kHz Figure 2 Transducer The SOUNDPixx transducer also includes MRI coil headsets that provide 30 dB NRR tested to ANSI standards, available in standard and mini sizes to accommodate all ear shapes and sizes, including those of children.
- Page 11 SOUNDPixx Amplifier rear panel information The following figure shows the rear panel of the SOUNDPixx amplifier. Figure 4 Amplifier rear panel Table 3 Amplifier rear panel information Connector Type description Pager / Mixing mode switch Switch Put switch in Mixing position to mix the selected AUX volume and MIC volume equally.
- Page 12 Install the SOUNDPixx transducer on the floor, near the front area of the magnet and 3ft away from the magnet’s bore. Place it in a location where it will not pose a trip hazard when the operator attends to the subject, and keep in mind that the 12-foot air tubing must reach the subject inside the magnet.
- Page 13 Figure 6 RFI filtered BNC connector inserts As illustrated on the figure 8, two 75-foot coax cables run from the SOUNDPixx amplifier to the RF penetration panel connected to the RFI filtered BNC. Inside the Magnet Room, two 30-foot coax cables come from the opposite RFI filtered BNC connectors and travel along the wall (possibly hidden in a wireway/trough) to the SOUNDPixx transducer installed securely on the floor.
- Page 14 SOUNDPixx User Manual RF penetration panel 30-ft Coax cable (2x) SOUNDPixx Transducer 75-ft Coax cable (2x) SOUNDPixx Amplifier Figure 8 Typical SOUNDPixx setup...
- Page 15 Tubing installation With the transducer securely installed, connect the stereo tubing to the LEFT and RIGHT transducer outlets. Figure 9 Left and right transducer outlets Copyright © 2018 VPixx Technologies Inc. All Rights Reserved...
- Page 16 Figure 11 SOUNDPixx amplifier To get the SOUNDPixx amplifier ready for use, follow this procedure: 1. Connect the SOUNDPixx amplifier power cable to the wall outlet and connect the power jack to the amplifier’s DC IN +12V port.
- Page 17 2. Connect the microphone to the MIC interface. 3. Connect the control room speaker to the Control Room output. 4. Connect your audio source/generator to an AUX input using the adapter cable supplied with your SOUNDPixx system. 5. Connect the BNC cable to the transducer interface.
- Page 18 SOUNDPixx User Manual Using your SOUNDPixx Figure 12 SOUNDPixx amplifier front panel controls The Phones jack accepts headphones using a 1/4” plug. MIC volume control This control allows you to adjust the volume of the connected microphone. This control only affects the volume heard by the subject.
- Page 19 Figure 13 SOUNDPixx amplifier rear panel connectors and switch Mixing / Pager switch When you need to speak to a subject wearing the MRI coil headsets, the Mixing / Pager switch allows you to lower the ambient music/AUX volume while maintaining the MIC volume constant. This allows your voice to drown out the ambient music/AUX audio and ensures that the subject hears your directives clearly.
- Page 20 SOUNDPixx User Manual Maintenance Cleaning the SOUNDPixx Clean the surface of your SOUNDPixx components as required and depending on usage. Do not use cleaners that contain any petroleum-based materials such as benzene, thinner, or any volatile substance to clean the SOUNDPixx.
- Page 21 Warranty The SOUNDPixx is warranted against manufacturing defects in materials and workmanship for two years for parts and labor from the date of purchase. Copyright © 2018 VPixx Technologies Inc. All Rights Reserved...
- Page 22 VPixx Technologies Inc. 630 Clairevue West suite 301 Saint-Bruno, Qc Canada, J3V 6B4 TEL: (514) 328-7499 FAX: (450) 300-7499 TOLL FREE: (844) 488-7499 (USA/CANADA) EMAIL: sales@VPixx.com...
Need help?
Do you have a question about the SOUNDPixx and is the answer not in the manual?
Questions and answers