Advertisement
Available languages
Available languages
Quick Links
Advertisement

Related Manuals for Sinaopus DSV108

Summary of Contents for Sinaopus DSV108
- Page 1 DSV108 Benutzerhandbuch SINAOPUS...
- Page 2 Katalog Sicherheitshinweise ..............02 Produkte ................... 04 Einbau des Produkts ............... 08 Verwendung des Produkts ............12 Wartung und Pflege ..............14 Grundlegende Parameter ............17 Fehlersuche ................18 Warnung ................... 20...
- Page 3 Sicherheitshinweise Um Stromschläge, Brände und andere Verletzungen durch unsachge- mäßen Gebrauch zu vermeiden, lesen Sie bitte die Gebrauchsanweisung vor der Benutzung sorgfältig durch. Dieses Produkt darf nicht von körperlich, sensorisch oder geistig behinderten Personen, älteren Menschen und Kindern benutzt werden. Kinder dürfen das Gerät nicht bedienen oder als Spielzeug benutzen, und es ist besondere Vorsicht geboten, wenn das Gerät in der Nähe von Kindern benutzt wird;...
- Page 4 Verwenden Sie den Staubsauger nicht zur Reinigung von Kalk, Ze- ment, Kohlepulver usw. Atmen Sie keine rauchenden oder brennenden Ma- terialien ein. Verwenden Sie nur das Original-Ladegerät, bitte verwenden Sie keine inoffiziellen Adapter, da sonst das Produkt beschädigt wird; bitte ziehen Sie den Stecker des Ladegeräts, nachdem es vollständig aufgeladen ist, um die Lebensdauer des Akkus nicht zu verkürzen und die Leistung zu verrin- gern;...
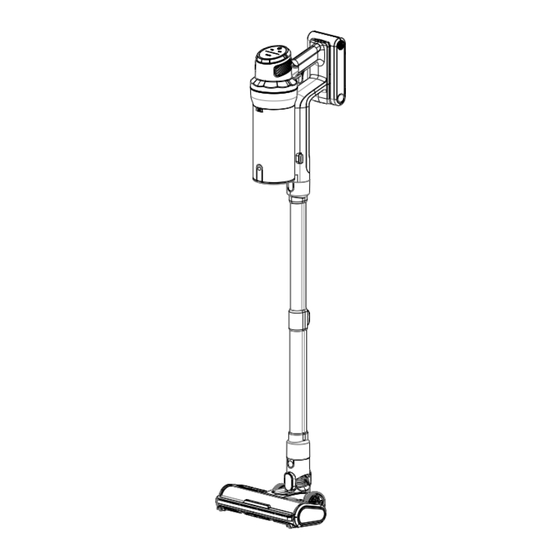
- Page 5 Produkte Liste des Zubehörs Teleskoprohr Montage Elektrische Bodenbürste lange Düse 2 in 1 Bürste Adapter Wandbehang (mit Schrauben*3, Dehnungsrohr*3)
- Page 6 Teil Name 1. elektrische Bodenbürste 2. elektrische Bodenbürstenverriegelung 3. Montage des Aluminiumrohrs 4. Aluminiumrohrverriegelung 5. untere Abdeckung des Staubbechers 6 die Verriegelung der Staubentleerung 7. der Staubbehälter 8. die Ladeöffnung 9. das Display 10. der Luftauslass 11.Akku-Baugruppe 12.Akku-Entriegelungstaste 13.Netzschalter 14.Staubbecher-Entriegelungstaste...
- Page 7 Anzeigen : 3. Batterieanzeigeleuchte 4.Drehzahlanzeigeleuchte 2.Bodenbür- 5.Verstop- stenblockade-An- fungsanze-ige- zeigelampe leuchte 1.Touch-Drehzahlregler 1. Drücken Sie die Getriebetaste: nachdem Sie den Schalter der Hauptma- schine der Zahnstange gedrückt haben, startet die Hauptmaschine im nied- rigen Gang; berühren Sie die Geschwindigkeitstaste, um abwechselnd in den Zyklus von mittlerer bis niedrige Stufe zu wechseln.
- Page 8 angezeigt. Die Leistung ist niedriger als 50%, um zwei Zellen von Strom zu zeigen, ist die Leistung niedriger als 10%, gibt es einen Verlust der Macht zu leuchten die rote Warnleuchte und wurde rot blinkend, die Not- wendigkeit zu laden. 4.
- Page 9 8. Die Blockier leuchte ist rot; nachdem der Luftkanal blockiert ist, leuch- tet die Warnleuchte für die Blockierung des Luftkanals auf, blinkt 10 Mal und erlischt dann; und die Hauptmaschine stoppt. Schalten Sie die Ma- schine nach der Reinigung des Luftkanals wieder ein, um die Funktion wiederherzustellen.
- Page 10 Installation des Zubehörs Stecken Sie die Aluminiumrohrverriegelung in die Ansaugöffnung des Hauptgeräts, um sie zu befestigen. Stecken Sie die Verriegelung der Bodenbürste in die Öffnung des Aluminiumrohrs, um sie zu befestigen.
- Page 11 Stecken Sie den Sofasauger in den Sauganschluss der Haupteinheit und fixieren Sie ihn. Drücken Sie die Bürstenkopfverriegelung, schieben Sie den Bürstenkopf hin und her, je nach der Verwendung der Umwelt kann auf die Borste und flache Saug zwei Ar- beitsbedingungen eingestellt werden Stecken Sie den Flachsauger in die Saugöffnung des Hauptkörpers und schließen Sie ihn ab, so dass er in der engen Öffnung verwendet werden kann.
- Page 12 Installation des Hängers Der Standort des Hängers sollte an einem kühlen und trockenen Ort mit Stromanschluss in der Nähe gewählt werden, und stellen Sie sicher, dass sich keine Einrichtungen wie elektrische Leitungen oder Pipelines di- rekt hinter dem Installationsbereich befinden. 1.entsprechend der Länge des gesamten Geräts (Host + Aluminiumrohr- montage + Bodenbürste), wählen Sie die geeignete Höhe und kreisen Sie die drei Schraubenlöcher gemäß...
- Page 13 Verwendung des Produkts Lagerung und Aufladung 1. Schieben Sie die Haupteinheit von der Mitte aus in den Schlitz der Halterung. 2. Schieben Sie den Flachsauger und den Sofasauger von unten in den Schlitz der Hal- terung. 2 Die Haupteinheit wird in den Schlitz des Racks gestellt und kann direkt durch Einstecken des Ladegeräts aufgeladen werden.
- Page 14 3. Entfernen Sie den Akku und laden Sie ihn separat auf Rotes Licht blinkt beim Laden, grü- nes Licht leuchtet immer, wenn es vollständig geladen ist...
- Page 15 Wartung und Pflege Hinweise 1.Achten Sie darauf, dass Sie nur Originalteile verwenden, da andernfalls keine Garantieleistungen erbracht werden können. 2.Bitte laden Sie den Akku bei den ersten beiden Verwendungen des neuen Produkts 5 Stunden lang auf. Zweck: um die interne Aktivität des Akkus vollständig zu aktivieren.
- Page 16 Taste zur Staubentfernung Bild 1 2.Der Staubbecher kann zum Reinigen durch Drücken der Entriege- lungstaste für den Staubbecher von der Entriegelung gelöst werden. Wie in Abbildung 2 dargestellt. Entriegelungstaste für die Staubtasse Bild 2...
- Page 17 3.Fassen Sie den Tragegriff des Luftansaugfilters an, um den Luftansaug- filter zu entfernen, und legen Sie ihn zum Trocknen unter den Wasserhahn, wie in Abbildung 3 dargestellt. Filterung der Einlassluft Bild 3 4.Drücken Sie, wie in Abbildung 4 dargestellt, die Rippen des Lufteinlass- gitters zusammen, um das Lufteinlassgitter zum Reinigen abzunehmen, und wischen Sie den Staubbehälter mit einem ausgewrungenen feuchten Lappen ab.
- Page 18 Grundlegende Parameter Hosts Produktmodell DSV108 Ladespannung Leistung 380W Nennspannung 25.9V Ladezeit Ca. 5h Batteriekapazität 2200mAH Rauschen ≤76dB Staubabsaugung Ca.0.8L Der Betrieb mit hoher Arbeitsgeschwindigkeit dauert Laufzeit etwa 10-15 Minuten, der Betrieb mit niedriger Arbeitsge- schwindigkeit etwa 40-45 Minuten.
- Page 19 Fehlerbehebung Bildzeichen gemeinsame Probleme mögliche Gründe Lösung Das Produkt ist defekt o- Bitte laden Sie das Produkt der nicht ausreichend auf- vor dem Gebrauch voll- geladen. ständig auf. Die Maschine funktio- Reinigen Sie die Staubab- niert nicht. Automatischer Schutz, saugung oder den Luftein- ausgelöst durch hohe Tem- lassfilter und starten Sie peraturen aufgrund von...
- Page 20 1. Kurzschluss der Er- 1. der Ersatz von Boden- dungsbürste bürsten Batteriestandsymbol 2. ein Kurzschluss im 2. Auswechseln der Alu- blinkt Aluminiumrohr miniumrohre ein Kurzschluss im 3. den Austausch des Hauptmotor Hauptmotors Schließen Sie das Ladege- rotes Licht blinkt Batterie schwach rät an, um den Akku zu la- 1.
- Page 21 Warnung: 1. bevor die Maschine verschrottet wird, sollte der Akku entfernt werden 2.Wenn Sie den Akku entfernen müssen, sollte das Gerät ausgeschaltet sein. 3.Der Akku enthält umweltschädliches Lithium. Um die Umwelt zu schüt- zen, sollten die ausrangierten Akkus sortiert und recycelt werden und nicht in den Müll geworfen werden.
- Page 22 DSV108 Use Manual SINAOPUS...
- Page 23 Catalogs Safety Instructions ········································· 02 Product Introduction ······································ 04 Product Installation ········································ 08 Product Use ·················································· 12 Maintenance ················································· 14 Basic Parameters ············································· 17 Troubleshooting ············································· 18 Warning ······················································ 20...
- Page 24 Safety Instructions In order to avoid electric shock, fire and other accidental injuries caused by improper use, please read the instruction manual carefully before use. This product may not be used by physically, sensually or intellectually disabled persons and the elderly, children. Children are prohibited from operating the product or using it as a toy, and close attention is required when using the product near children;...
- Page 25 reduce the performance; do not disassemble and replace the battery by yourself; do not place the battery in the fire, so as not to cause an explosion. Do not place the vacuum cleaner against unstable surfaces such as chairs, dining tables, etc. to prevent damage to the product or injury to the user after falling;...
- Page 26 Product Introduction List of accessories Telescopic Tube Assembly Electric floor brush long nozzle 2 in 1 brush adapter Wall hanging (with screws*3, expansion tube*3)
- Page 27 Part Name 1. Motorized floor brush 2. Motorized floor brush release button 3. Telescopic tube assembly 4. Telescopic tube release button 5. Dust cup bottom cover 6.Dust pouring button 7. Dust cup 8. Charging hole 9. Display screen 10. Air outlet 11.Battery pack assembly 12.
- Page 28 Screen display 3.White indicator for power level 4. RPM white indicator 2.Ground Brush 5.Clogged Hole Plugging Indicator Indicator 1.Touch the speed control button 1. Touch the gear button: after pressing the switch of the main frame, the mainframe will start in low gear; touch the speed button to switch to me- dium-grade-low-grade cycle in turn.
- Page 29 than 10%, the red warning light will light up and keep flashing red, prompting the need for charging. 4. RPM white indicator is white with three speeds; the default speed is low at startup. 5. Clogged Hole Indicator light is red; after the air duct is blocked, the air duct plugging warning light will light up and blink 10 times and then go out;...
- Page 30 Product Installation Mainframe Installation Product Installation Mainframe Installation Product Installation Mainframe Installation Battery pack installation, slide forward in the direction of the arrow, both sides of the latch buckle on the frame Insert the front of the rack into the dust cup assembly slot and rotate the dust cup to snap onto the frame locking clips Press in the direction of the arrow and pull back...
- Page 31 Accessory Installation Insert the aluminum tube lock into the main unit's suction port to lock Insert the floor brush lock button into the aluminum tube opening to lock it in place.
- Page 32 Insert the sofa suction into the main unit suction port and lock it in place. Press the brush head latch, slide the brush head back and forth, according to the use of the environment can be adjusted to the bristle and flat suction two working conditions Insert the flat suction into the suc- tion port of the main body and...
- Page 33 Hanger Installation The location of the hanger should be chosen in a cool and dry place with power supply nearby, and make sure that there are no facilities such as electric wires or pipes directly behind the installation area. 1. According to the length of the whole machine (host + aluminum tube assembly + floor brush), choose the right height and circle the three screw hole positions according to the drawing.
- Page 34 Product Use Storage and Charging 3. Slide the main unit into the slot of the rack from the middle position. 4. Snap the flat suction and sofa suction from the bot- tom into the bracket slot. The main unit is placed in the slot of the rack and can be charged directly by plugging in the charger.
- Page 35 3. Batteries are removed and charged separately Red light blinks when charging, green light always on when fully charged...
- Page 36 Maintenance caveat 1.Be sure to use original parts, otherwise the warranty may not be available. 2.Please charge the new product for 5 hours for the first two uses. Purpose: to fully activate the internal activity of the battery. 3.After the battery pack voltage drops, the charging and discharging indi- cator light and the battery pack indicator light on the front of the power switch flash at the same time, indicating that the battery is low and needs to be recharged.
- Page 37 Cleaning dust cups, filters and cyclone assemblies 1. Press the dust dumping button to open the bottom lid of the dust cup and dump the dust into the dust cup. (See figure 1) Dust pouring button Figure 1 2.Push the dust emptying button to pour out the dust. (See figure 2) Dust cup release button Figure 2...
- Page 38 3. Grab the air intake filter carrying handle to remove the air intake filter can be washed under the faucet to dry and set aside as shown in Figure 3. Inlet air filtra- tion Figure 3 4. As shown in Figure 4, pinch the air inlet grill bars to remove the air inlet grill for cleaning, and wipe the dust cup with a wrung out wet rag.
- Page 39 Basic parameters Hosts Product Model DSV108 Charging Voltage Rating 380W Rated Voltage 25.9V Charge Time Approx.5h Battery Capacity 2200mAH Noise ≤76dB Dust Collection Approx.0.8L Running Time Approx. 15 minutes for high end, 45minutes for low end...
- Page 40 Troubleshooting illustrations common break- possible causes cure down The product is dead or under- Please fully charge the product before use. charged. The machine does Clean the dust extraction port or the air in- Automatic protection triggered not work. take filter and restart it after it has cooled by high temperatures due to down.
- Page 41 Plug in the charger to charge the bat- red light blinking Low battery tery pack 3. Clean the hair on top of the roller brush and turn it on again red light blinking floor Brush Plugging 4. Replace the floor brush with a new one 2.
- Page 42 Warning: 1. Before the machine is scrapped, the battery pack should be removed 2. When you need to remove the battery pack, the machine should be in a power-off state. 3. The battery pack contains lithium which is harmful to the environment, in order to protect the environment, the discarded battery packs should be sorted and recycled, and should be disposed of safely instead of being thrown into the rubbish bin...
Need help?
Do you have a question about the DSV108 and is the answer not in the manual?
Questions and answers