Table of Contents
Advertisement
Available languages
Available languages
Quick Links
Advertisement
Table of Contents

Related Manuals for Sinaopus DSV808

Summary of Contents for Sinaopus DSV808
- Page 1 DSV808 Benutzerhandbuch SINAOPUS...
-
Page 2: Table Of Contents
Kataloge Sicherheitshinweise --------------------------------------- S.02 Produkteinführung -------------------------------------- S.04 Installation des Produkts -------------------------------- S.07 Verwendung des Produkts ------------------------------ S.14 Grundlegende Parameter ------------------------------- S.17 Fehlerbehebung ------------------------------------------ S.18 Warnung ---------------------------------------------------- S.19... -
Page 3: Sicherheitshinweise
Sicherheitshinweise Um Stromschläge, Brände und andere Verletzungen durch unsach- gemäßen Gebrauch zu vermeiden, lesen Sie bitte den Gebrauch Anweisung vor der Benutzung sorgfältig durch. Dieses Produkt darf nicht von körperlich, sensorisch oder geistig be- hinderten Personen, älteren Menschen und Kindern benutzt werden. Kinder dürfen das Gerät nicht bedienen oder als Spielzeug benutzen, und es ist besondere Vorsicht geboten, wenn das Gerät in der Nähe von Kindern benutzt wird;... - Page 4 ment, Kohlepulver usw. Atmen Sie keine rauchenden oder brennenden Materialien ein. Verwenden Sie nur das Original-Ladegerät, bitte verwenden Sie keine inoffiziellen Adapter, da sonst das Produkt beschädigt wird; bitte ziehen Sie den Stecker des Ladegeräts, nachdem es vollständig aufgeladen ist, um die Lebensdauer des Akkus nicht zu verkürzen und die Leistung zu verringern;...
-
Page 5: Produkteinführung
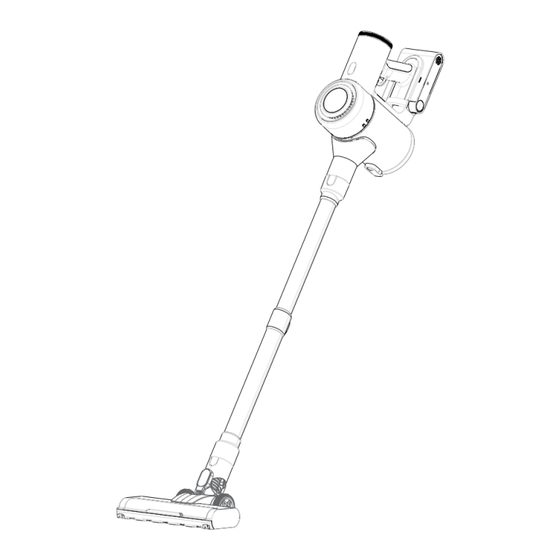
Produkt-Einführung Liste des Zubehörs Teleskoprohr Montage Elektrische Bodenbürste lange Düse 2 in 1 Bürste Adapter Wandbehang (mit Schrauben*3, Dehnungsrohr*3) kleine Bürste (mit Blatt) - Page 6 Teil Name 8 Anzeigebildschirm 9 Ein/Aus-Schalter 10 Montage des Akkupacks 1 Motorisierte Bodenbürste 11 Auflade Öffnung 2 Motorisierte Auslösetaste für die Bo- 12Entriegelungstaste für das Akkupaket denbürste 13 Staubbecher 3 Teleskopische Rohranordnung 14 Bodenabdeckung der Staubschale 4 Entriegelungstaste für das Teleskoprohr 15 Taste zum Ausgießen des Staubes 5 Luftauslass 16.Taste zur Einstellung der Teleskop-...
- Page 7 Bildschirmanzeige: 1.Symbol für die Blockierung der Bodenbürste: Das rote Licht blinkt, nachdem die Walzenbürste blockiert und angehalten wurde, die Boden- bürste hört auf zu arbeiten und der Hauptmotor stoppt nicht. 2. Gangsymbol, manueller Modus 1-6 Gänge leuchten blau. 3. weißes LOGO-Licht 4.
-
Page 8: Installation Des Produkts
Installation des Produkts Mainframe-Installation 1. Ein- und Ausbau des Akkupacks Ausbau: Drücken Sie die Verriegelung des Akkupacks nach unten und ziehen Sie den Akku nach hinten heraus. Einbau: Nach vorne in den Schlitz schieben und einrasten lassen, um ihn zu fixieren... - Page 9 2. Montage und Demontage der Staubschutzhaube Einbau der Staubschutzhaube: 2. Der An- schlussstift der Staubschutzhaube wird in den Schlitz des Gehäuses eingeführt und die Verriegelung sicher geschlossen. Einbau der Staubschutzhaube: 1. Der Kartenfuß der Staubschutzhaube wird in den Schlitz der vorderen Rackabdeckung eingesetzt.
- Page 10 Stecken Sie den Riegel der Bodenbürste zur Ver- riegelung in die Öffnung des Aluminiumrohrs Stecken Sie den Sofasauger in den Sauganschluss der Haupteinheit und verriegeln Sie ihn. Drücken Sie die Bürsten- kopfverriegelung, schieben Sie den Bürstenkopf hin und her, je nach der Verwendung der Umwelt kann auf die Borste und flache Saug zwei Arbeitsbedingungen einge-...
- Page 11 Stecken Sie den Flachsauger in die Saugöffnung des Hauptkörpers und ver- riegeln Sie ihn, so dass er in der engen Öff- nung verwendet wer- den kann. Montage der Hänger Der Standort des Hängers sollte an einem kühlen und trockenen Ort mit Stromanschluss in der Nähe gewählt werden, und stellen Sie sicher, dass sich keine Einrichtungen wie Stromleitungen oder Rohre direkt hinter dem Installationsbereich befinden.
- Page 12 3. In den Aufhängern mit drei Schrauben fixieren. Stecken Sie das Dehnungsrohr in das Loch und befestigen Sie die Wandaufhängung mit 3 Schrauben an der Wand.
- Page 13 Lagerung und Aufladung 1. Schieben Sie das Hauptgerät von der mittle- ren Position aus in den Schlitz des Racks. 2. Lassen Sie den Flachsauger und den Sofa- sauger von unten in den Schlitz der Halterung einrasten. Die Haupteinheit wird in den Schlitz des Racks gestellt und kann direkt durch Einstecken des Ladegeräts aufgeladen wer-...
- Page 14 Anzeige für den Ladevorgang Ladeöffnung, Akkupack kann zum Laden separat entnommen werden...
-
Page 15: Verwendung Des Produkts
Verwendung des Produkts 1. Drücken Sie die Einschalttaste, die Maschine schaltet in den nied- rigen Gang. 2. Gangeinstellung, drehen Sie den Knopf im oder gegen den Uhr- zeigersinn, um den Gang einzustellen, 6 aufeinanderfolgende Gänge, um die Saugleistung zu ändern. Wartung Hinweis 1.Stellen Sie sicher, dass Sie nur Originalteile verwenden, da sonst... - Page 16 Bereinigung des Mainframes Wischen Sie das Hauptgerät mit einem weichen, trockenen Tuch ab. Reinigung von Staubbechern, Filtern und Zyklonanlagen 1. Drücken Sie die Staubkipptaste, um den unteren Deckel des Staubbehälters zu öffnen und den Staub in den Staubbehälter zu entleeren. Drücken Sie die Staubent- leerungstaste, um den Staub auszuschütten.
- Page 17 Halten Sie das Ende des Stahlgitterrahmens fest und drehen Sie es im Uhrzeiger- sinn bis zum Anschlag, neh- men Sie den Stahlgitterrah- men heraus, spülen Sie ihn mit klarem Wasser ab und trocknen Sie ihn, bevor Sie ihn wiedereinsetzen. Halten Sie die Motorbaugruppe und drehen Sie sie gegen den Uhr- zeigersinn bis zum Anschlag.
-
Page 18: Grundlegende Parameter
Aufnahme und Platzierung der Rollenbürste Nachdem Sie den Riegel zum Entrie- geln gedrückt haben, nehmen Sie den Walzenbürstenkörper heraus, um die Haare zu entfernen. Grundlegende Parameter Hosts Produktmodell DSV808 Ladespannung Leistung 380W Nennspannung 25.9V Ladezeit 4.5-5.5h Batteriekapazität 2200mAH Rauschen ≤76dB Staubabsaugung 0.8L... -
Page 19: Fehlerbehebung
Fehlerbehebung gemeinsame Aufteilung mögliche Gründe Lösung Das Produkt ist defekt oder nicht Bitte laden Sie das Produkt vor dem ausreichend aufgeladen. Gebrauch vollständig auf. Reinigen Sie die Staubabsaugung Die Maschine funktioniert nicht. Automatischer Schutz, ausgelöst oder den Ansaugfilter und nehmen durch hohe Temperaturen aufgrund Sie das Gerät nach dem Abkühlen von Verstopfung. -
Page 20: Warnung
Die Akkuanzeige blinkt langsam 30 Bodenbürste Mal aus, die Betriebsanzeige 1 rot Ersetzen durch eine neue Boden- kurz und die Anzeige 1-4 grün blinken bürste abwechselnd 30 Mal aus. Die Batterieanzeige blinkt schnell, Falsches Ladegerät vom Stromnetz getrennt, die Batterieanzeige 1.4 grün blinkt Lademodus Ladegerät um den Blinkstatus zu deaktivieren,... - Page 21 DSV808 Use Manual SINAOPUS...
- Page 22 Catalogs Safety Instructions --------------------------------------------- P.02 Product Introduction ------------------------------------------ P.04 Product Installation ------------------------------------------- P.07 Product Use ----------------------------------------------------- P.13 Maintenance ---------------------------------------------------- P.13 Basic Parameters ----------------------------------------------- P.16 Troubleshooting ------------------------------------------------ P.17 Warning ---------------------------------------------------------- P.18 ·...
-
Page 23: Safety Instructions
Safety Instructions In order to avoid electric shock, fire and other accidental injuries caused by improper use, please read the instruction manual carefully be- fore use. This product may not be used by physically, sensually or intellectu- ally disabled persons and the elderly, children. Children are prohibited from operating the product or using it as a toy, and close attention is required when using the product near children;... - Page 24 charger after fully charged, so as not to overcharge to shorten the battery life and reduce the performance; do not disassemble and replace the bat- tery by yourself; do not place the battery in the fire, so as not to cause an explosion.
-
Page 25: Product Introduction
Product Introduction List of accessories Telescopic Tube Assembly Electric floor brush long nozzle 2 in 1 brush adapter Wall hanging (with screws*3, expansion tube*3) small brush (with blade) ·... - Page 26 Part Name 8.Display screen 9.Power switch 1. Motorised floor brush 10.Battery pack assembly 2.Motorised floor brush release but- 11.Charging hole 12.Battery pack release button 13. 3.Telescopic tube assembly Dust cup 4. Telescopic tube release button 14.Dust cup bottom cover 5.Air outlet 15.Dust pouring button 6.Dust cup release button 16.Telescopic tube length adjust but-...
-
Page 27: Screen Display
Screen display: 1. Ground brush blocking icon: the red-light flashes after the roller brush is blocked and stopped, the ground brush stops working and the main mo- tor does not stop. 2. Gear icon, manual mode 1-6 gears light blue. 3. -
Page 28: Product Installation
Product Installation Mainframe Installation 1. Battery pack installation and removal Removal: push down the battery pack latch and pull out the battery pack assembly backwards Installation: Push forward into the slot and latch into the slot to lock it in place ·... -
Page 29: Accessory Installation
2. Dust cup installation and removal Dust cup installation: 2. The dust cup con- nector pin is inserted into the slot of the body and the latch locks securely. Dust cup installation: 1. Dust cup card foot inserted into the rack front cover slot Accessory Installation Insert the aluminium tube latch into the main unit suction... - Page 30 Insert the floor brush latch into the aluminium tube opening for locking Insert the sofa suction into the main unit suction port and lock it in place. Press the brush head latch, slide the brush head back and forth, according to the use of the environment can be adjusted to the bristle and flat suction two working...
-
Page 31: Hanger Installation
Insert the flat suction into the suction port of the main body and lock it, so that it can be used in the narrow opening. Hanger Installation The location of the hanger should be chosen in a cool and dry place with power supply nearby, and make sure that there are no facilities such as electric wires or pipes directly behind the installation area. - Page 32 Plug the expansion tube into the hole and fix the wall hang- ing to the wall with 3 screws. ·...
- Page 33 Storage and Charging 1. Slide the main unit into the slot of the rack from the middle position. 2. Snap the flat suction and sofa suction from the bottom into the bracket slot. The main unit is placed in the slot of the rack and can be charged directly by plugging in the charger.
-
Page 34: Product Use
Product Use 1. Press the switch on button, the machine defaults to low gear mode. 2. Gear adjustment, turn the knob clockwise or counterclockwise to adjust the gear, 6 consecutive gears to change the suction power. Maintenance caveat 1.Be sure to use original parts, otherwise the warranty may not be availa- ble. - Page 35 Clean up the mainframe Wipe the main unit with a soft, dry cloth. Cleaning dust cups, filters and cyclone assemblies 1. Press the dust dumping button to open the bottom lid of the dust cup and dump the dust into the dust cup. Push the dust emptying button to pour out the dust 2.
- Page 36 Hold the end of the steel mesh frame and rotate it clockwise to the stopping position, take out the steel mesh frame, rinse it with clean water and dry it before putting it on. Hold the motor assembly and turn it anti-clockwise to the stop position. Wipe the dust cup with a wrung out damp rag (the dust cup contains elec- trical parts, do not wash it directly with water).
-
Page 37: Basic Parameters
Roller Brush Pickup and Placement After pressing the latch to unlock it, take out the roller brush body to remove the hair. Basic parameters Hosts Product Model DSV808 Charging Voltage Rating 380W Rated Voltage 25.9V Charge Time 4.5-5.5h Battery Capacity... -
Page 38: Troubleshooting
Troubleshooting common breakdown possible causes cure The product is dead or undercharged. Please fully charge the product before use. Clean the dust extraction port or the air intake The machine does not work. Automatic protection triggered by high filter and restart it after it has cooled down. temperatures due to clogging. -
Page 39: Warning
Warning: 1. Before the machine is scrapped, the battery pack should be removed 2. When you need to remove the battery pack, the machine should be in a power-off state. 3. The battery pack contains lithium which is harmful to the environment, in order to protect the environment, the discarded battery packs should be sorted and recycled, and should be disposed of safely instead of being thrown into the rubbish bin...
Need help?
Do you have a question about the DSV808 and is the answer not in the manual?
Questions and answers