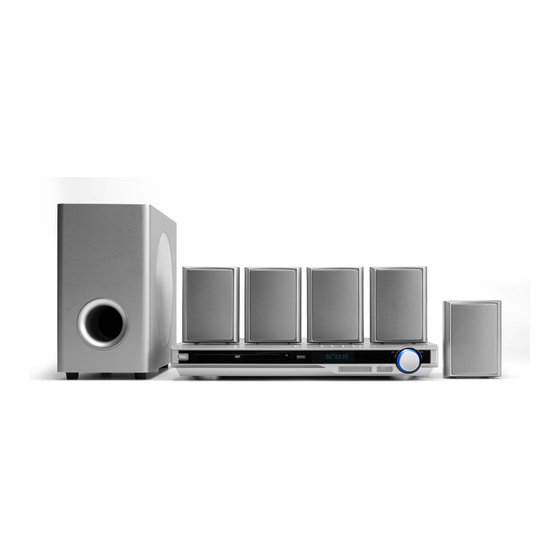
LENCO DVD-517H Instruction Manual
Hide thumbs
Also See for DVD-517H:
- Brochure (1 page) ,
- Quick manual (1 page) ,
- Instruction manual (195 pages)
Table of Contents
Advertisement
Quick Links
Advertisement
Table of Contents

Subscribe to Our Youtube Channel
Related Manuals for LENCO DVD-517H


Summary of Contents for LENCO DVD-517H
- Page 1 Instruction Manual DVD-517H...
- Page 2 RISQUE CHOC ELECTRIQUE NE AVIS PAS OUVRIR...
-
Page 5: Table Of Contents
TABLE OF CONTENTS Precaution General Steps In The Setup Menu Safety Information 1 System Setup 1.1 System Setup Table of Contents 1.1.1 Source About Your DVD Player 1.1.2 Tv System Best Location 1.1.3 Video To Obtain a Clear Picture 1.1.4 Tv Type Playable Discs 1.1.5 Password Digital Audio Output... -
Page 6: About Your Dvd Player
ABOUT YOUR DVD PLAYER The following will help you get the most enjoyment from your DVD receiver system. BEST LOCATION The unit should be placed on a firm, flat surface, away from VCRs, stereos, radios, or large speakers, as the magnetic flux from these devices may cause distortion in the sound and a poor picture. -
Page 7: Use Of Disc
USE OF DISCS This page contains valuable information regarding the handling, cleaning, and storage of discs played in this unit. Handling Do not touch the playback side of the disc. Do not attach paper or tape to discs. Do not stick or write anything on the surface. Protect against fingerprints. Always hold a disc by the center and edge portions. -
Page 8: Front And Back Panels
FRONT AND BACK PANELS Front Panel Functions 1. POWER PREV Before plugging the power cord into the AC While in the DVD status, you may press this outlet, check to make sure all of the connections button for previous track. have been properly completed. -
Page 9: Remote Control
REMOTE CONTROLLER 1. Open/Close 2. Tuner MUTE 3. DVD 4. Scroll Up TUNER SCART 5. FM Mode 6. Scroll Left 7. Scroll Down 8. Memo 9. Play 10. Pause/Step 11. Volume Up and Down SETUP 12. Next 13. Previous PRE/TUN FM MODE 14. -
Page 10: Operating The Remote Control
OPERATING THE REMOTE CONTROL Battery Installation Notes: Do not direct the remote sensor toward 1. Push down and out on the battery Compart- ment cover to remove it. any light source, such as direct sunlight or 2. Insert the two AAA batteries into the battery "... -
Page 11: Connecting Devices
CONNECTING DEVICES CD/DVD AUX PLAYER 1 AUDIO VIDEO OUTPUT VIDEO IN VIDEO 100-240V 50~60Hz ANTENNA AUX IN LINE OUT COAXIAL Pr/Cr Pb/Cb S-VIDEO SCART IN/OUT SPEAKER OUTPUT ACTIVE SUBWOOFER (OPTIONAL) RECORDER Red terminal (marked R) is for connecting the Connection terminals for this DVD receiver right channel. -
Page 12: Speakers
ARRANGEMENT SPEAKERS OF SPEAKERS The ideal surround sound speaker configur- The configuration and arrangement of a ation may vary according to room size and wall surround sound system's speakers is critical. material. The figure below illustrates a typical For maximum listening enjoyment, refer to the arrangement. -
Page 13: Connecting Speakers
CONNECTING SPEAKERS This well-designed DVD receiver provides Connecting Speaker Cables optimum sound quality when the speakers used are within the range of their rated impedance. 1.Peel off approximately " of cable 1/ 2 insulation 2.Tighten the wire end (#2 below) Important 3.Open cable terminal by pressing back on The minimum impedance of the five speaker... -
Page 14: Connecting Antenna
CONNECTING ANTENNA Radio signals may be difficult to receive in FM Indoor Antenna some buildings and under certain conditions. The FM antenna should be fully extended and The provided antennas will help in their reception. i n a d i r e c t i o n t h a t p r o v i d e s t h e c l e a r e s t They are intended for indoor use only. -
Page 15: Connecting Power Supply
CONNECTING POWER SUPPLY Before plugging the power cord into the AC outlet, check to make sure all of the connections have been properly completed. When they have been, carefully plug the power cord into the outlet. Press the POWER button on the front panel to power the unit. The display panel will light up. When the unit is initially powered, a brief surge of electricity may cause interference with the other electronic equipment on the same circuit. -
Page 16: Playing The Radio
PLAYING THE RADIO MUTE Tuner button TUNER SCART Number button SETUP FM MODE PRE/TUN ENTER MEMO AUTO PAUSE/STEP PLAY STOP ZOOM PROG SLOW GOTO TITLE MENU DISPLAY SUBTITLE LANGUAGE ANGLE RESUME REPEAT CH.SET RETURN PROLOGIC Positioning Automatic Tuning 1.Press the TUNER button to select the desired This unit will store up to 40 individual AM or wave band (AM or FM). -
Page 17: Basic Dvd Operation
BASIC DVD OPERATION O n c e t h e u n i t i s c o n n e c t e d t o a t e l e v i s i o n Once it has read the disc, the unit automati- set and any other accessory equipment, you cally will begin playback. -
Page 18: Functions
BASIC DVD FUNCTIONS OPERATION Screen Display While a disc is playing, the status of various functions may be checked, such as the tile, track number, and several time categories. 1. Press the DISPLAY key once and the title appears along with the chapter and how much playing time has passed. - Page 19 FUNCTIONS Language T h i s D V D r e c e i v e r s u p p o r t s v i d e o o u t p u t o f The unit has the capability to show movies in various systems, including auto, NTSC, and PAL.
- Page 20 FUNCTIONS Time This DVD receiver can display various data REPEAT TITLE regarding the disc being played. Press the DISP button for the following. 1. Press once, the number of titles and chapters in each title appears The repeat mode changes each time the TITLE 01/02 CHAPTER 06/28 DISP REPEAT key is pressed (i.e., from title repeat...
-
Page 21: General Steps In The Setup Menu
FUNCTIONS SYSTEM SETUP 1. General Steps in the setup menu Zoom A) Press the setup button, the main setup menu A picture may be enlarged up to four times appears. during either playback or slow motion through the unit's zoom function. Press the ZOOM key SYSTEM SETUP once and it enlarges the image 2x, press a SOURCE... -
Page 22: System Setup
SYSTEM SETUP 1 SYSTEM SETUP 1.1.4 TV TYPE 1.1 SYSTEM SETUP According to the TV type,you can choose The system setup options are illustrated 16:9,4:3LB or 4:3PS. below: 1.1.1 SOURCE SYSTEM SETUP SOURCE There are 3 kinds of sources illustrated TV SYSTEM below. -
Page 23: Default
SYSTEM SETUP Highlight the AUDIO LANG option,and press the Arrow buttons to choose the audio language you prefer.Press Enter to confirm.If the disc you are playing has that language SYSTEM SETUP SOURCE 1 KID SAFE available,it will use that language. TV SYSTEM VIDEO 3 PG... -
Page 24: Audio Setup
SYSTEM SETUP 1.4 VIDEO SETUP 1.3 AUDIO SETUP 1.4.1 SCREEN SAVER The audio setup options are illustrated below: VIDEO SETUP 1.3.1 AUDIO OUT SCREEN SAVER Highlight the AUDIO OUT option, and press BRIGHTNESS CONTRAST the Arrow buttons to choose the audio output mode you prefer. -
Page 25: Saturation
SYSTEM SETUP 1.5.3 REAR DELAY 1.4.5 SATURATION You can adjust the Rear delay by using the Up Use the Up and Down arrow buttons to scroll and Down buttons to move the scroll bar to adjust and adjust the the delay. saturation. - Page 26 SYSTEM SETUP REFERENCE: REFERENCE: 1. To protect your DVD player, the interval between turning the unit on and off, via the Main Power button, should be more than 30 seconds. 2. If the unit will not be used for an extended period of time, please disconnect the power plug from the outlet.
-
Page 27: Mp3 & Mpeg Function
Mp3 & MPEG FUNCTION When an MPEG and an Mp3 disc is loaded, the screen will display as follows: Current MP3/JPEG file Current name. If a JPEG file is directory playing, the name should name have a JPEG extension. File Switch Region: Displays the file type of the playing and the switching. -
Page 28: Jpeg Files
JPEG FILES JPEG files contain picture information which can be encoded by micro computer software and transmitted to the TV screen via a video output interface. This function is useful in many contexts. For example teachers can change pictures to be shown in the classroom to JPG files by means of a digital camera or a scanner which are often used within the IT world and transfer the pictures to CD-R discs. -
Page 29: Usb Input And Cardreader
USB INPUT AND CARDREADER USB input This unit has a USB jack,when no disc is in the player, you can insert a USB DISC or an Mp3 Player with USB Interface to play the Mp3 music and JPEG files. All the operating functions are the same as playing JPEG- or Mp3 discs. -
Page 30: Troubleshooting
TROUBLESHOOTING This troubleshooting guide may help you find a possible cause of and solution to a problem. If there are still problems, please contact the local service centre or distributor. PROBLEMS AND POSSIBLE SOLUTIONS Common sympton Possible cause Remedy No function Mains power is not connected Connect to the mains power outlet... -
Page 31: Specifications
SPECIFICATIONS DVD Player TV System NTSC/PAL Compatible Discs DVD, CD, Mp3, JPEG,CD-R, CD-RW Resolution Ratio Greater Than 500 lines Video S/N Ratio 65dB Frequency Response fs (96KHz/24bit) 4Hz - 44KHz:+/-2dB Audio S/N Ratio 95dB Degree of Distortion <0.01% D/A Converter 192KHz/24bit Video Out 1Vp-p...
Need help?
Do you have a question about the DVD-517H and is the answer not in the manual?
Questions and answers