Table of Contents
Advertisement
Quick Links
Advertisement
Table of Contents

Subscribe to Our Youtube Channel
Related Manuals for Cosa P5TR-21


Summary of Contents for Cosa P5TR-21
- Page 1 Smart Thermostat Installation and User Manual...
- Page 2 C5-5V/Bat C5J1-230V Heater Control Cosa Wireless P5TR-21-W C5-5V/Bat C5J1-230V Heater Control Cosa Wireless Heater and AC* P5TR-21-AC C5-5V/Bat-AC C5J1-230V Control Cosa Wireless Heater and AC* P5TR-21-AC-W C5-5V/Bat-AC C5J1-230V Control *The AC control feature is available in AC named device models...
-
Page 3: Table Of Contents
Comfort and saving with Cosa Installation and user manual of Thermostat Installation and user manual of Wireless Heater Control Pairing of Devices Internet connection AC Control Frequently asked questions and support... -
Page 4: With Cosa
Comfort with Cosa < > Smart Modes You can enable your home’s temperature to change automatically based on family members’ locations or according to a weekly schedule. - Page 5 Comfort with Cosa < > Smart Modes With Cosa, you can set different target temperatures for Home, Sleep, Away and Custom Modes, and these will be automatically or manually changed according to your preferences. Automatic Control Mode* It automatically switches between Home, Sleep and Away modes based on the location of selected users and phones.
- Page 6 Comfort with Cosa < > Smart Modes Home Mode: Set the temperature you are comfortable with when you are at home. Sleep Mode: You can lower the temperature by 1 or 2 degrees while sleeping. Away Mode: The temperature does not need to remain at the same level when no one is home.
- Page 7 Save with Cosa < > Energy Management You can monitor the usage times and the saving rates and use energy more efficiently.
-
Page 8: Installation And User Manual Of Thermostat
Installation and user manual < of Thermostat > Placement of Cosa Smart Thermostat Cosa needs to be placed correctly for accurate measurements. The thermostat should not be placed under direct sunlight, near radiators, near doorways or corridors. Moreover, the thermostat should be placed at between the height of 50 cm to 150 cm above the ground. - Page 9 Placement and Powering of Cosa Smart Room Thermostat You can mount the thermostat on the wall with the Cosa wall bracket or place it on a table with the stand. For Heater Control products, use batteries (included) on the wall or table.
- Page 10 Installation and user manual < of Thermostat > Powering the Cosa Smart Room Thermostat Remove the back cover by sliding it downwards. After inserting the batteries or connecting the adapter cable, attach the cover to the wall to mount the thermostat on the wall.
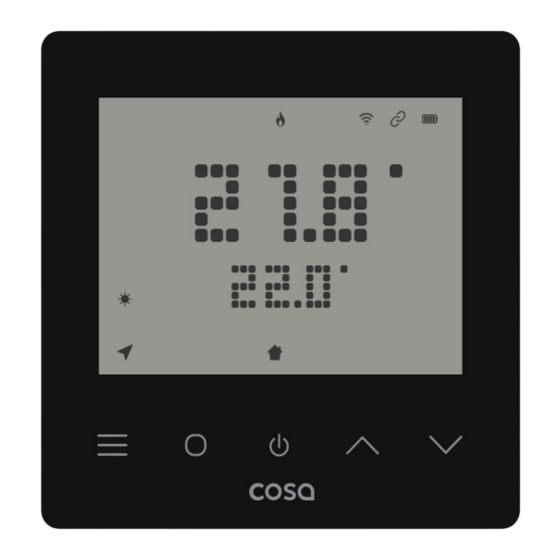
- Page 11 Installation and user manual < of Thermostat > Buttons and screen of Cosa Smart Room Thermostat Use the buttons below to make adjustments. Any changes will be saved automatically after a short delay. Room temperature Target temperature Mode change button...
- Page 12 Installation and user manual < of Thermostat > Changing Smart Modes on the Cosa Smart Room Thermostat The current mode is displayed at the bottom left of the thermostat screen. Once Cosa is connected to the internet, you can modify all settings via the Cosa mobile app.
- Page 13 Installation and user manual < of Thermostat > Accessing the Information Menu of Cosa Smart Room Thermostat To enter the Information Menu press and hold the button for 2 seconds. The screen will display the outside air temperature and the indoor humidity...
- Page 14 Installation and user manual < of Thermostat > Accessing and navigating the Settings Menu on the Cosa Smart Room Entering Selection/ the Menu Confirmation Back Adjust button button settings To access the settings menu, press and hold the menu button for 2 seconds.
- Page 15 Installation and user manual < of Thermostat > Navigating the Settings Menu on the Cosa Smart Room Thermostat You can adjust the thermostat settings using the parameters listed below: Operation Mode Weekly Schedule Setting Open Window Detection Child Lock Setting...
- Page 16 Choose between heating, cooling, or AC control modes to determine how your device operates. In heating and cooling modes, Cosa will follow the target temperature you set. In AC control mode, the feature you select will function independently of the room temperature.
- Page 17 Installation and user manual < of Thermostat > Navigating the Settings Menu on the Cosa Smart Room Thermostat P02 - Weekly Schedule Setting Use the P02 parameter to select the desired Weekly Schedule Mode. 1 Saving Schedule Weekdays 0-7 Sleep, 7-18 Away, 18-24...
- Page 18 The P03 parameter allows you to configure the Open Window Detector. When you select 15, 30, 45, 60, 75, or 90 minutes, Cosa will detect sudden changes in room temperature and turn off heating or cooling for the selected duration.
- Page 19 Installation and user manual < of Thermostat > Navigating the Settings Menu on the Cosa Smart Room Thermostat P04 - Child Lock Enable the Child Lock feature to prevent accidental changes on the device. To activate this feature, set the P04 parameter to 1 in the settings menu.
- Page 20 Installation and user manual < of Thermostat > Navigating the Settings Menu on the Cosa Smart Room Thermostat P05 - Sensor Calibration Temperature measurements may vary slightly between different brands and models of thermometers or thermostats. Even within the same brand and model, minor differences can occur.
- Page 21 Installation and user manual < of Thermostat > Navigating the Settings Menu on the Cosa Smart Room Thermostat P06 - Sound Setting You can adjust the sound level for the thermostat’s buttons. ● 0: Mutes sound completely ● 1: Lowest volume ●...
- Page 22 Installation and user manual < of Thermostat > Navigating the Settings Menu on the Cosa Smart Room Thermostat P08 - Internet Connection Setting FOR INTERNET CONNECTION SETTINGS, GO TO THE “INTERNET CONNECTION” SECTION OF THIS MANUAL P09 - Pair Setting FOR PAIRING GO TO THE “PAIRING...
- Page 23 Installation and user manual < of Thermostat > Navigating the Settings Menu on the Cosa Smart Room Thermostat P10 - Resetting to Factory Settings Setting this parameter to 1 will reset all thermostat settings to their factory defaults. Please note that this process will delete...
-
Page 24: Of Wireless Heater Control
REFER TO THE USER MANUAL YOUR HEATING AND COOLING SYSTEMS OR CONSULT THE AUTHORIZED TECHNICAL SERVICE FOR INSTALLING COSA WIRELESS HEATER CONTROL UNIT TO YOUR HEATING OR COOLING SYSTEMS MAKE SURE THAT THERE IS NO POWER ON ANY OF THE WIRES... - Page 25 Unit > Cosa Wireless Heater Control Unit Connect one end of the 230V power cable to the Cosa Wireless Heater Unit, and plug the other end into a power outlet. Once the cable is plugged in, the LED indicator next to it should light up.
- Page 26 Installation and user manual < of Wireless Heater Control Unit > Cosa Wireless Heater Control Unit You can control the Cosa Wireless Heater Control unit by short or long pressing the control buttons. Reset Button: Wifi Button: Resets to factory...
- Page 27 Installation and user manual < of Wireless Heater Control Unit > Cosa Wireless Heater Control Unit Steady Light: Heater is off Fast Flashing: Remote software update in progress. Steady Light: Heater is on Fast Flashing: Device is ready to pair...
- Page 28 Installation and user manual < of Wireless Heater Control Unit > To control your heating system with Cosa, connect the Wireless Heater Control Unit to the room thermostat connection on your heater. If there is a room thermostat connected to the heater...
- Page 29 ON/OFF type room thermostat connection on your heater. Then, connect the other end to the Heater Connection Socket on the orange cover of the Cosa Heater Control Unit. FOR WIRING INSIDE THE HEATING SYSTEM, REFER TO THE HEATING SYSTEM USER...
- Page 30 Testing the Heater Connection To test the connection between the Cosa and your heater, press and hold the flame button on the side of the Cosa Wireless Heater Control Unit for 3 seconds to manually start your heater. To turn off press and hold the same button again for another 3 seconds.
-
Page 31: Pairing Of Devices
Pairing of Thermostat and Wireless Heater Control Unit < > Pairing Cosa Smart Room Thermostat and Cosa Wireless Heater Control Unit COSA DEVİCES ARE ALREADY PAIRED WHEN FIRST UNPACKAGED If you need to re-pair them, follow the steps below: Putting the Cosa Wireless Heater Control Unit into pairing mode To put the unit into pairing mode;... - Page 32 Pairing of Thermostat and Wireless Heater Control Unit < > Putting the thermostat in pairing mode To put the thermostat into pairing mode; Enter the settings menu of the thermostat by pressing the button for 2 seconds and go to P09 using the up or down keys.
- Page 33 Pairing of Thermostat and Wireless Heater Control Unit < > Completing the Pairing When the pairing is completed, the pairing symbol on the thermostat screen will become solid, and the green light on the heater control unit will turn off. If the devices do not pair, the LED indicator next to the device will turn red, indicating a communication issue due to...
-
Page 34: Internet Connection
CONTROLLED FROM MOBILE PHONES. Download Cosa mobile application to control Cosa from your mobile device. If you are logging to Cosa mobile app for the first time, sign up first or use your existing login information, if available. FOLLOW THE INSTRUCTIONS IN COSA MOBILE APP TO COMPLETE THE INTERNET CONNECTION. - Page 35 > Internet connection with Cosa After setting up your home in the mobile application, navigate to the product selection screen, select Cosa Smart Room Thermostat v5, and follow the instructions carefully. The application will guide you step-by-step through all the necessary...
- Page 36 < Internet connection > Connecting to the Internet via the Cosa Smart Thermostat If the Wireless Heater Control Unit is too far from your home's wireless network, you can also connect Cosa to the internet through the thermostat. TO CONNECT TO THE INTERNET...
-
Page 37: Ac Control
< AC Control > TO CONTROL YOUR AC WITH COSA, THERMOSTAT MUST HAVE “AC” IN THE MODEL INFORMATION TO CONTROL AIR CONDITIONER WITH COSA, YOUR AIR CONDITIONER MUST BE SETUP IN COSA MOBILE APPLICATION. DURING THIS PROCESS, THE THERMOSTAT MUST BE POWERED VIA USB, NOT BATTERY. - Page 38 < AC Control > Setting up AC via app Go to the AC settings from the settings menu in the app. Select AC Brand. After selecting the brand of your AC, you will see the remote control list of your AC that can be controlled.
- Page 39 < AC Control > Checking AC features You can test the features below to ensure you selected the right remote control after setting up the app.sı aşağıdaki özellikleri test edebilirseniz. Target temperature setting Fan speed setting Humidity mode Fan mode Heating Mode Cooling Mode...
-
Page 40: Frequently Asked
< Frequently asked questions > I could not connect Cosa to internet Cosa is frequently disconnecting from the internet There is pairing problem between devices I could not do the wiring to the heating system Heater is not running AC is not running The thermostat or wireless heater control unit is malfunctioned. - Page 41 < Frequently asked questions > I could not connect Cosa to internet You have to reconnect the internet connection. For this, follow the internet connection steps in this guide. While doing this, pay attention to the following. - Make sure your wifi password is correct.
- Page 42 Cosa is connected. Follow steps below to fix the issue. - If the internet connection is made through Cosa Wireless Heater Control Unit, place Cosa device in an open and high position away from the metal surfaces of your boiler as much as possible.
- Page 43 - You may try to change stance angles of both devices. - If the internet connection is made through Cosa Wireless Heater Control Unit, place Cosa device in an open and high position away from the metal surfaces of your boiler as much as possible.
- Page 44 < Frequently asked questions > I could not do the wiring to the heating system Please refer to the user manual of your heating system or get support from the authorized technical service for the wiring to the heating system.
- Page 45 < Frequently asked questions > Heater is not running If your heating system appears to be working in the mobile application or the heater led on the wireless heater control unit is on but your heating system is not working, check the following: - At first wait.
- Page 46 - Make sure the correct remote controller of your AC is set in the mobile app. - If Cosa Smart Thermostat is used with batteries, the AC remote control mode of Cosa will not function. - Make sure the heating and cooling settings of Home Settings in the mobile application are correct.
- Page 47 2 seconds you can turn on heating system’s leds and control it manually. 2. In case of malfunction of Cosa Wireless Heating Control Unit You should disconnect the heating system’s gas and electricity. Then you...
- Page 48 For this: 1. Enter the settings of the house whose temperature you want to calibrate in your application. 2. Enter the "Cosa Device Settings" menu and calibrate the temperature value. So you will see that the measured temperature changes by the amount...
- Page 49 For example, if the stopping range is 0.3 ℃, the operating range is 0.1 ℃, and the target temperature of your home is set as 22 ℃, Cosa will stop your heating system at 22.3 ℃, and start it at 21.9 ℃. Therefore, by...
- Page 50 50-60 ℃ would help your house to warm up faster and help your heater to run in shorter intervals. b. By using Cosa's Auto Control or Weekly Schedule feature, you can make automatic switches between Home, Sleep and Away modes according to your preferences.
- Page 51 The outdoor temperature information used in this calculation is determined based on the location information you have set in your Cosa application. Therefore, if weather information cannot be obtained from the location information you selected, Cosa may not be able to calculate the savings rate.
- Page 52 < Frequently asked questions > Auto Control does not work Please first make the following checks: - Make sure Auto Control mode is selected. - Make sure your home location setting is correct. - Make sure that active phones list in the Auto Control settings is correct.
- Page 53 Cosa is installed. Therefore, if the location of your home is chosen incorrectly, Cosa may be operating in a different time zone. To fix the problem, you should check your home's location information.
- Page 54 Weather information in the app is wrong If you think the weather information is wrong, you should first check your home's location information. Cosa receives weather information from the closest weather station to your chosen location. There may be slight...
- Page 55 An invitation email will be sent to the user you invited. If the user you invited has not registered with the Cosa application before with the same e-mail address, it will be enough to accept your invitation from the application notifications after registering and logging in.
-
Page 56: Technical Support
Cosa mobile application! By pressing the "Help" button with a question mark in the lower right corner of the Settings section, you can create tickets for Cosa Support Team. You can also find user manuals, installation videos and frequently... - Page 57 smartcosa.com C5-UM-5V/Bat-AC-v1.0-EN Copyright 2024 Nuvia A.Ş. All rights reserved.
Need help?
Do you have a question about the P5TR-21 and is the answer not in the manual?
Questions and answers