Sony ICF-SW7600G, ICF-SW7600GS Manual
- Operating instructions manual (80 pages) ,
- Service manual (27 pages) ,
- Limited warranty (1 page)
Advertisement
- 1 Features
- 2 Location and Function of Controls
- 3 Power Sources
- 4 Setting the Clock
- 5 Changing the MW Channel Step
- 6 Direct Tuning
- 7 Manual Tuning
- 8 Scan Tuning
- 9 Preset Tuning
- 10 Receiving Single Side Band/Continuous Wave Transmissions
- 11 Receiving with the Synchronous Detection
- 12 Using the Standby Function
- 13 Using the Sleep Timer
- 14 For Better Reception
- 15 Recording Radio Programs
- 16 Specifications
-
17
Troubleshooting Guide
- 17.1 No display in the time display
- 17.2 Display is dim
- 17.3 Display appears slowly
- 17.4 Sound is not heard at all
- 17.5 Very weak or interrupted sound or unsatisfactory reception
- 17.6 Frequency cannot be input during direct tuning
- 17.7 Presetting frequency cannot be input
- 17.8 No key input is acceptable
- 17.9 The preset station cannot be received when preset tuning
- 18 WARNING
- 19 Precautions
- 20 Documents / Resources
Features
Refer to the section indicated in ( ) for details.
- An FM stereo/SW/MW/LW receiver with worldwide hand coverage.
- Quartz controlled PLL (Phase Locked Loop) synthesizer system using a microcomputer for easy pinpoint tuning. The tuned frequency is digitally displayed.
- SSB (Single Side Band) can be received (see "Receiving SSB/CW Transmissions")
- FM stereo reception for headphones (not supplied).
| Direct tuning | Tuning in the station by inputting the frequency of the station directly (see "Direct Tuning") |
| Manual tuning | Even if you don't know the frequency of the station, you can tune in the station precisely. (see "Manual Tuning") |
| Scan tuning | Automatic searching of a station (see "Scan Tuning") |
| Preset tuning | Up to 20 stations, 10 stations each for FM and AM, can be preset for button-touch tuning. (see "Presetting the Station") |
| Timer standby | Receiving a desired station at the desired time (see "Using the Standby Function") |
| Sleep timer | Turning the radio off automatically in 60 minutes (see "Using the Sleep Timer") |
| Power sources | Three different power sources: internal batteries, house current, car batteries. (see "Power Sources") |
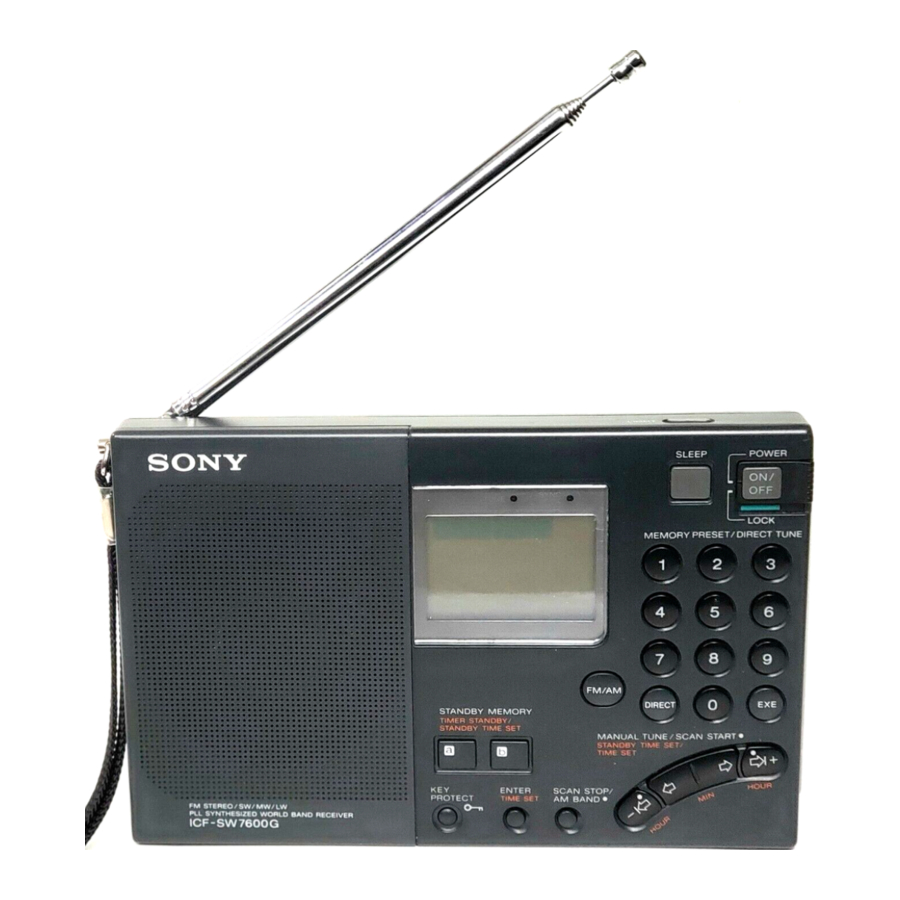
Location and Function of Controls
Refer to the section indicated in ( ) for details.
Front

- Telescopic antenna (see "Direct Tuning")
- EXT ANT jack (see "For Better Reception")
- SENS DX/LOCAL (FM/AM sensitivity) selector (see "Direct Tuning")
- LINE OUT (recording output) jack (see "Recording Radio Programs")
![]() (headphones) jack
(headphones) jack
When the stereo headphones (not supplied) are plugged in, no sound comes from the speaker. You can listen to FM stereo.- DC IN 6V
![]() (external power input) jack (see "Power Sources")
(external power input) jack (see "Power Sources") - Display (9)
- LIGHT button
Press this button to illuminate the display window for about 15 seconds. - Control panel (8)
- Speaker
 (headphones) jack
 (external power input) jack (see "Power Sources")
 Rear

- SSB FINE TUNE control (see "Receiving SSB/CW Transmissions")
- LSB/USB selector (see "Receiving SSB/CW Transmissions" and "Receiving with the Synchronous Detection")
- AM MODE selector (see "Receiving SSB/CW Transmissions" and "Receiving with the Synchronous Detection")
- TONE selector (see "Direct Tuning")
- VOLUME control
- Stand

- RESET button
Press this button with an pointed object when the unit functions incorrectly. When this button is pressed, the preset stations and the clock settings are erased. - MW CH STEP (MW channel step) 9/10 kHz selector (see "Changing the MW Channel Step")
- Battery compartment (see "Power Sources")

Control panel

- SLEEP button (see "Using the Sleep Timer")
- FM/AM button
- STANDBY MEMORY/TIMER STANDBY/STANDBY TIME SET
![]() buttons (see "Using the Standby Function")
buttons (see "Using the Standby Function") - ENTER/TIME SET button
- KEY PROTECT
![]() button (see "Direct Tuning")
button (see "Direct Tuning") - POWER/LOCK (main power) switch
Set this switch to POWER, then press the ON/OFF button to turn on the radio. Set the switch to LOCK when carrying the radio.
When this switch is set to LOCK, the power will not be turned on even if you press the ON/OFF button. - ON/OFF (power) button
- MEMORY PRESET/DIRECT TUNE 0 - 9 buttons (see "Direct Tuning" and "Preset Tuning")
- EXE (execute) button (see "Direct Tuning")
- DIRECT button (see "Direct Tuning")
- MANUAL TUNE/SCAN START/STANDBY TIME SET/TIME SET buttons
- SCAN STOP/AM BAND button
 buttons (see "Using the Standby Function")
  button (see "Direct Tuning")
 Display

- TUNE indicator
Lights when a station is tuned in. - STANDBY
![]() indicators (see "Using the Standby Function")
indicators (see "Using the Standby Function")
Appears when the standby timer![]() is set.
is set. - Key protect indicator (see "Direct Tuning")
While this indicator appears, all the functions of the buttons are locked. - Battery empty indicator (see "Power Sources")
- SYNC LOCK indicator (see "Receiving with the Synchronous Detection")
Lights when the synchronous detection is performed. - SLEEP indicator (see "Using the Sleep Timer")
Appears when the sleep timer is operating. - Preset display (see "Presetting the Station")
- Time/frequency display
Power Sources
Batteries
Before installing the batteries, be sure to cheek that the MW CH STEP 9/10 kHz selector is set correctly (See "Changing the MW Channel Step").

Notes
- To operate the unit by internal batteries, disconnect the AC power adaptor or car battery cord from the DC IN 6V jack.
When you disconnect them from the DC IN 6V jack,![]() may flash in the display even if battery capacity still remains. To stop the flashing, press ON/OFF.
may flash in the display even if battery capacity still remains. To stop the flashing, press ON/OFF. - When the batteries are removed for a long time, the preset stations and the dock settings will be erased. In this case, set them again before use.
 may flash in the display even if battery capacity still remains. To stop the flashing, press ON/OFF.
 Battery replacement
- When the batteries run down, the sound become week and distorted, and
![]() flashes in the display. Even in this condition, you can use the unit for a while.
flashes in the display. Even in this condition, you can use the unit for a while.
When the batteries are completely exhausted, the radio is turned off and![]() lights up.
lights up. - Replace all the batteries with new one when
![]() flashes in the display. Even after you replace the batteries,
flashes in the display. Even after you replace the batteries, ![]() remains flashing. To turn off
remains flashing. To turn off ![]() , press ON/OFF.
, press ON/OFF. - Replace the batteries within ten minutes after removing the batteries.
Otherwise, the preset stations and the clock settings will be erased.
If they are erased, preset the stations and set the time again. - For battery life, see "Specifications".
House Current

Use the AC-E60HG AC power adaptor (supplied with the ICF-SW7600GS for Canada and European continent).
Car Battery
For use on a car battery, connect the Sony car battery cord (not supplied) to the DC IN 6V jack.
For detailed information, see the Operating Instructions of the car battery cord.
Notes
- The internal batteries are automatically disconnected when the AC power adaptor or the car battery cord is connected to the DC IN 6V jack.
- When connecting and disconnecting the external power source plug, be sure to turn off the radio.
Otherwise, the "![]() " mark will be displayed and the power will be cut. If this happens, turn the radio on again.
" mark will be displayed and the power will be cut. If this happens, turn the radio on again. - After using the AC power adaptor or the car battery cord, disconnect the DC IN 6V jack first. When the cord is connected to the DC IN 6V jack, the radio does not operate by the internal batteries.
- Keep the batteries installed for the built-in computer back-up even if you use external power sources.
However, replace the batteries once a year because they are discharged gradually. - Use only the recommended AC power adaptor or car battery cord manufactured by Sony. The polarity of the plugs of other manufacturers may be different.
![]()

Setting the Clock

- Set POWER/LOCK to POWER.
When you first install batteries or the clock is reset, "0:00" flashes in the display. Press TIME SET. - While holding down TIME SET, press a MANUAL TUNE/ SCAN START/STANDBY TIME SET/TIME SET button to adjust the clock.
Every pressing of an inner MANUAL TUNE/SCAN START/STANDBY TIME SET/TIME SET button (![]() or
or ![]() ) changes the time setting by one minute, and an outer button (
) changes the time setting by one minute, and an outer button ( ![]() or
or ![]() ) by one hour.
) by one hour.
To advance the time digits rapidly, keep it pressed.

- Release TIME SET.
The ": " indication starts flashing, and the clock begins to operate.
 or
or  ) changes the time setting by one minute, and an outer button (
  or
or  ) by one hour.
While listening to the radio
You cannot set the clock while you are listening to the radio. Be sure to press ON/OFF to turn the radio off and then set the clock.
The display when POWER/LOCK is LOCK
The current time is displayed.
Changing the MW Channel Step
The MW channel step is factory-set to 9 (10) kHz to match the frequency allocation system of the country. If you use the radio where the frequency allocation system is based on 10 (9) kHz interval, set the MW CH STEP 9/10 kHz selector in the battery compartment to 10 (9) kHz.

- Set POWER/LOCK to LOCK.
- Open the battery compartment and remove the batteries.
- Change MW CH STEP 9/10 kHz.
- Install the batteries and dose the battery compartment.
- Set POWER/LOCK to POWER.
| The frequency allocation of the area | |
| Area | Frequency allocation system |
| North America, South America | 10 kHz step |
| Other countries | 9 kHz step |
Change the MW CH STEP 9/10 kHz within 10 minutes
If more than 10 minutes have passed after the batteries were removed, the current time will be erased. In this case, set the time again.
Direct Tuning

- Set POWER/LOCK to POWER.
- Press ON/OFF. The radio is turned on.
- Press FM/AM to select the band (FM or AM).
Select AM to receive SW, MW or LW. - Press DIRECT. The frequency in the display is erased.
- Enter the frequency of the desired station directly by pressing the MEMORY PRESET/DIRECT TUNE buttons 0 - 9.
You should press a button within 10 seconds after pressing the previous button.
Minimum entry digit:
FM: 0.05 MHz (50 kHz)
AM: 1 kHz
For FM band, a decimal point is not required.
For AM band, lower triple zero digits can be omitted. (See the examples at left.) - Press EXE.
When the station is tuned in, the TUNE indicator lights. - Adjust VOLUME.
To turn off the radio, press ON/OFF.
Note
After pressing a button, press the next button within 10 seconds. If you do not, the display will return to the previously received station.
When you input a frequency outside the frequency range
The display will return to the previously received station. Press DIRECT and enter the correct frequency again.
If you input a wrong frequency
Press DIRECT to cancel the entry, and perform the above procedure from step 4 with the correct frequency.
To Improve Reception

For MW/LW reception
Retract the telescopic antenna. The built-in ferrite bar antenna activates. Since this antenna is directional, rotate the unit horizontally to the optimum direction.

For SW reception
Pull out the telescopic antenna to its full length and set it vertically.

For FM reception
Pull out the telescopic antenna to expose its swivel base and adjust its length, angle and direction.
When the sound is distorted
Normally set SENS DX/LOCAL to DX. However, when the sound is distorted, set it to LOCAL.
When you are listening to the news
Set TONE to NEWS. Vocal will be heard more clearly. When you are listening to music, set it to MUSIC.
To Prevent Accidental Change of the Received Station
Press KEY PROTECT  . The mark appears in the display window and all the buttons on the control panel do not work.
To release the key protect function, press KEY PROTECT again.
Manual Tuning

- Set POWER/LOCK to POWER.
- Press ON/OFF. The radio is turned on.
- Press FM/AM to select the band (FM or AM).
Select AM to receive SW, MW or LW. - If you select the FM band, skip this step.
While pressing the SCAN STOP/AM BAND, press an outer MANUAL TUNE/SCAN START/STANDBY TIME SET/TIME SET button (![]() or
or ![]() ) repeatedly to select the desired band or meter band.
) repeatedly to select the desired band or meter band.

 or
or  ) repeatedly to select the desired band or meter band.
The minimum frequency in that band or meter band is received.
- Press an MANUAL TUNE/SCAN START/STANDBY TIME SET/ TIME SET button to search for a desired station. Pressing the outer (
![]() or
or ![]() ) or inner (
) or inner ( ![]() or
or ![]() ) buttons changes the frequency in the following frequency step.
) buttons changes the frequency in the following frequency step.
| Band | Outer buttons (  or or  ) ) | Inner buttons (  or or  ) ) |
| FM | 50 kHz | 50 kHz |
| SW | 5 kHz | 1 kHz |
| MW | 9/10 kHz | 1 kHz |
| LW | 9 kHz | 1 kHz |
When the station is tuned in, the TUNE indicator lights.
- Adjust VOLUME.
To turn off the radio, press ON/OFF.
What is meter band?
SW is divided into 13 bands by the wave length (meter).
Each band is called a meter band. (See the table in the next section)
Frequency band does not change
If you keep pressing MANUAL TUNE/SCAN START/STANDBY TIME SET/TIME SET, the frequency will repeat in the following ranges.
| Band | Inner buttons ( or ) | Outer buttons *1 ( or ) |
| FM |  |  |
| AM |  | in each broadcast b and or meter band |
*1 Scan tuning mode
*2 87.5  108 MHz for the Italy model
*3 150 285, 530 1620, 3850 26100 kHz for the Italy model
Scan Tuning
- Set POWER/LOCK to POWER.
- Press ON/OFF. The radio is turned on.
- Receive a broadcast band by way of direct tuning or manual tuning. (Refer to the table below for the frequency range of each broadcast band.)
- Keep pressing an outer MANUAL TUNE/SCAN START/ STANDBY TIME SET/TIME SET button (
![]() or
or ![]() ) for about 2 seconds. Scan tuning will begin within the frequency range. When a station is received, the scanning will stop automatically for about 2 seconds and the TUNE indicator lights.
) for about 2 seconds. Scan tuning will begin within the frequency range. When a station is received, the scanning will stop automatically for about 2 seconds and the TUNE indicator lights. - Press SCAN STOP/AM BAND to listen to the station being received. The scan tuning stops and the station being received is tuned in.
- Tune in the station more precisely by inner buttons of MANUAL TUNE/SCAN START/STANDBY TIME SET/TIME SET (
![]() or
or ![]() ), if required.
), if required. - Adjust VOLUME.
To turn off the radio, press ON/OFF.
 or
or  ) for about 2 seconds. Scan tuning will begin within the frequency range. When a station is received, the scanning will stop automatically for about 2 seconds and the TUNE indicator lights.
  or
or  ), if required.
 | Frequency Range of the Auto Scan for Each Broadcast Band | |||
| Broadcast band | Frequency range | SW meter band | |
| AM | LW | 153 kHz - 522 kHz *1 | — |
| MW | 530 kHz - 1620 kHz (10 kHz step) | — | |
| 531 kHz-1620 kHz (9 kHz step) | — | ||
| SW | 2250 kHz-2550 kHz *2 | 120 meter band | |
| 3150 kHz-3450 kHz *2 | 90 meter band | ||
| 3850 kHz - 4050 kHz | 75 meter band | ||
| 4700 kHz -.5100 kHz | 60 meter band | ||
| 5900 kHz - 6250 kHz | 49 meter band | ||
| 7100 kHz - 7400 kHz | 41 meter band | ||
| 9400 kHz - 10000 kHz | 31 meter band | ||
| 11500 kHz-12150 kHz | 25 meter band | ||
| 13500 kHz-13900 kHz | 22 meter band | ||
| 15000 kHz - 15700 kHz | 19 meter band | ||
| 17450 kHz - 18000 kHz | 16 meter band | ||
| 21450 kHz - 21950 kHz | 13 meter band | ||
| 25600 kHz - 26100 kHz | 11 meter band | ||
| FM | 76.00 MHz - 108.00 MHz*3 | — | |
*1 153-285 kHz for the Italy model
*2 For the Italy model, these frequencies cannot be tuned in.
*3 87.50 - 108.00 MHz for the Italy model
| The frequency allocation (channel step) | |
| FM | 50 kHz |
| SW | 5 kHz |
| MW | 9 kHz/10 kHz |
| LW | 9 kHz |
When scan tuning stops too often
Set SENS DX/LOCAL to LOCAL.
Frequency band does not change
If you do not stop scanning, the scanning will repeat in the range of the broadcast band or meter band.
Preset Tuning
Presetting a Station

- Set POWER/LOCK to POWER.
- Press ON/OFF. The radio is turned on.
- Tune in a desired station by way of direct tuning (see "Direct Tuning"), manual tuning (see "Manual Tuning") or scan tuning (see "Scan Tuning").
- While keeping ENTER pressed, press one of the MEMORY PRESET/DIRECT TUNE buttons 0 to 9.
The station which is tuned in is preset on that button. The preset number appears in the display.


Ex. To preset FM 89.0 MHz on MEMORY PRESET/DIRECT TUNE 1
The number of stations you can preset
Up to 20 stations, 10 stations each for FM and AM, can be preset to MEMORY PRESET/DIRECT TUNE button 0 to 9.
To change the preset station
Preset a station to the desired MEMORY PRESET/DIRECT TUNE button 0 to 9. The station previously preset to the button is erased.
Tuning in a Preset Station

- Set POWER/LOCK to POWER.
- Press ON/OFF. The radio is turned on.
- Press FM/AM to select the band (FM or AM).
- Press the desired MEMORY PRESET/DIRECT TUNE button 0 to 9.
The station preset on that button will be tuned in. - Adjust VOLUME.
To turn off the radio, press ON/OFF.
Receiving Single Side Band/Continuous Wave Transmissions

- Turn on the radio, and select AM with FM/AM.
- Set AM MODE to SSB.
- Switch LSB/USB to select the desired sideband. To receive CW, select LSB.
- Tune in a frequency near the broadcast you want to receive by way of direct tuning (see "Direct Tuning"), manual tuning (see "Manual Tuning") or scan tuning (see "Scan Tuning").
- Adjust the tuning with SSB FINE TUNE.
You can adjust the frequency within an approx. ±1.5 kHz range.
The frequency display will not change.
What is SSB (Single Side Band)?
SSB is very popular among ham and business radio users and will be found on all of the amateur bands because of its signal intelligibility.
In general, SSB transmissions employ USB (upper sideband) modulation, and for amateur bands lower than 10 MHz, LSB (lower sideband) is often used.

What is CW (Continuous Wave)?
CW is also popular among ham and business radio users. In CW transmission, the amplitude of a carrier is not modulated while that of other system is modulated. CW conveys information by interrupting a carrier using Morse code. It can be heard as a beat sound only with the unit equipped with BFO circuits. To understand the information transmitted by CW, you need to learn the Morse code.
Receiving with the Synchronous Detection

- Turn on the radio, and select AM with FM/AM.
- Tune in a frequency you want to receive by way of direct tuning (see "Direct Tuning"), manual tuning (see "Manual Tuning"), scan tuning (see "Scan Tuning") or preset tuning (see "Preset Tuning").
- Set AM MODE to SYNC.
- Switch LSB/USB to a sideband that gives clear reception.
When the synchronous detection is locked, the SYNC LOCK indicator lights.
What is synchronous detection?
There are two big problems in AM reception: distortion due to fading and interference from adjacent stations. Synchronous detection is effective in solving these problems. Distortion due to fading is caused by over-modulation, which occurs when a carrier component of the received signal is attenuated on the way. In this receiver, a pure carrier frequency with no level variation, perfectly synchronized with the original carrier, is generated in the synchronous detector circuit and is mixed with the received signal to compensate the attenuated carrier component. In this way, distortion is remarkably reduced. On the other hand, AM (SW, MW, and LW) broadcasting generally uses double sideband transmission, in which modulated signals are transmitted using both the upper and lower sidebands (USB and LSB). In most cases, one of the sidebands is affected by interference from adjacent stations (beats). In the synchronous detector circuit, one of USB and LSB can be received. This allows dear reception without interference from adjacent stations.

Using the Standby Function

- Tune in the desired station which you want to listen to at the desired time by way of direct tuning (see "Direct Tuning"), manual tuning (see "Manual Tuning"), scan tuning (see "Scan Tuning") or preset tuning (see "Preset Tuning").
- Adjust VOLUME.
- While keeping ENTER pressed, press STANDBY MEMORY/ TIMER STANDBY/STANDBY TIME SET
![]() or
or ![]() . The station is preset on that button.
. The station is preset on that button.

- Press ON/OFF. The radio will be turned off.
- While keeping STANDBY MEMORY/TIMER STANDBY/ STANDBY TIME SET
![]() or
or ![]() pressed, press a MANUAL TUNE/SCAN START/STANDBY TIME SET/TIME SET to set the standby time.
pressed, press a MANUAL TUNE/SCAN START/STANDBY TIME SET/TIME SET to set the standby time.
Every pressing of an inner MANUAL TUNE/SCAN START/STANDBY TIME SET/TIME SET button (![]() or
or ![]() ) changes the standby time by one minute, and an outer button (
) changes the standby time by one minute, and an outer button ( ![]() or
or ![]() ) by one hour. To advance the time digits rapidly, keep it pressed.
) by one hour. To advance the time digits rapidly, keep it pressed.
The STANDBY![]() indicator flashes in the display while STANDBY MEMORY/TIMER STANDBY/STANDBY TIME SET
indicator flashes in the display while STANDBY MEMORY/TIMER STANDBY/STANDBY TIME SET ![]() or
or ![]() is being pressed.
is being pressed.

 or
or  . The station is preset on that button.
 or
or  ) changes the standby time by one minute, and an outer button (
  or
or  ) by one hour. To advance the time digits rapidly, keep it pressed.

Ex. Setting 7:15 to STANDBY 
- Stop pressing STANDBY MEMORY/TIMER STANDBY/STANDBY TIME SET
![]() or
or ![]() . The current time appears in the display, and the STANDBY
. The current time appears in the display, and the STANDBY ![]() indicator will continue to be displayed.
indicator will continue to be displayed.
When you set the standby time
Be sure to turn the radio off. You cannot set the standby time while you are listening to the radio.
To cancel the standby mode
Press STANDBY MEMORY/TIMER STANDBY/STANDBY TIME SET or  so that the STANDBY
  indicator disappears or set POWER/ LOCK to LOCK.
Once you preset the standby time
The radio is turned on at the same time everyday.
To check the preset standby time
Hold down STANDBY MEMORY/TIMER STANDBY/STANDBY TIME SET or when the STANDBY indicator is not displayed.
To change the preset standby time
Set the desired standby time. The time previously set is erased.
When the radio is turned on at the preset time
The radio will be turned off automatically after about 60 minutes.
When you are listening to the radio at the preset time
The frequency will change to that preset to the appropriate STANDBY MEMORY/TIMER STANDBY/STANDBY TIME SET button.
You can set standby and together
When the standby time comes while the other standby is working, the next standby will work with the appropriate frequency.
If you set standby and to the same desired time
Only standby will work.
Using the Sleep Timer

- Set POWER/LOCK to POWER.
- Press SLEEP.
The radio is tuned on. The SLEEP indicator appears in the display. - Tune in the desired station and adjust VOLUME.
The radio will be turned off automatically after about 60 minutes.
When you press SLEEP while listening to the radio
The radio will be turned off automatically after about 60 minutes.
To turn off the radio before the sleep time
Press ON/OFF.
To prolong the listening time
Press SLEEP again. The radio will be turned off about 60 minutes later.
If you press SLEEP after the radio is turned off
The sleep timer activates and the last station to be tuned in will be received.
For Better Reception
Using the Supplied SW Antenna
Usually the telescopic antenna is sufficient for SW reception. However, in a metal or concrete building, the use of the supplied SW antenna is recommended.

To Use the Compact Antenna AN-71 Supplied With the ICF-SW7600G
- Fully pull out the cord from the case.
- Attach the coupler to the telescopic antenna.
- When the window can be opened: Extend the cord and the case out through the window, after making sure there is no danger.
When the window cannot be opened: Fully extend the cord along the frame of the window.
To Use the Active Antenna AN-LP1 Supplied With the ICF-SW7600GS
Refer to the instruction manual supplied with the AN-LP1.
Using the External FM Antenna
(not supplied)
In a steel-frame building, a mountainous area, at a distance from the transmitter or in a location where ignition noise is severe, FM reception may be unsatisfactory with the telescopic antenna. In this case, connect a commercially available external FM antenna with a 75-ohm coaxial cable.


After use
Using the Wide Range Antenna
(not supplied)
Use the wide range antenna AN-1 or AN-102 (not supplied). There are the following two methods.
Method A (For SW reception)
With a connecting cord, connect the OUTPUT jack of the antenna controller (supplied with the AN-1 or AN-102) and the EXT ANT jack of this unit.
Method B (For MW/LW reception only)
- With the connecting cord, connect the OUTPUT jack of the antenna controller and the INPUT jack of the antenna coupler (supplied with the AN-1 or AN-102).
- Position the antenna coupler near the unit.

Example: When the AN-1 is used.
Notes
- When receiving MW or LW broadcasts without the external antenna, be sure to disconnect an SW external antenna.
Otherwise, you cannot receive them as the built-in ferrite bar antenna does not function. - If there is lightning, do not touch the wire of an external antenna and disconnect its AC power adaptor (if connected) immediately. Never touch the antenna wire during a lightning storm.
- When using an external antenna, retract the telescopic antenna.
- Locate the outdoor antenna as far away from the street as possible.
- For details about the external antenna, refer to its instruction manual.
Recording Radio Programs

| Cassette recorder | Connecting cable | |
| Type | Jack | Connecting cable |
| Monaural | MIC IN (minijack) | RK-G135 |
| Stereo | MIC IN (minijack) | RK-G134 |
| LINE IN (minijack) | RK-G136 | |
| LINE IN (pinjack) | RK-G129 | |
Tune in a desired radio program, set TONE to a desired position, and set the cassette recorder to the record mode.
Note
The VOLUME control setting on the radio has no effect on recording.
Stereo recording
When you record with a stereo recorder, you can record FM stereo programs in stereo. To do so, headphones must be connected to the headphones jack. AM programs are recorded monaurally to both channels.
Specifications
| Circuit system | FM: Superheterodyne | |
| SW / MW / LW: Dual conversion superheterodyne | ||
| Intermediate frequency | FM: 10.7 MHz | |
| SW/MW/LW: 55.845 MHz (first), 455 kHz (second) | ||
| Speaker | Approx. 77 mm (3 1/8 inches) dia., 8 ohms | |
| Power output | 400 mW (at 10% harmonic distortion) | |
| Outputs | Recording output jack (stereo minijack) output level 245 mV (-10 dBs) output impedance 10 kilohm or less Headphones jack (stereo minijack) 16 ohms | |
| Power requirements | 6 V DC Four R6 (size AA) batteries DC IN 6V jack accepts: Sony AC power adaptor (supplied only with the ICF-SW7600GS for Canada and European continent) Sony car battery cord (not supplied) | |
| Battery life | Using Sony R6 (size AA) batteries: FM: approx. 15 hours, AM: approx. 10 hours | |
| Using Sony R6 (size AA) alkaline batteries: FM: approx. 33 hours, AM: approx. 20 hours (When listening for four hours a day at normal volume) | ||
| Dimensions | Approx. 191.2 x 118 x 32.3 mm (w/h/d) (7 3/8 x 4 3/4 x 1 5/16 inches) including projecting parts and controls | |
| Mass | Approx. 615 g (1 lb. 5.7 oz) including batteries | |
| Accessories supplied | AC power adaptor (1)*1 Compact antenna AN-71 (1)*2 Active antenna AN-LP1 (1)*3 Carrying case (1) Wave handbook (1) *1 Supplied only with the ICF-SW7600GS for Canada and European continent *2 Supplied only with thq ICF-SW7600G *3 Supplied only with the ICF-SW7600GS | |
| Frequency range | ||
| Band | Italy model | Other models |
| FM | 87.5-108.0 MHz | 76.0 - 108.0 MHz |
| SW | 3850 - 26100 kHz | 1621 -29999 kHz |
| MW | 530- 1620 kHz | 530 - 1620 kHz |
| LW | 150 - 285 kHz | 150 - 529 kHz |
Design and specifications subject to change without notice.
Optional accessories
AC power adaptor AC-E60HG*
Connecting cord:
RK-G135 (stereo miniplug  miniplug)
RK-G134"(stereo miniplug stereo miniplug)
RK-G136 (stereo miniplug stereo miniplug)
RK-G129 (stereo miniplug two pinplugs)
LW/MW/SW wide range antenna AN-1 /AN-102
*The voltage of power supply is different depending on the country. Please buy an AC power adaptor suitable in the country where the radio is to be used.
Your dealer may not handle some of the above listed optional accessories. Please ask your dealer for detailed information on the optional accessories available in your country.
Troubleshooting Guide
The power is not turned on even if you press the ON/OFF button.
- Weak batteries (
![]() appears in the display).
appears in the display).
→ Replace all the batteries with new ones. - Incorrect polarity of batteries. See "Power Sources"
- The POWER/LOCK switch is set to LOCK.
- The AC power adaptor or a car battery cord is disconnected.
- Battery operation is attempted while an AC power adaptor or a car battery cord is connected to the unit, but not to a wall outlet or cigarette lighter socket.
- The KEY PROTECT
![]() button has been pressed. → Press this button again to make the
button has been pressed. → Press this button again to make the ![]() mark disappear.
mark disappear.
 appears in the display).
 button has been pressed. → Press this button again to make the
 No display in the time display
- Incorrect polarity of batteries. See "Power Sources"
- Weak batteries.
Display is dim
- Weak batteries (
![]() appears in the display).
appears in the display).
→ Replace all the batteries with new ones. - The unit is being used in extremely high temperatures or in a place with excessive moisture.
Display appears slowly
- The unit is being used in extremely low temperatures.
Sound is not heard at all
- The VOLUME control is turned down completely.
- The stereo headphones are plugged in.
- Incorrect polarity of batteries. See "Power Sources"
Very weak or interrupted sound or unsatisfactory reception
- Weak batteries.
- Tuning or antenna adjustment is not correct. → Tune in correctly with manual tuning (see "Manual Tuning"). For antenna adjustment, see "Direct Tuning")
- Weak signal. → When in a vehicle or in a building, listen near a window.
- The frequency displayed differs a little from the active station frequency. → Tune more precisely with manual tuning (see "Manual Tuning") or by using SSB FINE TUNE (see "Receiving SSB/CW Transmissions").
- The SENS DX/LOCAL selector is set to LOCAL. → Set to DX.
Frequency cannot be input during direct tuning
- The next button was not pressed within 10 seconds after the previous button was pressed.
Presetting frequency cannot be input
- ENTER is not pressed when you press the MEMORY PRESET/ DIRECT TUNE button. → To input a frequency, while pressing the ENTER, press the desired MEMORY PRESET/DIRECT TUNE button.
No key input is acceptable
- The KEY PROTECT
![]() button has been pressed. → Press this button again to make the
button has been pressed. → Press this button again to make the ![]() mark disappear.
mark disappear.
The preset station cannot be received when preset tuning
- Incorrect MEMORY PRESET/DIRECT TUNE button is pressed.
- The preset station is erased. → Preset the station again.
The radio is not turned on at the timer-setting time
- The timer is not in the standby mode. → Press the STANDBY MEMORY/TIMER STANDBY/STANDBY TIME SET
![]() or
or ![]() button.
button. - The POWER/LOCK is set to LOCK.
- When it took more than 10 minutes to replace batteries, the timer setting time has been erased. → After replacing the batteries, set the timer again.
 or
or  button.
 WARNING


To prevent fire or shock hazard, do not expose the unit to rain or moisture.
To avoid electrical shock, do not open the cabinet.
Refer servicing to qualified personnel only.
Please note that accordingly only Sound and TV-Radio Receivers meant for the entire population are allowed to be received via this set. It is prohibited to receive all other transmission such as police radio or mobile radio.
Precautions
- Operate the unit only on 6V DC with four R6 (size A A) batteries.
For AC operation, use the AC power adaptor recommended for this unit.
Do not use any other type.
For car battery operation, use the car battery cord recommended for this unit. Do not use any other type. - The unit is not disconnected from the AC power source (mains) as long as it is connected to the wall outlet, even if the unit itself has been turned off.
- Disconnect the AC power adaptor from the wall outlet when the unit is not to be used for a long period of time.
- The name plate indicating operating voltage, etc., is located at the rear of the unit.
- Use the unit within a temperature range of 0°C to 40°C (32°F to 104°F). If it is used in temperatures outside this range, an irregular display may appear on the display window. If it is used in temperatures lower than this range, the display may change very slowly. These irregularities will disappear and there will be no damage to the unit when the unit is used in its recommended temperature range.
- Do not leave the unit near heat sources, such as radiators or air ducts, or in a place subject to direct sunlight, excessive dust, moisture, rain, mechanical vibration or shock.
- Should any solid object or liquid fall into the unit, remove the batteries, and have the unit checked by qualified personnel before operating it any further.
- Since a strong magnet is used for the speaker, keep personal credit cards using magnetic coding or spring-wound watches away from the unit to prevent them from possible damage caused by the magnet.
- When the casing becomes soiled, dean it with a soft dry cloth dampened with mild detergent solution. Never use abrasive cleansers or chemical solvents, as they may mar the casing.
- When there is lightning and you are using an external antenna, immediately disconnect the AC power adaptor (if connected) from the wall outlet. Never touch the antenna wire when there is a lightning storm.
- Never connect a ground wire to a gas pipe.
- Reception of 3.6 MHz may be difficult because of internal spurious signals generated by the built-in oscilators.
- In vehicles or buildings, radio reception may be difficult or noisy. Try listening near a window.
Note on the MW channel step
The MW channel step differs depending on area. The channel step of this unit is factory-set to 10 kHz or to 9 kHz to match the frequency allocation system of the country as listed. You can change the channel step (See "Changing the MW Channel Step").
| Area | MW channel step |
| North and South American countries | 10 kHz |
| Other countries | 9 kHz |
If you have any question or problem concerning your unit that is not covered in this manual, please consult your nearest Sony dealer.
Documents / ResourcesDownload manual
Here you can download full pdf version of manual, it may contain additional safety instructions, warranty information, FCC rules, etc.
Advertisement


Need help?
Do you have a question about the ICF-SW7600G and is the answer not in the manual?
Questions and answers