Logitech Pebble 2 Combo, K380, M350 Manual
- Setup manual (2 pages) ,
- Faqs (45 pages)
Advertisement
GENERAL TOPICS
PRODUCT OVERVIEW
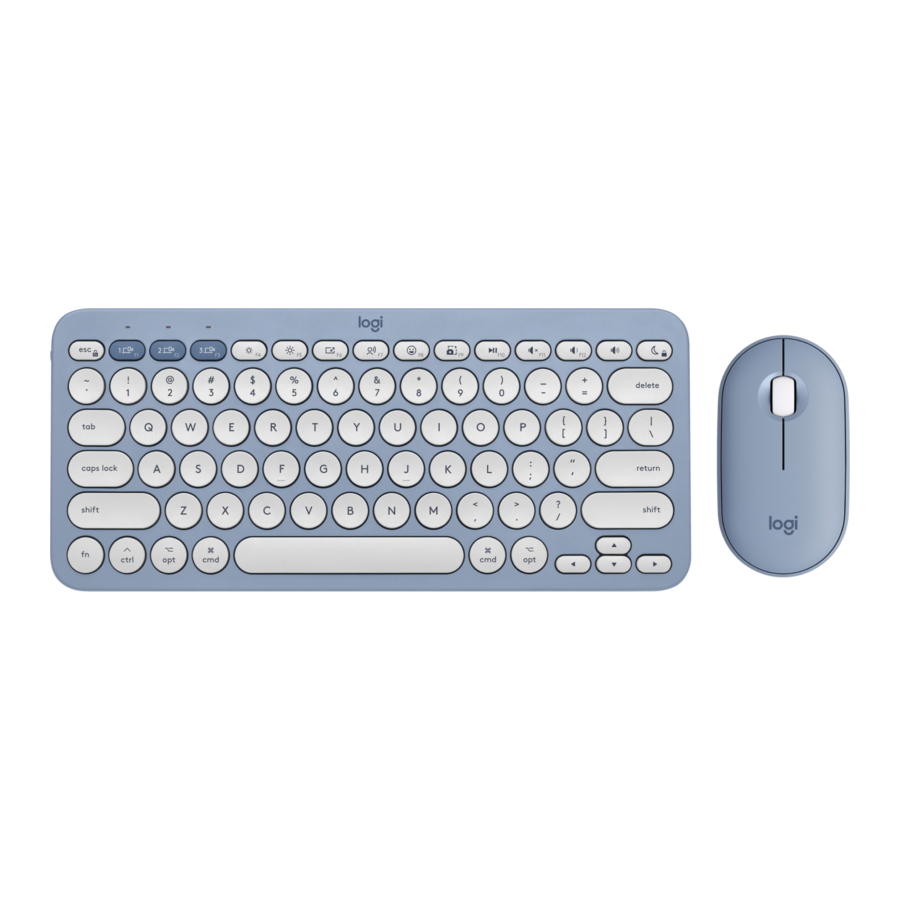
Pebble Keys 2 K380s at a glance

- Connection status LEDs
- Easy-switch / Connection button
- Customizable 10 keys: Hot Keys & Media Keys
- Split keys (modifier based on type of device connected to keyboard)

- Battery compartment
- On/Off button
- Battery status light
Pebble Mouse 2 M350s overview

- Scroll Wheel / Customizable middle click
- Battery (and receiver) compartment
- On/off toggle switch
- Connection status LEDs
- Easy-switch / Connection button
- High precision sensor
FEATURES
Explore the advanced features your new keyboard offers:
- Customizable 10 keys: Hot Keys & Media Keys
- Customize the 10 keys
- App-Specific Settings
- Shortcuts
- Function keys instead of shortcut keys
- OS-adaptive keyboard
Customizable 10 keys: Hot Keys & Media Keys


Customize the 10 keys

- In Logi Options+, select the Pebble Keys 2 K380s and go to the keyboard settings menu.
- Click on "KEYS", then on the "shortcut keys" select the shortcut you want to customize (i.e. search)
- Scroll through the recommendation, smart actions and other actions and select your favorite.
App-Specific Settings
After installing Logi Options+ app, you can have predefined app-specific settings that will adapt the keys behavior to the selected applications.
The 10 shortcut keys can be customized to perform different functions for different applications.
You can assign any functions to apps such as Chrome, Spotify, Wechat, WhatsApp, Zoom, etc.
- In Logi Options+, select the Pebble Keys 2 K380s and go to the keyboard settings menu.
- Click on "KEYS", then on the "ADD APPLICATION" and add your favorite apps (i.e. Chrome, Spotify, Wechat, WhatsApp, Zoom, etc.)

- Select the application (ex: Spotify), select the shortcut keys (ex: previous) you want to be specifically customized and assign the preferred shortcut.


SHORTCUTS
To perform a shortcut, hold down the fn (function) key while pressing the key associated with an action.

Use F-row keys as Function keys instead of media/shortcut keys
To use F-row keys as Function keys instead of Shortcut keys
Option 1. Use Fn Lock
You can directly swap between Media keys and F-Keys by pressing FN + Esc.
Option 2. Use Logi Options+
In Logi Options+ software you can choose whether to use F-keys as standard function keys in "SETTINGS" without having to hold down the Fn key.
NOTE: By default, the keyboard has direct access to Media Keys.
OS-adaptive keyboard
The Logitech Pebble Keys 2 K380s includes OS-adaptive keys that have different functions, depending on the operating system of the device you're typing on.
When connected by bluetooth, the keyboard automatically detects the operating system on the currently selected device and remaps keys to provide functions and shortcuts where you expect them to be.
Manual selection
If the keyboard is connected by Logi Bolt dongle or fails to correctly detect the operating system of a device, you can manually select the operating system by performing a long press (3 seconds) of a function key combination.

Explore the advanced features your new mouse offers:
- Customize the middle button
- App-specific settings
- Assign gestures to the middle button
- Customize the scroll wheel
- Customize the pointer speed
- Flow between two computers
Customize the middle button
- In Logi Options+, select the Pebble Mouse 2 M350s and go to the mouseSettings menu.

- Click onBUTTONS, then click on Middle button.

- Select or add the application you want the settings to be applied in, and assign the action to the button.


App-specific settings
After you install Logi Options+ app, you can have predefined app-specific settings that will adapt the middle button behavior to the selected applications.
The middle mouse buttons can be customized to perform different functions for different applications.
You can assign any functions to apps such as Chrome, Spotify, Wechat, WhatsApp, Zoom, and so on.
- Select the application (ex. Spotify), select the action you want to be specifically assigned to that app when you click the middle button.


Assign gestures to the middle button
If you want more advanced functionality, you can assign the middle button to be the Gesture Button. This will transform your selected button into a powerful multi-function button allowing you to use gestures for desktop navigation, app management, pan, zoom, and more.

- On the Mouse tab, select the button and click onGesture Button.
- By default, the gesture buttons will allow you to navigate between windows and desktops.
- In order to perform the gestures, you will need to hold the button while you move the mouse.
Customize the Scroll wheel
- In Logi Options+, select the Pebble Mouse 2 M350s and go to the mouseSettings menu.
- Click on POINT AND SCROLL, then click on Scroll wheel.

- Select scrolling speed, natural or inverted direction.

- You can also activate the smooth scrolling (Windows only).


Customize the Pointer Speed
- In Logi Options+, select the Pebble Mouse 2 M350s and go to the mouseSettings menu.

- Click on POINT AND SCROLL, then click on Pointer Speed.

Flow between two computers
You can work on multiple computers with Logi Flow.
With Logi Flow, you can use the Logitech mouse cursor to move from one computer to the next and the Logitech keyboard will follow the mouse and switch computers at the same time.
You can even copy and paste between computers.
- In Logi Options+, select the Pebble Mouse 2 M350s and go to the mouse Flow menu.


You will need to install Logi Options+ app on both computers, and follow these instructions.
To download Logi Options+ app and learn more, go here.
POWER MANAGEMENT
- Check battery status
- Battery life and replacement
- Installing a new battery
Check battery status
You can install Logi Options+ app to receive battery status notifications, including low-charge warnings. To download Logi Options+ app and learn more, go here.
Or the status LED on the side of the keyboard turns red to indicate battery power is low and it's time to change batteries.
Battery life and replacement
Battery information:
Keyboard:
- Requires 2 AAA alkaline battery
- Expected battery life is up to 36 months
Mouse:
- Requires 1 AA alkaline battery
- Expected battery life is up to 24 months
Installing a new battery
Keyboard:
- Detach the battery compartment lid from the base. Take out the old batteries and insert 2 new AAA alkaline batteries, making sure that it faces the correct direction, and then put back the battery compartment lid.


Mouse:
- Lift the top case off the mouse. Take out the old battery and insert the new battery, making sure that it faces the correct direction, and then put back the top case.
![]()

SPECIFICATIONS
| Product Information | ||
| Component | Model Number (M/N) | Location |
| Keyboard | YR0091 | Label on back panel |
| Mouse | MR0103 | Label inside the battery compartment |
What's in the Box?
Keyboard, Mouse, Logi Bolt, User documentation
| Physical Specifications | ||||
| Component | Height | Width | Depth | Weight |
| Keyboard | 279.5 mm | 124.2 mm | 16.4 mm | Without Battery 395g With Battery 415g |
| Mouse | 279.5 mm | 124.2 mm | 16.4 mm | 53g without Receiver and without battery 76g without receiver and with 1 Alkaline battery |
| Retail Box | 136 mm | 310 mm | 36 mm | Without Battery 508g |
| General Product Specifications | |
| Wireless (non-Bluetooth, non-WiFi) Protocol | 2.4GHZ |
| Bluetooth Protocol | Supported Protocols |
| Software Support (at release) | Logitech Options+ |
| Mouse Specifications | |
| Connection Type | Bluetooth Low Energy and Bolt |
| Wireless Report Rate (Bolt mode) | Wireless report rate: 125 Hz (8 ms) |
| Bluetooth Report Rate | Bluetooth report rate: 88-133 Hz (7.5-11.25 ms) |
| Microprocessor | Nordic NRF52820 |
| DPI (Min/Max) | Resolution: 400-4000DPI |
| Sensor | Sensor: TCOB |
| Max Acceleration | Max. acceleration: > 10 G |
| Max Speed | Max. speed: > 20 IPS |
| Indicator Lights (LED) | One green, one red, three white host LEDs |
| Buttons | Three channel change button, On/off button |
| Indicator Lights (LED) | 1 - Connectivity |
| Buttons | 3 buttons + Connectivity button |
| Durability (button presses) | Left/Right button: 3M cycles Middle wheel button: 1M cycles |
| Durability feet | Material type + KM Range, Feet abrasion resistance: 100KM range |
| Materials used | Plastic PCR ABS |
| Battery Details | AA x 1 |
| Battery life (not rechargeable) | 24 months |
| Battery user replaceable? | Yes |
| Corded or Wireless | Wireless |
| Wireless range | 10m in office environment |
| Power Adapter Notes | Detachable power cord, cradle and power supply combined unit, etc. |
| Keyboard Specifications | |
| Connection type | Bluetooth® Low Energy PRO |
| Indicator lights (LED) | 1 green/red LED power indicator |
| Keyboard type | Scissor Keyboard |
| Durability (key presses) | 10M for standard keys, 3M for function and cursors keys |
| Actuation force (g/ounce) | 60+/-10gf |
| Total travel distance (mm / inch) | 1.5 ± 0.3 mm |
| Battery details | 2 x AAA batteries |
| Battery life (not rechargeable) | >50 Months |
| Battery user replaceable? | No |
| Corded or wireless | Wireless |
| Wireless range | >10 m |
CONNECTING YOUR COMBO
Connect your products to your device
There are two options to connect the keyboard and mouse to your device:
OPTION 1 - Logi Bolt
You can pair the products by using the Logi Bolt receiver

- Plug the included Logi Bolt receiver in your device.
- Remove the pull tabs from the keyboard and mouse. They will automatically turn on and pair to the receiver.
- Select your OS by pressing FN key + O (for Mac) or + C (for ChromeOS) or + P (for Windows)
OPTION 2 - Bluetooth
You can pair the products by using a Bluetooth® Low Energy connection.

- Remove the pull tab from the keyboard and mouse. It will automatically turn on.Channel 1 will be ready to pair.
- Open the Bluetooth preferences on your device. (Click here for more details on how to do this on your computer). Add a new peripheral by selecting the keyboard and mouse from your list of devices (make sure you select the same model number that is engraved under your keyboard) and your keyboard will be ready to use.
- If you experience issues with Bluetooth, click here for Bluetooth troubleshooting.
Your keyboard and mouse can be paired with up to three different devices and you can use the Easy-Switch button to toggle between them.
Pairing a second device
If you want to pair additional devices to your keyboard:

- Select the channel you want using theEasy-Switch button — press and then hold the same button for three seconds. This will put the keyboard in discovery mode so it can be seen by your computer. The LED will start blinking rapidly.
- Open theBluetooth settings on your computer to complete the pairing. You can find more details here.
- Once paired, a short press on theEasy-Switch button lets you toggle between your devices.
If you want to pair additional devices to your mouse:

- Select the channel you want using theEasy-Switch button — press and then hold the same button for three seconds. This will put the mouse in discovery mode so it can be seen by your computer. The LED will start blinking rapidly.
- Open theBluetooth settings on your computer to complete the pairing. You can find more details here.
- Once paired, a short press on theEasy-Switch button lets you toggle between your devices.
Pairing a device again
If a device becomes disconnected from the keyboard, you can easily re-pair the device with the keyboard. Here's how:
On the keyboard
- Press and then hold down theEasy-Switch button until the status light starts blinking rapidly.
- The keyboard is now in pairing mode for the next3 minutes.
On the device
- Go toBluetooth settings on your device and select Pebble K380s/Pebble K3 when it appears in the list of available Bluetooth devices.
- Follow the onscreen instructions to complete the pairing.
- Upon pairing, the status LED on the keyboard stops blinking and remains steady for 10 seconds.
On the mouse
- Press and then hold down the Easy-Switch button until the status light starts blinking rapidly.
- The mouse is now in pairing mode for the next 3 minutes.
On the device
- Go to Bluetooth settings on your device and select Pebble M350s/Pebble M3 when it appears in the list of available Bluetooth devices.
- Follow the onscreen instructions to complete the pairing.
- Upon pairing, the status LED on the mouse stops blinking and remains steady for 10 seconds.
INSTALL LOGI OPTIONS+
Download Logi Options+ to use all the possibilities this keyboard and mouse have to offer. In addition to optimizing the Pebble Keys 2 K380s and Pebble Mouse 2 K350s for your operating system, Logi Options+ lets you customize them to fit your needs and personal style — create shortcuts, reassign key functions, display battery warnings, and much more. To download and learn more, go here.
Click here for the list of supported OS versions for Logi Options+.
Download and run Logi Options+ app. Click here to download the software.
An installer window will pop up on your screen — click Install Options+.

- Once Logi Options+ is installed, a window will open and you'll be able to see an image of your keyboard and mouse. Click on it

- You will be taken into a quick onboarding process that shows you how to customize your keyboard and mouse. We highly recommend not to skip it.

![]()


COMPATIBILITY
Bluetooth wireless technology enabled devices:
- Windows 10, 11 or later
- macOS 11 or later
- iPadOS 14 or later
- iOS 14 or later
- Android 9.0 or later
- Chrome OS
- Linux
Compatible with Logi Bolt USB receiver (included only with Pebble 2 Combo).
FAQS
My Pebble Keys 2 K380s and Pebble Mouse 2 M350s are sometimes slow and unresponsive.
Try the following to resolve any slowness or unresponsiveness on your mouse or keyboard:
- Install new batteries. You'll need 2 AAA batteries for the keyboard and 1 AAA battery for your mouse.
- Try using a mouse pad or hard surface.
- Re-pair the products to your device.
- Reboot your device.
If this doesn't help, please contact Customer Servicefor extra support.
Can sleep mode be disabled on the Pebble Keys 2 K380s and the Pebble Mouse 2 M350s?
Sleep mode cannot be disabled on the keyboard or mouse. This function can save power — you can click any button to activate your device and it will not affect normal usage.
Do I need to pair the Pebble Keys 2 K380s and the Pebble Mouse 2 M350s individually?
It depends on if you want to use the Logi Bolt receiver or a Bluetooth connection:
- If you want to use the Logi Bolt receiver, simply insert it into your device. The keyboard and mouse will automatically pair with the Logi Bolt receiver and work with your device immediately.
- If you want to use your Bluetooth connection, you'll need to pair the keyboard and mouse individually.
Click here for more information about Pebble Keys 2 K380s.
Click here for more information about the Pebble Mouse 2 M350s.
What has been improved in Pebble Keys 2 K380s compared to K380?
The new Pebble Keys 2 K380s keyboard now includes:
- Logi Options+ support (APP profiles, Logi Flow compatibility, low battery notifications)
- New must-have shortcuts such as Emoji menu, dictation, screenshot
- Longer battery life — 36 months for K380s instead of 24 months for K380
- Latest Bluetooth 5.1 (robust connectivity, secure DFU, Swift pair) with added support for the Logi Bolt receiver
- Updated FSC sustainable packaging
- New color options
My Pebble Keys 2 K380s keyboard is sometimes slow and unresponsive.
Try the following to resolve any slowness or unresponsiveness:
- Install new batteries. You'll need two AAA batteries.
- Re-pair the keyboard to your device.
- Reboot your device.
If this doesn't help, please contact Customer Servicefor extra support.
Can I disable sleep mode on the Pebble Keys 2 K380s keyboard?
Sleep mode cannot be disabled on this keyboard. This function can save power — you can click any button to activate your device and it will not affect normal usage.
How do I know when Caps Lock is enabled on Pebble Keys 2 K380s?
To get on-screen notification when Caps Lock is enabled, download and install Logi Options+.
Can I use FLOW on my Pebble Keys 2 K380s?
Pebble Keys 2 K380s is FLOW compatible. You will need to have a mouse, such as Pebble Mouse 2 M350s, that supports FLOW to initiate the function.
What is the difference between the multi-OS and the Mac version of Pebble Keys 2 K380s?
Pebble Keys 2 K380s for Mac has a Mac-specific layout and the addition of the Do Not Disturb functionality.
Why don't the Easy-Switch keys work on my Pebble Keys 2 K380s?
If you experience issues accessing the Easy-Switch keys, you may have swapped them by mistake. Press Fn + Esc to swap between the enhanced and F-keys.
Easy-Switch keys are by default on F1, F2, and F3. When you receive your keyboard, the default layout will always give you direct access to the Easy-Switch keys and all enhanced keys such as volume and media keys.
Why do I need to install software to make some advanced shortcuts work on my Pebble Keys 2 K380s keyboard?
We do our best to make sure all keys, including shortcuts, work out of the box. We do this by leveraging specific key-codes that are natively available in the operating system. At the same time, we strive to make each of these keys evolve and adjust based on new ways of working. This means that some new functionalities do not have an existing code. In that case, you will need to install Logi Options+ software to unlock the keys so they work as expected on Windows and macOS.
Click here to download Logi Options+ and learn more.
Battery life and replacement for Pebble Keys 2 K380s
- Battery life: 36 months under standard conditions
- Battery replacement: Your product comes with two replaceable AAA batteries.
Can I use Pebble Keys 2 K380s in the BIOS setting interface?
Yes, if you use a Bolt receiver you can navigate BIOS settings. You will not be able to if you use a Bluetooth connection.
Does the Pebble Keys 2 K380s have backlighting?
No, the Pebble Keys 2 K380s doesn't come with the backlight keys.
How do I switch the default F-row functions to F1-F12 on my Pebble Keys 2 K380s?
There are two ways to switch the default settings for the F-Rows:
- On the keyboard, press the Fn and Esc keys.
- In the keyboard menu, select SETTINGS, and in the right pane under GENERAL, enable/disable Use F1, F2, etc. keys at standard functions keys.
![]()
![]()


How do I reset my device settings on Logi Options+?
To reset your settings:
- Download and install the Logi Options+ App.
- Make sure the keyboard/mouse is on and connected.
- Go to the keyboard/mouse settings menu and click on SETTINGS.
![]()
- UnderOTHER settings, click RESET TO DEFAULT SETTINGS.
![]()


How can I check which devices are connected to my keyboard?
To find the list of devices connected to your keyboard:
- Download and install the Logi Options+ App.
- Make sure the keyboard is on and connected.
- Go to the keyboard settings menu and click onEasy-Switch.
- The devices connected to different channels will appear.
![]()

How do I customize the F-row on my Pebble Keys 2 K380s?
Follow the instructions given below to customize your Pebble Keys 2 K380s F-Row keys:
- Download and install the Logi Options+ App.
- Make sure the keyboard is on and connected.
- Go to the keyboard settings menu and click on KEYS.
- Use the Global settings or ADD APPLICATION where you want the functions.
- Select the action you want for the keys.
![]()

How can I connect the Pebble Keys 2 K380s if I don't have Bluetooth?
If you don't have Bluetooth on your computer, you can use a Logi Bolt receiver, purchased separately, to connect your keyboard. If you have a Logi Bolt receiver from a different product you can also use that. Click here to learn more about Logi Bolt and connecting your device.
To pair your keyboard with Logi Bolt, download and use the Logi Options+ software or go to Logi Web Connect to connect your wireless devices.
Can I use a Unifying receiver for Pebble Keys 2 K380s?
You cannot use a Unifying receiver with the Pebble Keys 2 K380s. Your keyboard is compatible with the Logi Bolt receiver which can be purchased separately.
To pair your keyboard with Logi Bolt, download and use the Logi Options+ software or go to Logi Web Connect to connect your wireless devices.
How many devices can I connect to the Pebble Keys 2 K380s?
You can connect up to 3 devices to Pebble Keys 2 K380s. Use the Easy-Switch buttons (F1-F2-F3), located on the top row of your keyboard, to switch between your 3 devices.
How do I pair additional devices to the Pebble Keys 2 K380s?
To pair the keyboard with an additional device:

- Select the channel you want using theEasy-Switch button — press and then hold the same button for three seconds.
- When the LED starts blinking the second channel will be ready to pair through a Bluetooth connection. If the LED on the Channel does not start blinking, long press on the keycap for three seconds to activate the pairing mode.
- To toggle between devices, simply short press F1, F2, F3 to switch between Channel 1, 2, or 3.
What has been improved in Pebble Mouse 2 M350s compared to M350?
The new Pebble Mouse 2 M350s now includes:
- Logi Options+ support (Point & Scroll adjustment, APP profiles, Logi Flow compatibility, low battery notifications)
- Customizable middle button that supports shortcuts (ex. Emoji menu, dictation, screenshot, gesture, and so on) and specific APP profiles shortcuts for multiple apps (such as WhatsApp, Spotify, Wechat, KuGou, Zoom, Teams)
- Latest Bluetooth 5.1 (robust connectivity, secure DFU, Swift pair) with added support for the Logi
- Bolt receiver
- Easy-switch to pair up to three devices (M350s) instead of two (M350)
- Precise and adjustable 4000 DPI sensor (M350s) instead of standard 1000 DPI sensor (M350)
- Updated FSC sustainable packaging
- New color options
Can I purchase a new Logi Bolt receiver?
If you've lost your Logi Bolt receiver, you can purchase a new one.
To pair your product with a new Logi Bolt receiver, download and use the Logi Options+ software or go to Logi Web Connect to connect your wireless devices.
My Pebble Mouse 2 M350s is sometimes slow and unresponsive.
Try the following to resolve any slowness or unresponsiveness:
- Install a new battery.
- Try using a mouse pad or hard surface (not glass).
- Re-pair the mouse to your device.
- Reboot your device.
If this doesn't help, please contact Customer Service for extra support.
Can sleep mode be disabled on the Pebble Mouse 2 M350s?
Sleep mode cannot be disabled on this mouse. This function can save power — you can click any button to activate your device and it will not affect normal usage.
Can I customize the Pebble Mouse 2 M350s to use left-handed?
The Pebble Mouse 2 M350s is ambidextrous. You can use Logi Options+ to swap the left and right clicks. Click here to see how.
Battery life and replacement for Pebble Mouse 2 M350s.
- Battery life: 24 months under standard conditions
- Battery replacement: Your product comes with one replaceable AAA battery
Can I use Pebble Mouse 2 M350s in the BIOS setting interface?
If you use a Logi Bolt receiver, you can navigate in BIOS settings. This will not work when you're using a Bluetooth connection.
How do I swap left/right buttons using Logi Options+?
To swap the left and right mouse buttons:
- Download and install the Logi Options+ App.
- Make sure the mouse is on and connected.
- Go to the mouse settings menu and click onSETTINGS.
- Enable or disable the function underGENERAL settings.
![]()

How can I check which devices are connected to my mouse using Logi Options+?
To find the list of devices connected to your mouse:
- Download and install the Logi Options+ App.
- Make sure the mouse is on and connected.
- Go to the mouse settings menu and click on EASY SWITCH.
- The devices connected to different channels will appear.
![]()

What does smooth scrolling do in Windows?
- With Smooth Scrolling, web pages will glide across the screen in single-pixel increments.
- Without Smooth Scrolling, web pages typically scroll in choppy three-line increments.
How do I enable and disable smooth scrolling in Windows using Logi Options+?
To enable and disable smooth scrolling (Windows only):
- Download and install the Logi Options+ App.
- Make sure the mouse is on and connected.
- Go to the mouse settings menu and click on POINT AND SCROLL.
![]()
- Click on Scroll Wheel on the mouse image in the right pane.
- Enable or disable smooth scrolling.
![]()


How do I change the cursor speed on Logi Options+?
You can change the speed using either Options+ or change the speed in the system.
To change the cursor speed:
- Download and install the Logi Options+ App.
- Make sure the mouse is on and connected.
- Go to the mouse settings menu and click on POINT AND SCROLL.
![]()
- Click on Pointer speed on the mouse image in the right pane.
![]()
- Use the slider to change the speed.
![]()


How do I invert the scroll direction on Logi Options+?
To invert the scroll direction:
- Download and install the Logi Options+ App.
- Make sure the mouse is on and connected.
- Go to the mouse settings menu and click on POINT AND SCROLL.
![]()
- Click on Scroll wheel on the mouse image in the right pane.
![]()
- Choose the scroll direction you want.
![]()


How can I customize the middle button?
Follow the instructions given below to customize your middle button
- Download and install the Logi Options+ App.
- Make sure the mouse is on and connected.
- Go to the mouse settings menu and click BUTTONS, then click on Middle button.
![]()
- Use the Global settings orADD APPLICATION where you want the functions.
![]()
- Select the action you want for the middle button.
![]()


I don't have Bluetooth connectivity on my computer. How do I connect the Pebble Mouse 2 M350s?
If you don't have Bluetooth on your computer, you can use a Logi Bolt receiver, purchased separately, to connect your mouse. If you have a Logi Bolt receiver from a different product you can also use that. Click here to learn more about Logi Bolt and connecting your device.
To pair your mouse with Logi Bolt, download and use the Logi Options+ software or go to Logi Web Connect to connect your wireless devices.
Can I use the receiver from Pebble M350 to connect Pebble Mouse 2 M350s?
Pebble Mouse 2 M350s is not compatible with the dongle of the Pebble M350. Your mouse is compatible with the Logi Bolt receiver which can be purchased separately.
To pair your mouse with Logi Bolt, download and use the Logi Options+ software or go to Logi Web Connect to connect your wireless devices.
Can I use a Unifying receiver with Pebble Mouse 2 M350s?
You cannot use a Unifying receiver with the Pebble Mouse 2 M350s. Your mouse is compatible with the Logi Bolt receiver which can be purchased separately.
To pair your mouse with Logi Bolt, download and use the Logi Options+ software or go to Logi Web Connect to connect your wireless devices.
How many devices can I connect to the Pebble Mouse 2 M350s?
You can connect up to 3 devices to the Pebble Mouse 2 M350s. Use the Easy-Switch button on the bottom of the Pebble Mouse 2 M350s to switch between your 3 devices.
How do I pair additional devices to the Pebble Mouse 2 M350s?
To pair your mouse with a second device:

- On the bottom of your mouse, select Channel 2 with a short press (one second) on the Connect button.
- The second channel will be ready to pair through a Bluetooth connection when the LED starts blinking (if the LED on Channel 2 does not start blinking, long-press the Connect button for three seconds to activate pairing mode).
- To toggle between devices, simply short-press the Connect button between Channel 1, 2, or 3.
CONTACT US
Would you like to speak with us? We're here to help.
Have an account? Log in

DOWNLOAD
Click here to download Logi Options+
Documents / Resources
References
Logi Options+ (plus): Customization app voor Logitech-apparaten
![support.logi.com]() What is Logitech Flow and how do I set it up and troubleshoot it? – Logitech Support + Download
What is Logitech Flow and how do I set it up and troubleshoot it? – Logitech Support + Download![support.logi.com]() All about Logi Options+ – Logitech Support + Download
All about Logi Options+ – Logitech Support + Download![support.logi.com]() Bluetooth - Pairing and Troubleshooting – Logitech Support + Download
Bluetooth - Pairing and Troubleshooting – Logitech Support + Download![support.logi.com]() Product Info & Specs – Logitech Support + Download
Product Info & Specs – Logitech Support + Download![support.logi.com]() Submit a request – Logitech Support + Download
Submit a request – Logitech Support + Download![support.logi.com]() Getting Started - Pebble Keys 2 K380s – Logitech Support + Download
Getting Started - Pebble Keys 2 K380s – Logitech Support + Download![support.logi.com]() Getting Started - Pebble Mouse 2 M350s – Logitech Support + Download
Getting Started - Pebble Mouse 2 M350s – Logitech Support + DownloadLogi Options+ (plus): Customization app voor Logitech-apparaten
![support.logi.com]() Logi Bolt – Logitech Support + Download
Logi Bolt – Logitech Support + DownloadLogi Options+ (plus): Customization app voor Logitech-apparaten
![logiwebconnect.com]() Logi Web Connect
Logi Web Connect![support.logi.com]() How do I swap left/right buttons using Logi Options+? – Logitech Support + Download
How do I swap left/right buttons using Logi Options+? – Logitech Support + DownloadLogi ID
https://download01.logi.com/web/ftp/pub/techsupport/optionsplus/logioptionsplus_installer.zip
Download manual
Here you can download full pdf version of manual, it may contain additional safety instructions, warranty information, FCC rules, etc.
Advertisement


Need help?
Do you have a question about the Pebble 2 Combo and is the answer not in the manual?
Questions and answers