Sony Handycam HDR-XR100 Operating Manual
Digital hd video camera recorder
Hide thumbs
Also See for Handycam HDR-XR100:
- Operating instructions manual (228 pages) ,
- Operating manual (128 pages) ,
- Service manual (119 pages)
Table of Contents
Advertisement
Available languages
Available languages
Quick Links
Additional information on this product and
answers to frequently asked questions can
be found at our Customer Support Website.
Puede encontrar más información sobre
este producto y respuestas a las preguntas
más frecuentes en nuestro sitio Web de
atención al cliente.
http://www.sony.net/
Printed on 70% or more recycled
paper using VOC (Volatile Organic
Compound)-free vegetable oil based ink.
Impreso en papel reciclado en un 70%
o más utilizando tinta hecha con aceite
vegetal exento de compuesto orgánico
volátil (COV).
Printed in Japan
HDR-XR100/XR101/XR200/XR200V
Digital HD Video Camera Recorder
Operating Guide
Guía de operaciones
2009 Sony Corporation
4-121-425-12(1)
US
ES
Advertisement
Chapters
Table of Contents

Related Manuals for Sony Handycam HDR-XR100


Summary of Contents for Sony Handycam HDR-XR100
- Page 1 Printed on 70% or more recycled paper using VOC (Volatile Organic Compound)-free vegetable oil based ink. Impreso en papel reciclado en un 70% o más utilizando tinta hecha con aceite vegetal exento de compuesto orgánico volátil (COV). Printed in Japan 2009 Sony Corporation ...
- Page 2 Record the serial number of important operating and in the space provided below. Refer to these maintenance (servicing) numbers whenever you call your Sony instructions in the literature dealer regarding this product. accompanying the appliance. Model No. HDR- Serial No.
-
Page 3: Important Safety Instructions
SAVE THESE INSTRUCTIONS. DANGER - TO REDUCE THE RISK OF FIRE OR ELECTRIC SHOCK, CAREFULLY FOLLOW THESE INSTRUCTIONS. Read these instructions. Keep these instructions. Heed all warnings. Follow all instructions. Do not use this apparatus near water. ... -
Page 4: Read This First
Do not handle damaged or leaking lithium ion batteries. Caution: Do not handle damaged or Be sure to charge the battery with Sony battery leaking Lithium-Ion batteries. charger or the device that can charge the battery pack. - Page 5 Trade Name: SONY can radiate radio frequency energy and, Model No.: HDR-XR200V if not installed and used in accordance Responsible Party: Sony Electronics Inc. with the instructions, may cause harmful Address: 16530 Via Esprillo, San Diego, interference to radio communications.
- Page 6 Representative plug of power supply cord of countries/regions around the world. A Type B Type BF Type B3 Type C Type SE Type O Type (American (British Type) (British Type) (British Type) (CEE Type) (CEE Type) (Ocean Type) Type) The representative supply voltage and plug type are described in this chart. Depend on an area, Different type of plug and supply voltage are used.
- Page 7 Oceania Countries/regions Voltage Frequency (Hz) Plug type Australia New Zealand 230/240 North America Countries/regions Voltage Frequency (Hz) Plug type Canada Central America Countries/regions Voltage Frequency (Hz) Plug type Bahamas 120/240 Costa Rica Cuba 110/220 Dominican (rep) El Salvador Guatemala Honduras Jamaica Mexico 120/127...
-
Page 8: Using The Camcorder
ejecting the “Memory Stick PRO Duo” media Supplied items removing the battery pack or AC Adaptor from the camcorder The numbers in ( ) are the supplied Do not apply shock or vibration to the quantity. camcorder. The camcorder may not be able to AC Adaptor (1) ... -
Page 9: About Language Setting
on some type of external media first, and then Discs recorded with high definition perform [MEDIA FORMAT] (p. 42). image quality (HD) The LCD screen is manufactured using This camcorder captures high definition footage extremely high-precision technology, so over in the AVCHD format. -
Page 10: Operation Flow
Operation flow Recording movies and photos (p. 17) In the default settings, movies are recorded with high definition image quality (HD) on the internal hard disk. In the default settings, photos are recorded on the internal hard disk. You can change the recording media selected, and the image ... -
Page 11: Table Of Contents
Table of contents IMPORTANT SAFETY INSTRUCTIONS............. 3 Read this first. - Page 12 Creating a standard definition image quality (SD) disc with a recorder, etc. (A/V connecting cable connection)............40 Making good use of your camcorder Deleting movies and photos.
-
Page 13: Getting Started
Getting started Step 1: Charging the battery pack Battery pack DC IN jack Charge lamp DC plug ACCESS lamp AC Adaptor Power cord (mains lead) (hard disk) To the wall outlet (wall socket) You can charge the “InfoLITHIUM” battery pack (H series) after attaching it to your camcorder. -
Page 14: Charging The Battery Pack Abroad
To remove the battery pack Close the LCD screen. Slide the BATT (battery) release lever and remove the battery pack . To use a wall outlet (wall socket) as a power source Make the same connections as “Step 1: Charging the battery pack. ” Notes on the battery pack and the AC Adaptor When you remove the battery pack or disconnect the AC Adaptor, close the LCD screen and make sure ... -
Page 15: Step 2: Turning The Power On, And Setting The Date And Time
Step 2: Turning the power on, and setting the date and time Open the LCD screen of your camcorder. Your camcorder is turned on. To turn on your camcorder when the LCD screen is open, press POWER. POWER (Movie): To record movies (Photo): To record photos Select the desired geographical area with / , then touch [NEXT]. -
Page 16: Changing The Language Setting
To turn off the power Close the LCD screen. The (Movie) lamp flashes several seconds, then the camcorder is turned off. POWER You can turn off your camcorder also by pressing POWER. When [POWER ON BY LCD] (p. 49) is set to [OFF], turn off your camcorder by pressing POWER. ... -
Page 17: Recording
Recording Recording Recording movies In the default setting, movies are recorded with high definition image quality (HD) on the hard disk (p. 43, 48). Fasten the grip belt. Open the LCD screen of your camcorder. Your camcorder is turned on. To turn on your camcorder when the LCD screen is already open, press POWER. - Page 18 Press START/STOP to start recording. Zoom lever Wide Telephoto [STBY] [REC] To stop recording, press START/STOP again. Move the power zoom lever slightly for a slower zoom. Move it further for a faster zoom. If you close the LCD screen during recording, the camcorder stops recording. ...
- Page 19 Shooting photos In the default setting, photos are recorded on the hard disk (p. 43). Open the LCD screen of your camcorder. Your camcorder is turned on. To turn on your camcorder when the LCD screen is already open, press POWER. ...
- Page 20 Press PHOTO lightly to adjust the focus, then press it fully. Zoom lever Wide Telephoto Flashes Lights up When disappears, the photo is recorded. Move the power zoom lever slightly for a slower zoom. Move it further for a faster zoom. ...
-
Page 21: Recording And Playing Movies And Photos Easily
Recording and playing movies and photos easily (Easy Handycam operation) Simply press EASY. To cancel Easy Handycam operation, press EASY again after you finish recording, or menu operations. During Easy Handycam operation, you can set basic options, such as changing the image size or deleting images, among the setting and adjustment items. -
Page 22: Playback
Playback Playback .on.the.camcorder In the default setting, movies and photos on the internal hard disk are played (p. 43). Playing movies Open the LCD screen of your camcorder. Your camcorder is turned on. To turn on your camcorder when the LCD screen is already open, press POWER. ... - Page 23 HDR-XR200/XR200V To the screen to select To the HIGHLIGHT the index type PLAYBACK screen To the list of recording Previous dates Next To return to recording mode appears on the movie/photo that was played or recorded most recently. Touch the image to ...
- Page 24 Viewing photos (Photo) a desired photo on the VISUAL INDEX screen. Touch Displays the Map Index screen (p. 47) (HDR- XR200V) Your camcorder displays the selected photo. To start/stop slide show Previous Next To the VISUAL INDEX screen You can zoom in the photo by moving the zoom lever while viewing photos (PB ZOOM).
-
Page 25: Playing Images On A Tv
Playing images on a TV Connection methods and the image quality (high definition (HD) or standard definition (SD)) played on the TV screen differ depending on what type of TV is connected, and the connectors used. You can connect your camcorder to the TV easily following the instructions of [TV CONNECT Guide]. - Page 26 On “PhotoTV HD” This camcorder is compatible with the “PhotoTV HD” standard. “PhotoTV HD” allows for highly-detailed, photo-like depiction of subtle textures and colors. By connecting Sony’s PhotoTV HD-compatible devices using an HDMI cable (sold separately) * or the component A/V cable (supplied) ** , a whole new world of photos can be enjoyed in breathtaking full HD quality.
-
Page 27: Saving Movies And Photos With A Computer
(Intel Pentium 4, 2.8 GHz or faster, is required when creating a DVD see the following website. video by converting high definition image http://guide.d-imaging.sony.co.jp/mac/ quality (HD) to standard definition image ms/us/ quality (SD).) Copying a disc... -
Page 28: Camcorder Screen
Step 2 Installing the supplied Click [Install]. software “PMB” Install “ PMB ” before connecting your camcorder to a computer. If a version of “PMB” supplied with another device has already been installed on the computer, check the version. (The version number is displayed by clicking [Help] - [About PMB].) Compare the version number of the supplied CD-ROM with that of the previously... - Page 29 To disconnect your camcorder from the computer Click [Continue]. Click the icon at the bottom Confirm the license agreement, right of the desktop of the and if you accept the terms, computer [Safely remove USB click [Next] change Mass Storage Device].
-
Page 30: Selecting The Method For Creating A Disc (Computer)
Creating a Blu-ray disc* with high definition image quality (HD) (p. 35) AVCHD format playback devices Creating a disc with one touch (One Touch (a Sony Blu-ray disc player, Disc Burn) (p. 32) PLAYSTATION 3, etc.) ... - Page 31 Discs you can use with “PMB” You can use 12 cm discs of following type with “PMB. ” For Blu-ray disc, see page 35. Disc type Features DVD-R/DVD+R/DVD+R DL Unrewritable DVD-RW/DVD+RW Rewritable Always maintain your PLAYSTATION 3 to use the latest version of the PLAYSTATION 3 system ...
-
Page 32: Creating A Disc With One Touch (One Touch Disc Burn)
Creating a disc with one touch (One Touch Disc Burn) You can save movies and photos on a disc by simply pressing the (DISC BURN) button on your camcorder. Movies and photos recorded on your camcorder that have not yet been saved with One Do not close the LCD screen when the ... -
Page 33: Importing Movies And Photos To A Computer (Easy Pc Back-Up)
Importing movies and photos to a computer (Easy PC Back-up) On the computer screen, click Movies and photos recorded on your [Easy PC Back-up] [Import]. camcorder that have not yet been saved with Easy PC Back-up can be imported to a computer automatically. -
Page 34: Starting Pmb (Picture Motion Browser)
DVD disc (p. 30) is explained. screen, click [Start] [All Programs] You can play a high definition image quality [Sony Picture Utility] [PMB] to start “PMB. ” (HD) disc on AVCHD format playback devices, You can view, edit, or create discs of movies such as a Sony Blu-ray disc player and a and photos using “PMB. -
Page 35: Playing A High Definition Image Quality (Hd) Disc On A Computer
Blu-ray discs. You cannot add contents to To start “Player for AVCHD, ” Click either type of disc after creating the disc. [Start] [All Programs] [Sony Picture Utility] [Player for AVCHD]. See the “Player for AVCHD” help on the operation. -
Page 36: On Ordinary Dvd Players
Click [Folders] or [Calendar] on movies to standard definition image quality (SD) movies. the left side in the window, and Click [Start] [All Programs] [Sony select the folder or date, then Picture Utility] [Video Disc Copier] select the movies and photos. -
Page 37: Editing Movies
Editing movies You can cut out only necessary parts from a movie and save it as another file. Using “PMB, ” select the movie you want to edit, then click [Manipulate] [Video Trimming] on the menu to display the Video Trimming window. See the PMB Guide on the operation (p. -
Page 38: Saving Images With A Dvd Writer, Recorder
See page 35 to create a Blu-ray disc. Player Choosing a method and disc type AVCHD format playback devices (a Sony Blu-ray disc player, PLAYSTATION 3, etc.) Creating a high definition image quality (HD) disc with a DVD writer, etc. (USB cable connection) (p. -
Page 39: (Usb Cable Connection)
(HD) movies on a disc by connecting your camcorder to disc creation devices, After the operation is completed, such as a Sony DVD writer, with the USB touch [END] [YES] on the cable. Refer also to the instruction manuals camcorder screen. -
Page 40: Creating A Standard Definition Image Quality (Sd) Disc With A Recorder, Etc
You can dub images played back on your camcorder on a disc or video cassette, by connecting your camcorder to a disc recorder or a Sony DVD writer, etc. with Input the A/V connecting cable. Connect the S VIDEO device in either way of ... -
Page 41: Your Camcorder
A/V connecting cable to the video input jack, and the white (left channel) or the red (right channel) plug to the audio input jack on the device. Sony DVD writer may not be available in some countries/regions. -
Page 42: Making Good Use Of Your Camcorder
Making good use of your camcorder Deleting movies and photos Formatting the recording media You can free media space by deleting Formatting deletes all the movies and movies and photos from recording media. photos to recover recordable free space. Select the recording medium that contains Connect your camcorder to the wall outlet (wall ... -
Page 43: Coping With Shooting Conditions
Coping with shooting Changing the conditions recording medium Many settings and adjustment options are You can select the internal hard disk or available on the menu (p. 45). “Memory Stick PRO Duo” media as the recording, playback, or editing medium on Recording in dark places your camcorder. -
Page 44: To Check The Recording Media Settings
“Memory Stick PRO Duo” media of up to 16 GB is confirmed to work with this camcorder. Touch the desired recording medium. Open the “Memory Stick Duo” media cover, and insert the Touch [YES] “Memory Stick PRO Duo” media The recording medium is changed. -
Page 45: Memory Stick Pro Duo" Media
Customizing your camcorder with menus To eject the “Memory Stick PRO Duo” media Menu items are described in more details with Open the “Memory Stick PRO Duo” media color photos in the “Handycam Handbook” (p. 51). cover and lightly push the “Memory Stick PRO Duo”... -
Page 46: Using The Help Function
When the item you want is not on the screen, Using the HELP function touch another tab. (There may be no tab.) You cannot use the OPTION MENU during To see the descriptions on the HOME Easy Handycam operation. MENU, touch (HELP) on the HOME MENU screen. - Page 47 List of the HOME MENU (CAMERA) category MOVIE ......... p. 17 PHOTO ........p. 19 SMTH SLW REC ......Records fast moving subjects in slow-motion. (VIEW IMAGES) category VISUAL INDEX ......p. 22 MAP * ........Displays the Map Index for searching for movies and photos by recording location.
- Page 48 USB CONNECT USB CONNECT ..Connects the internal hard disk via USB. USB CONNECT ..Connects the “Memory Stick PRO Duo” media via USB. DISC BURN ....... p. 32 DOWNLOAD MUSIC .. Download music files that can be played with HIGHLIGHT PLAYBACK. TV CONNECT Guide ....
- Page 49 AUTO SLW SHUTTR ..Adjusts the shutter speed automatically. GUIDEFRAME ....Displays the frame to make sure the subject is horizontal or vertical position. FLASH MODE ** ....Sets how the flash is activated. FLASH LEVEL ** ....Sets the brightness of flash. REDEYE REDUC ** ...
- Page 50 REMOTE CTRL ..... Sets whether the Wireless Remote Commander is to be used or not. DROP SENSOR ....p. 8 CTRL FOR HDMI ..... p. 26 [SOUND/DISP SET] is changed to [SOUND SETTINGS] during Easy Handycam operation. HDR-XR200V HDR-XR200/XR200V List of the OPTION MENU Following items are available on the OPTION MENU only.
-
Page 51: Getting Detailed Information From The "Handycam Handbook
Getting detailed information from the “Handycam Handbook” Click [Exit] [Exit], then remove the CD-ROM from your The “Handycam Handbook” is a users computer. guide designed to be read on a computer screen. The functions of your camcorder are described, some of them with color To view the “Handycam Handbook, ”... -
Page 52: Additional Information
Pressing START/STOP or PHOTO does not amount of data stored on the hard disk in order record images. to investigate the problem. However, your Sony dealer will neither copy nor retain your data. Press MODE to turn on the (Movie) or ... -
Page 53: Self-Diagnosis Display/Warning Indicators
If the problem persists even after you The temperature of your camcorder is low. have tried to fix a couple of times, contact Make the camcorder warm. your Sony dealer or local authorized Sony service facility. No “Memory Stick PRO Duo” media is C:04:... -
Page 54: Precautions
If any solid object or liquid gets inside the casing, unplug your camcorder and have it checked by a Sony dealer before operating it any further. Avoid rough handling, disassembling, modifying, physical shock, or impact such as hammering, dropping or stepping on the product. -
Page 55: Rechargeable Battery
If the battery electrolytic liquid has leaked: About care and storage of the lens Consult your local authorized Sony service facility. Wipe the surface of the lens clean with a soft ... - Page 56 In this case, replace the battery with you may not delete data from the hard disk a Sony CR2025 lithium battery. Use of another completely. When you transfer the camcorder, it battery may present a risk of fire or explosion.
-
Page 57: Specifications
(lux) (during NightShot function (HDR- Audio: Dolby Digital 2ch/5.1ch XR200/XR200V)) Dolby Digital 5.1 Creator Photo file format: DCF Ver.2.0 compatible The unique pixel array of Sony’s ClearVid Exif Ver.2.21 compatible and the image processing system MPF Baseline compatible (BIONZ) allow still image resolution equivalent to the sizes described. - Page 58 Expected charging and running time HDR-XR200/XR200V: 70 122 mm (2 7/8 2 3/4 4 7/8 in.) (w/h/d) including for the supplied battery pack (minute) the projecting parts 133 mm (2 7/8 2 3/4 5 1/4 in.) ...
- Page 59 32 h 0 m 48 h 10 m 47 h 50 m (5.1 ch) time. [HD LP] A Sony “Memory Stick PRO Duo” media is 33 h 30 m 50 h 30 m 50 h 10 m (2 ch) used.
- Page 60 Duo” are trademarks or registered trademarks of Sony Corporation. “InfoLITHIUM” is a trademark of Sony Corporation. “x.v.Color” is a trademark of Sony Corporation. “BIONZ” is a trademark of Sony Corporation. “BRAVIA” is a trademark of Sony Corporation.
-
Page 61: Screen Indicators
Screen indicators Upper left Center Upper right Upper right Indicator Meaning Recording quality (HD/ SD) and recording mode (FH/HQ/SP/LP) Recording/playback media Counter (hour:minute: 0:00:00 seond) Bottom Expected recording [00min] Upper left remaining time Indicator Meaning FADER HOME button LCD backlight off AUDIO MODE Drop sensor off Self-timer recording... -
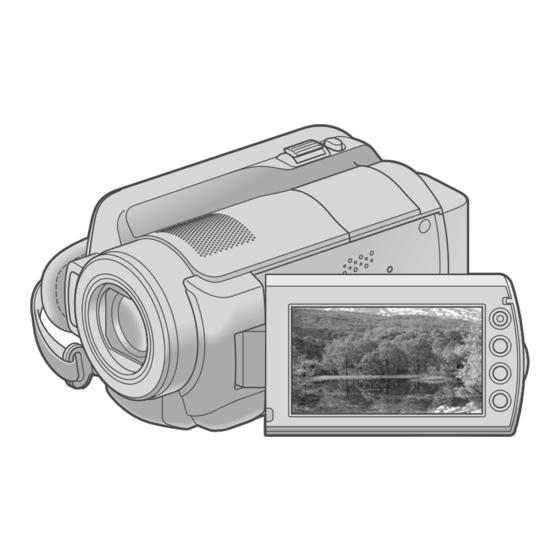
Page 62: Parts And Controls
Parts and controls Figures in ( ) are reference pages. Indicator Meaning OPTION button VIEW IMAGES button HDR-XR100/XR101 Slide show button Data file name 101-0005 VISUAL INDEX button Indicators and their positions are approximate and may differ from what you actually see. Depending on the models of camcorder, some ... - Page 63 Camera recording lamp (49) The camera recording lamp lights up in red HDR-XR100/XR101 during recording. The lamp flashes when the remaining recording media capacity or battery power is low. Remote sensor/Infrared port LENS COVER switch HDR-XR200/XR200V LCD screen/Touch panel (15) ...
- Page 64 (Movie)/ (Photo) lamps (15) CHG lamp (HDR-XR100/XR101)/ /CHG lamp (HDR-XR200/XR200V) (13) ACCESS lamp (Hard disk) (13) While the lamp is lit or flashing, the camcorder is reading or writing data. Battery pack (13) DC IN jack (13) ...
-
Page 65: Index
Index Image quality .......43 Tripod...........43 Install ..........28 Troubleshooting ......52 Turning the power on ....15 Active Interface Shoe ....62 TV ..........25 Language ........16 AVCHD........30, 38 TV CONNECT Guide ....25 A/V connecting cable....40 Macintosh ........27 USB .........27, 39 “Memory Stick” ......44 Battery ..........13 Using a wall outlet (wall socket) “Memory Stick PRO Duo”..44 as a power source ......14... -
Page 66: Lea Esto Primero
No la incinere ni la arroje al fuego. No manipule baterías de iones de litio dañadas o que presenten fugas. Asegúrese de cargar la batería con un cargador de baterías original de Sony o con un dispositivo que pueda cargarla. - Page 67 Elementos suministrados Notas sobre el uso Uso de la videocámara Los números entre ( ) indican la cantidad suministrada. La videocámara no está protegida contra el polvo, las salpicaduras ni el agua. Consulte el Adaptador de alimentación de ca (1) ...
- Page 68 Para proteger el disco duro interno de golpes Grabación en una caída, la videocámara cuenta con una Antes de comenzar a grabar, pruebe las función de sensor de caída. Cuando se produce funciones de grabación para asegurarse de que una caída o en condiciones donde no hay la imagen y el sonido se graben sin problemas.
- Page 69 Discos grabados con calidad de imagen de alta definición (HD) Esta videocámara captura imágenes de alta definición en formato AVCHD. Los soportes DVD que contengan imágenes en formato AVCHD no deben usarse con reproductores o grabadoras de DVD, ya que es posible que dichos dispositivos no puedan expulsar el soporte y borren su contenido sin previo aviso.
-
Page 70: Flujo De Funcionamiento
Flujo de funcionamiento Grabación de películas y fotos (pág. 13) En los ajustes predeterminados, las películas se graban con calidad de imagen de alta definición (HD) en el disco duro interno. En los ajustes predeterminados, las fotos se graban en el disco ... - Page 71 Índice Lea esto primero..................2 Flujo de funcionamiento..
- Page 72 Almacenamiento de imágenes con una grabadora de DVD Selección del método para la creación de un disco (grabadora de DVD)....36 Creación de un disco con calidad de imagen de alta definición (HD) mediante una grabadora de DVD, etc.
-
Page 73: Procedimientos Iniciales
Procedimientos iniciales Paso 1: Carga de la batería Batería Toma DC IN Indicador de carga Enchufe de cc Indicador ACCESS Adaptador de Cable de alimentación (disco duro) alimentación de ca Al tomacorriente de pared Puede cargar la batería “InfoLITHIUM” (serie H) luego de instalarla en la videocámara. No puede conectar ninguna batería “InfoLITHIUM”... -
Page 74: Carga De La Batería En El Extranjero
Para extraer la batería Cierre la pantalla de cristal líquido. Deslice la palanca de desbloqueo BATT (batería) y extraiga la batería . Para usar un enchufe de pared como fuente de alimentación Realice la misma conexión que en el “Paso 1: Carga de la batería”. Notas sobre la batería y el adaptador de alimentación de ca Antes de extraer la batería o el adaptador de alimentación de ca, cierre la pantalla de cristal líquido y ... -
Page 75: Paso 2: Encendido Y Ajuste De La Fecha Y La Hora
Paso 2: Encendido y ajuste de la fecha y la hora Abra la pantalla de cristal líquido de la videocámara. La videocámara se enciende. Para encender la videocámara cuando la pantalla de cristal líquido está abierta, presione POWER. POWER (Película): Para grabar películas (Foto): Para grabar fotos Seleccione la zona geográfica deseada con... -
Page 76: Cambio Del Ajuste De Idioma
La fecha y la hora no aparecen durante la grabación, aunque se graban automáticamente en el soporte de grabación y se pueden mostrar durante la reproducción. Para mostrar la fecha y la hora, toque (HOME) (AJUSTES) [VIS.AJUSTES IMÁG] [CÓDIGO DATOS] [FECHA/HORA] ... -
Page 77: Grabación
Grabación Grabación Grabación de películas En el ajuste predeterminado, las películas se graban con calidad de imagen de alta definición (HD) en el disco duro (pág. 41, 46). Ajuste la correa de sujeción. Abra la pantalla de cristal líquido de la videocámara. La videocámara se enciende. - Page 78 Presione START/STOP para iniciar la grabación. Palanca del zoom Gran angular Teleobjetivo [ESPERA] [GRAB.] Para detener la grabación, presione START/STOP de nuevo. Mueva la palanca del zoom motorizado levemente para realizar un zoom más lento. Muévala con más intensidad para realizar un zoom más rápido.
- Page 79 Si desea ver las películas en un televisor compatible con x.v.Color, grabe las películas con la función (HOME) (AJUSTES) [AJUSTES PEL.CÁM] [X.V.COLOR] x.v.Color. Toque [ACTIVADO] . Es posible que deba realizar algunos ajustes en el televisor para ver las películas.
- Page 80 Presione PHOTO levemente para ajustar el enfoque y luego presiónelo completamente. Palanca del zoom Gran angular Teleobjetivo Parpadea Se enciende Cuando desaparece, se graba la foto. Mueva la palanca del zoom motorizado levemente para realizar un zoom más lento. Muévala con ...
-
Page 81: Grabación Y Reproducción Sencilla De Películas Y Fotos
Grabación y reproducción sencilla de películas y fotos (Funcionamiento en modo Easy Handycam) Simplemente presione EASY. Para cancelar el funcionamiento en modo Easy Handycam, presione EASY nuevamente después de finalizar la grabación o las operaciones en el menú. Durante el funcionamiento en modo Easy Handycam, puede ajustar opciones básicas, como cambiar el tamaño de la imagen o eliminar imágenes, entre los elementos de configuración y ajuste. -
Page 82: Reproducción
Reproducción Reproducción .en.la.videocámara En el ajuste predeterminado, se reproducen las películas y fotos del disco duro interno (pág. 41). Reproducción de películas Abra la pantalla de cristal líquido de la videocámara. La videocámara se enciende. Para encender la videocámara cuando la pantalla de cristal líquido ya está abierta, presione ... - Page 83 HDR-XR200/XR200V A la pantalla para A la pantalla seleccionar el tipo de REPRODUCCIÓN índice DE SELECCIÓN A la lista de fechas de Anterior grabación Siguiente Para regresar al modo de grabación aparece junto con la película o foto que se reprodujo o se grabó más recientemente. Toque la ...
- Page 84 Para ajustar el volumen del sonido de las películas Durante la reproducción de películas, toque ajuste con Puede ajustar el volumen del sonido desde el OPTION MENU (pág. 44). Visualización de fotos (Foto) la foto deseada en la pantalla VISUAL INDEX. Toque Muestra la pantalla Índice de mapas...
-
Page 85: Reproducción De Imágenes En Un Televisor
Reproducción de imágenes en un televisor Los métodos de conexión y la calidad de la imagen (alta definición (HD) o definición estándar (SD)) que se reproduce en el televisor dependen del tipo de televisor conectado y de los conectores utilizados. Puede conectar la videocámara al televisor fácilmente si sigue las instrucciones de [GUÍA CONEXIÓN TV]. - Page 86 Al conectar dispositivos Sony compatibles con PhotoTV HD mediante un cable HDMI (se vende por separado) * o un cable de A/V de componente (suministrado) ** , es posible disfrutar de todo un mundo nuevo con fotografías que disponen de una calidad HD impresionante.
-
Page 87: Almacenamiento De Películas Y Fotos Con Una Computadora
Almacenamiento de películas y fotos con una computadora Preparación de una computadora Paso 1 Comprobación del sistema (Windows) de computadora Puede realizar las siguientes operaciones usando “PMB (Picture Motion Browser)”. Microsoft Windows XP SP3 /Windows Vista Importación de imágenes a una ... -
Page 88: Si Usa Un Equipo Macintosh
Consulte la página 50 en la “Guía práctica de una computadora Macintosh conectada Handycam”. a la videocámara, consulte el siguiente sitio Web. Confirme que la videocámara no http://guide.d-imaging.sony.co.jp/mac/ esté conectada a la computadora. ms/es/ Encienda la computadora. Inicie sesión como administrador para la instalación. - Page 89 Haga clic en [Instalar]. Haga clic en [Continuar]. Confirme el acuerdo de licencia y si acepta los términos, cambie haga clic en [Siguiente] [Instalar] en la pantalla de la computadora. Seleccione el idioma de la ...
- Page 90 Para desconectar la videocámara de la computadora Haga clic en el icono la parte inferior derecha del escritorio de la computadora [Extracción segura de Dispositivo de almacenamiento masivo USB]. Toque [FIN] [SÍ] en la pantalla de la videocámara. ...
-
Page 91: Selección Del Método Para La Creación De Un Disco (Computadora)
(HD) (pág. 33) Dispositivos de reproducción de Creación de un disco con un solo toque formato AVCHD (un reproductor (One Touch Disc Burn) (pág. 29) de discos Sony Blu-ray, PLAYSTATION 3, etc.) Importación de películas y fotos a una computadora (Easy PC Back-up) (pág. - Page 92 Discos que puede usar con “PMB” Puede usar discos de 12 cm de los siguientes tipos con “PMB”. Para obtener información sobre discos Blu-ray, consulte la página 33. Tipo de disco Características DVD-R/DVD+R/DVD+R DL No regrabable DVD-RW/DVD+RW Regrabable Siempre mantenga el PLAYSTATION 3 actualizado con la versión más reciente del software de sistema ...
-
Page 93: Creación De Un Disco Con Un Solo Toque (One Touch Disc Burn)
Creación de un disco con un solo toque (One Touch Disc Burn) Encienda la videocámara y Puede guardar películas y fotos en un conéctela a la computadora disco simplemente al presionar el botón usando el cable USB. (DISC BURN) en la videocámara. Las películas y fotos grabadas en la videocámara que aún no se hayan guardado con One Touch Disc Burn se pueden... -
Page 94: Importación De Películas Y Fotos A Una Computadora (Easy Pc Back-Up)
Importación de películas y fotos a una computadora (Easy PC Back-up) En la pantalla de la computadora, haga clic en [Easy PC Back-up] Las películas y fotos grabadas en la [Importar]. videocámara que aún no se hayan guardado con Easy PC Back-up se pueden importar a una computadora automáticamente. -
Page 95: Cambio De La Unidad O Carpeta De Destino De Las Películas Y Fotos
Si el icono no se muestra en la pantalla de la imágenes. computadora, haga clic en [Inicio] [Todos los programas] [Sony Picture Utility] [PMB] para iniciar “PMB”. Puede ver, editar o crear discos de películas y fotos usando “PMB”. -
Page 96: Creación De Un Disco Con Calidad De Imagen De Alta Definición (Hd)
(HD) en dispositivos mantenga presionada la tecla Ctrl y haga de reproducción de formato AVCHD, como clic en las imágenes en miniatura. un reproductor de discos Blu-ray de Sony y un PLAYSTATION 3. No puede reproducir ... -
Page 97: Una Computadora
BD para “PMB”. Haga clic en [Software clic en [Inicio] [Todos los programas] Complementario de BD] en la pantalla [Sony Picture Utility] [Player for de instalación de “PMB” e instale AVCHD]. Consulte la ayuda de “Player este complemento de acuerdo con las for AVCHD”... -
Page 98: Con Reproductores De Dvd Comunes
Siga las instrucciones en la También puede iniciar “PMB” al hacer clic pantalla para crear un disco. en [Inicio] [Todos los programas] Es posible que la creación de un disco [Sony Picture Utility] [PMB]. tarde bastante tiempo. -
Page 99: Copia De Un Disco
(SD). Consulte la “Guía de PMB” para obtener Haga clic en [Inicio] [Todos los información sobre su funcionamiento programas] [Sony Picture Utility] (pág. 31). [Video Disc Copier] para iniciar el software. Consulte la ayuda de “Video Disc Copier” para obtener información sobre su funcionamiento. -
Page 100: Almacenamiento De Imágenes Con Una Grabadora De Dvd
Consulte la página 33 para crear un disco Blu-ray. Reproductor Selección de un método y tipo de disco Dispositivos de reproducción de formato AVCHD (un reproductor de discos Sony Blu-ray, Creación de un disco con calidad de PLAYSTATION 3, etc.) imagen de alta definición (HD) mediante una grabadora de DVD, etc. -
Page 101: Grabadora De Dvd, Etc. (Conexión De Cable Usb)
DVD no son compatibles con el formato AVCHD, DVD es posible que no puedan expulsar el disco. Es posible que la grabadora de DVD de Sony no esté disponible en algunos países o regiones. Aparece la pantalla [SELEC.USB] en la... -
Page 102: Grabadora, Etc. (A/V Cable De Conexión)
Entrada discos o grabadora de DVD de Sony, etc., con el A/V cable de conexión. Conecte el S VIDEO dispositivo de la manera o . Consulte además el manual de instrucciones de... - Page 103 (canal derecho) en la entrada de audio del Para obtener más información, consulte los dispositivo. manuales de instrucciones suministrados Es posible que la grabadora de DVD de Sony no con el dispositivo de grabación. esté disponible en algunos países o regiones. Cuando haya finalizado la copia, detenga el dispositivo de grabación y, a continuación,...
-
Page 104: Uso Correcto De La Videocámara
Uso correcto de la videocámara Eliminación de películas y fotos Formateo del soporte de grabación Puede liberar espacio en el soporte de El formateo borra todas las películas y fotos grabación si elimina películas y fotos para recuperar espacio libre grabable. almacenadas en él. -
Page 105: Copia Con Condiciones De Filmación
Copia con condiciones Cambio del soporte de de filmación grabación El menú cuenta con muchas opciones de Puede seleccionar el disco duro interno o configuración y ajustes (pág. 43). “Memory Stick PRO Duo” como el soporte de grabación, reproducción o edición en Grabación en lugares oscuros la videocámara. -
Page 106: Para Comprobar Los Ajustes Del Soporte De Grabación
Selección del soporte para las fotos Inserción de un “Memory Stick PRO Duo” (HOME) Toque Ajuste el soporte de grabación en [MEMORY (GESTIONAR SOPORTE) [AJ. STICK] para grabar películas y/o fotos en un SOPORTE FOTO]. “Memory Stick PRO Duo” (pág. 41). Aparecerá... -
Page 107: Duo
Personalización de la videocámara con menús Los elementos de menú se describen de manera más detallada con fotos en color en la “Guía práctica de Handycam” (pág. 50). Uso de HOME MENU Indicador de acceso Cuando presiona el botón (HOME), (“Memory Stick PRO Duo”) aparece el HOME MENU. -
Page 108: Uso De La Función Help
Uso de OPTION MENU Cuando finalice el ajuste, toque OPTION MENU se abre igual que las ventanas emergentes que aparece al hacer Si el elemento no aparece en la pantalla, clic con el botón derecho del mouse de una toque computadora. - Page 109 Lista del HOME MENU Categoría (TOMA DE IMÁGENES) PELÍCULA ........pág. 13 FOTO ..........pág. 15 GR.LEN.UNIF......Graba en cámara lenta motivos que se mueven rápidamente. Categoría (VISUALIZAR IMÁGENES) VISUAL INDEX ......pág. 18 MAPA * ........Muestra el Índice de mapas para buscar películas y fotos por ubicación de grabación.
- Page 110 CONEXIÓN USB CONEXIÓN USB ..Conecta el disco duro interno mediante USB. CONEXIÓN USB ..Conecta el “Memory Stick PRO Duo” mediante USB. GRABAR EN DISCO ..pág. 29 DESCARG.MÚSICA ..Descarga archivos de música que se pueden reproducir con REPRODUCCIÓN DE SELECCIÓN.
- Page 111 AJUST.FOTO CÁM. TAM.IMAGEN ..... Ajusta el tamaño de la foto. NÚM.ARCHIVO ....Define cómo se asigna el número de archivo. ILUM.NIGHTSHOT ** ..Emite luz infrarroja cuando se usa NIGHTSHOT. STEADYSHOT ** ..Ajusta la función SteadyShot cuando se toman fotos. OB.LENTO AUTO ....
- Page 112 AJUST.GENERALES MODO DEMO....Define si se muestra o no la demostración...... Define si indicador de grabación se enciende o no. IND.GRAB. CALIBRACIÓN ....Calibra el panel táctil. APAGADO AUTO .... Cambia el ajuste [APAGADO AUTO] (pág. 10). ENCEND.CON LCD ..Define si la videocámara se enciende y se apaga al abrir y cerrar la pantalla de cristal líquido.
- Page 113 Lista del OPTION MENU Los siguientes elementos se encuentran disponibles en el OPTION MENU solamente. Ficha MED./ENF.PUNTO ..Ajusta el brillo y enfoca el objeto seleccionado simultáneamente. MEDID.PUNTO ....Ajusta el brillo de las imágenes de acuerdo a un objeto que toque en pantalla.
-
Page 114: Obtención De Información Detallada Con La "Guía Práctica De Handycam
Obtención de información detallada con la “Guía práctica de Handycam” Haga clic en [Exit] [Exit] y, a continuación, retire el CD-ROM La “Guía práctica de Handycam” es una de la computadora. guía para el usuario diseñada para leerse en la pantalla de una computadora. En ella se describen las funciones de la Haga doble clic en el icono de acceso videocámara, en algunos casos con fotos... -
Page 115: Información Complementaria
Déjela reposar unos momentos y luego Sin embargo, el distribuidor de Sony no copiará enciéndala. ni conservará sus datos. Consulte la Guía práctica de Handycam ... - Page 116 Cierre “PMB” y reinicie la computadora. La videocámara necesita reparación. Póngase en contacto con su distribuidor de Sony o con La computadora no reconoce la un centro de servicio técnico local autorizado videocámara. de Sony. Indíquele el código de 5 dígitos que comienza con la letra “E”.
- Page 117 Se restringió el acceso al “Memory Stick PRO El disco duro de la videocámara está lleno. Duo” en otro dispositivo. Elimine del disco duro las imágenes que no necesita (pág. 40). (HDR-XR200/XR200V) Se produjo un error en el disco duro de la ...
-
Page 118: Precauciones
Sony antes de volver a utilizarla. puede calentar. No se trata de una falla de Evite manipular, desmontar o modificar la ... - Page 119 Para limpiar la pantalla de cristal líquido Carga de la pila recargable preinstalada Si la pantalla de cristal líquido se ensucia de La videocámara contiene una batería recargable huellas dactilares o polvo, se recomienda el uso preinstalada para conservar la fecha, la hora y de un paño suave para limpiarla.
-
Page 120: Especificaciones
Cuando se convierte a una cámara de éste no funcione correctamente. En ese caso, imágenes fijas de 35 mm sustitúyala por una pila de litio Sony CR2025. Para películas : 42 ~ 497 mm (16:9) Para fotos: 38 ~ 380 mm (4:3) Si utiliza otro tipo de pila, podría producirse un... - Page 121 NightShot (HDR-XR200/XR200V)) Peso (aprox.): La exclusiva matriz de píxeles del HDR-XR100/XR101: 330 g únicamente la sensor ClearVid de Sony y el sistema de unidad principal procesamiento de imágenes (BIONZ) 410 g incluida la batería recargable permiten una resolución para las suministrada imágenes fijas equivalente a los tamaños...
- Page 122 Tiempo esperado de carga y Tiempo de grabación esperado de funcionamiento de la batería películas en el disco duro interno suministrada (minutos) Para ajustar el modo de grabación, toque (HOME) (AJUSTES) [AJUSTES HDR-XR100/XR101 PEL.CÁM] [MODO GRAB.]. En el ajuste “Memory Stick predeterminado, el modo de grabación es [HD Disco duro...
-
Page 123: Marcas Comerciales
Los números entre paréntesis ( ) indican el “BIONZ” es una marca comercial de Sony tiempo mínimo de grabación. Corporation. Se usa un Sony “Memory Stick PRO Duo”. “BRAVIA” es una marca comercial de Sony El tiempo de grabación varía según las ... -
Page 124: Indicadores De La Pantalla
Indicadores de la pantalla Parte superior izquierda Parte central “NAVTEQ” y el logotipo de “NAVTEQ MAPS” Parte superior derecha son marcas comerciales de NAVTEQ en los Estados Unidos y en otros países. Todos los demás nombres de productos mencionados en este manual pueden ser marcas comerciales o marcas comerciales registradas de sus respectivas compañías. - Page 125 Parte superior derecha Indicador Significado Indicador Significado Imagen protegida Calidad de grabación OBJETIVO CONVER. (HD/SD) y modo de Botón OPTION grabación (FH/HQ/SP/LP) Botón VISUALIZAR Soporte de grabación/ IMÁGENES reproducción Botón de presentación de Contador (hora:minuto: 0:00:00 diapositivas segundo) Nombre del archivo de Tiempo de grabación 101-0005 [00min]...
-
Page 126: Piezas Y Controles
Piezas y controles Los números entre ( ) corresponden a las Objetivo (objetivo Carl Zeiss) páginas de referencia. Flash (16) Indicador de grabación de la cámara (48) El indicador de grabación de la cámara se ilumina en rojo durante la grabación. El HDR-XR100/XR101 indicador parpadea cuando queda poca capacidad restante en el soporte de grabación... - Page 127 HDR-XR100/XR101 HDR-XR200/XR200V Indicadores (Película)/ (Foto) (11) Indicador CHG (HDR-XR100/XR101)/ indicador /CHG (HDR-XR200/XR200V) Indicador ACCESS (Disco duro) (9) Botón (VISUALIZAR IMÁGENES) (18) Si el indicador está encendido o parpadeando, significa que la videocámara está leyendo o Botón (DISC BURN) (29) escribiendo datos.
-
Page 128: Índice
Índice Flujo de funcionamiento .....6 Reparación ........51 Formato........40 Reproducción ......18 Fotos ........15, 20 Reproducción de un disco con calidad de imagen de alta A/V cable de conexión ....38 Funcionamiento en modo Easy definición (HD) ......33 Handycam ........17 Active Interface Shoe ....62 RESET ..........63 Función HELP ......44 AVCHD........27, 36...