Advertisement
- 1 PRECAUTIONS FOR USE
- 2 Packing list
- 3 Product Introduction
- 4 Button Function Introduction
- 5 Introduction of Display Interface
- 6 The Screen Displays Precautions
- 7 UPS Mode
- 8 Connection of Solar Panels
- 9 Car Charging
- 10 Use of Fan Covers
- 11 Product Specifications
- 12 Battery Specifications
- 13 Troubleshooting
- 14 Warranty
- 15 Documents / Resources
PRECAUTIONS FOR USE
- Please avoid long-term storage and use of this product in environments with high temperature and humidity or direct sunlight to avoid shortened battery life and other failures. The product should not be close to the fire source, otherwise it may cause a major fire or accident.
![burn hazard]() This product must not be disassembled or modified. Improper operation may cause product malfunction or even fire.
This product must not be disassembled or modified. Improper operation may cause product malfunction or even fire. - Be careful not to drop or drop the product from a high place, so as not to damage the product
- Please store or use this product out of the reach of children, otherwise the product may be dropped or collided and may cause bodily injury to children
- Please use our original accessories, and Fossibot will not guarantee the defective products caused by the use of non-original accessories.
![burn hazard]() Please directly plug in the wall socket to charge the product, do not use extension cords or cable taps, otherwise there is a risk of damage to the extension cords and cable taps or even a fire; If the extension socket is plugged in to charge this product, please do not connect other electrical appliances to this socket, otherwise the household energy meter may trip
Please directly plug in the wall socket to charge the product, do not use extension cords or cable taps, otherwise there is a risk of damage to the extension cords and cable taps or even a fire; If the extension socket is plugged in to charge this product, please do not connect other electrical appliances to this socket, otherwise the household energy meter may trip- When the product is not in use or idle, please turn it off and unplug the power cable. If it needs to be idle for a long time, please consume the product from a fully charged state to an uncharged state, then recharge it to about 50% of the battery level and store it. In order to prolong the life of the product, please take three months as a cycle, operate and keep it in this way.
- If the product reaches scrap conditions, please discard or recycle the product in accordance with local laws.
 This product must not be disassembled or modified. Improper operation may cause product malfunction or even fire.
 Due to the transportation requirements of international customs for battery products, F2400 is charged to about 30% before delivery. Please fully charge the product after unpacking for use.
This product should be charged directly from the wall socket. Do not use extension cords and cable taps. When using two or more sockets to charge, do not use devices other than this product on the same socket.
| OUTLET TYPE: AC OUTPUT | ||||
 US/JP 100V~120V 50/60Hz |  CN 220V 50Hz |  UK 230V 50Hz |  EU 220V-240V 50Hz |  KR 220V 60Hz |
Packing list

Product Introduction
This product is a 2048Wh large-capacity 2400W high-power portable power station supplied with 2-hour high-speed charging, using a lithium iron phosphate battery with extremely high safety performance.
It can be used as a backup power supply in the event of a sudden power failure or a disaster, or used for camping and living power in a camper, and can also provide power for various power tools regardless of the occasion.
2400W high power, sine wave AC output, can be used for high-power household appliances such as dryers, microwave ovens, refrigerators, induction cookers and electric ovens; it can also be used for other electronic devices such as personal computers.
0-100% charging can be completed within 2 hours through the 1100W ultra-fast charging of the household power socket, and the input voltage frequency can be auto switched to 50Hz/60Hz, or the input voltage frequency can be manually switched to 50Hz/60Hz. In addition, this product also supports solar panel charging, and the maximum input power cannot exceed 500w, allowing you to charge outdoors or at home when there is a power outage.

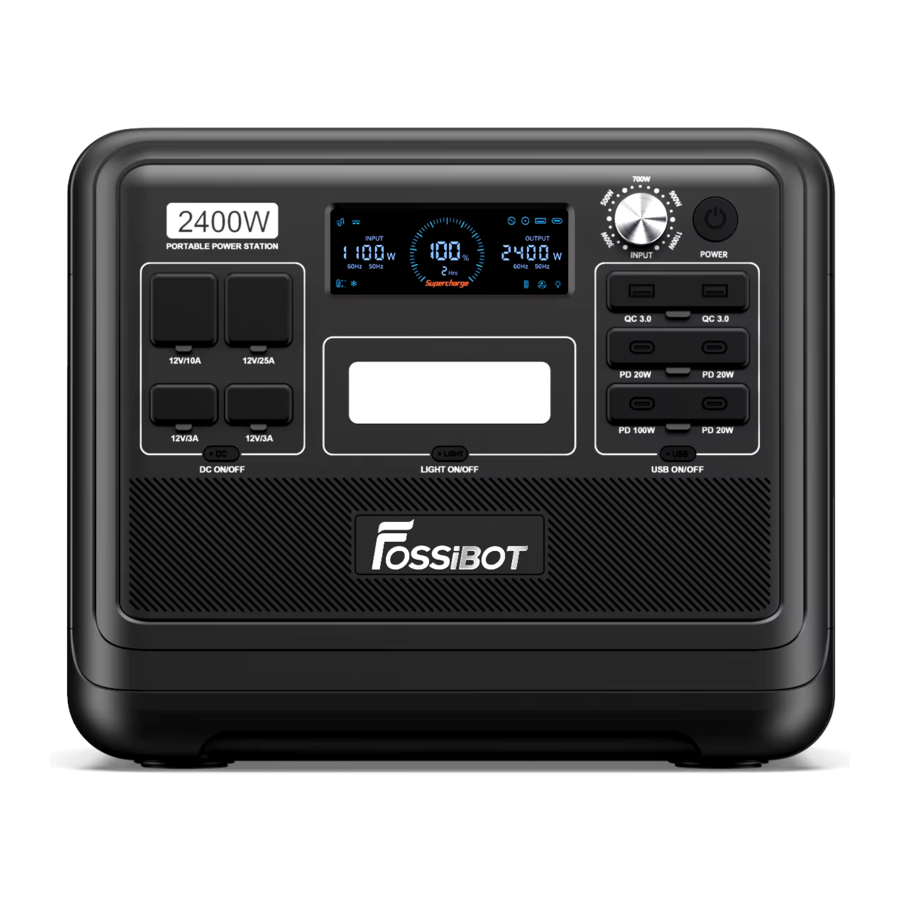
Button Function Introduction

- Power ON/OFF Button
- LED Light Button (Switch to different mode)
- USB ON/OFF Button
- DC ON/OFF Button
- LCD Screen
- Input Power Knob
- Cooling Air Duct
- AC Switch (Manually Switch to 50/60Hz)
- XT90 Input Port (For Solar Panel)
- AC input
- Overload Protection Button
- Power ON/OFF Button
Instructions: Press and hold the power button for 3s to wake up the system, turn on the LCD display, and press and hold again for 3s to turn off. - Light Button
Instructions: Short press the Light button, the LED light is on; short press again, the LED light enters the SOS mode, short press in turn, enter the strobe mode, and finally the LED light turns off (LED in any mode, long press the LIGHT button for ≥ 1 second, directly turn off the LED light). - USB ON/OFF Button
Instructions: Short press the USB button to turn on the USB output port, and short press it again to turn it off.

- DC ON/OFF Button
Instructions: Short press the DC button to turn on the DC output port, and short press it again to turn it off. - LCD Screen
Display the product's battery level and usage status tips. - Input Power Knob
When the product is connected to the AC mains for charging, the power can be adjusted according to the actual input voltage. The clockwise rotation increases the input power, and the counter clockwise rotation decreases the input power. It is worth noting that charging this product at low power is beneficial for extending battery life. - Cooling Suction/Exhaust Port
When the product reaches the temperature threshold set by the system, the cooling fan will automatically run, accompanied by a certain fan noise (fan noise below 60dB is normal). Do not block the cooling suction/exhaust port during use of this product, and do not place any object within the range of 30CM. - AC Switch (AC output port, the sum of electrical load power should be ≤ 2400W)
Tap the AC button to enable the AC output function.
Notices:- Since there may be differences in the AC output frequency in different regions, please check the AC voltage and frequency of the device before use.
- Press and hold the AC button for 2 seconds to enter the frequency switching mode, the 50Hz or 60Hz icon will flash on the display. Short press the AC button again to select 50Hz or 60Hz; when the icon stops flashing and displays 50Hz or 60Hz, it indicates the switch is successful.
- Short press the AC button 10 times in quick succession in the United States and Japan to switch the AC output voltage to 100V or 110V.
- XT90 Input Port
Connect the solar panel using the XT 90 to MC4 cable- The input of the solar panel can be up to 500W and the maximum voltage is 50V.
- If the equipment is damaged by exceeding the maximum voltage, it is outside the scope of warranty.
- AC Input
1100W fast charging with a household socket can perform a 100% charge within 2 hours.
*The charging of this product can directly use the socket on the wall, etc. Please do not use extension cords and cable taps to connect several devices at the same time.
![burn hazard]() *Using a cable tap to charge several devices at the same time will cause a large current to flow, causing cable breakage and fire risk.
*Using a cable tap to charge several devices at the same time will cause a large current to flow, causing cable breakage and fire risk.
*Do not use the same socket to connect other devices while charging this product. In general, when the same wiring in the family exceeds 1500W, the safety circuit breaker will start. - Overload Protection Button
When the power supply current is unstable due to lightning or other reasons, and there is a large current input at the AC Input, in order to protect the product, the overload protection function (safety circuit breaker) will activate and cut off the AC input port.
Please follow the sequence below to restore the AC input function:- Turn off the power button and unplug all ports.
- After confirming that there is no abnormality in each part, turn on the power button.
- Press the overload protection button, connect the AC cable to restore the AC input.

Introduction of Display Interface

- Remain Using/Recharging Time
- FanStatus
- High/Low Temperature Protection
- Battery Level Percentage
- Input Power in Total
- Output Power in Total
- LED Light
- AC Output
- PD Output
- USB Output
- Connected to the AC Mains
- XT90 Input Port
- DC(12V) Output
- Cigar Lighter (12V) Output
- XT60 (12V) Output
- Battery Progress Bar
The Screen Displays Precautions
 | When this icon lights up, please ensure that the vent is not blocked. |
 | When this icon flashes, it means that the temperature is too high or too low, and the product may turn on the smart protection program and stop working. (Need to wait for the product to return to the normal temperature range to continue working) |
 | If the icon blinks, it indicates that the AC mains connection is abnormal. Check the charging port. |
 | When this icon flashes, it means abnormal, please check the load. |
UPS Mode
- UPS Feature
This product has a bypass mode, which can output directly from AC mains without going through the battery.
In the UPS state, when the AC input power of the commercial power is cut off due to a power failure, it can automatically switch to the product battery power supply within about 8 milliseconds to ensure the AC output. - UPS Connection Diagram
As shown in the figure below, connect the product between the socket and the electrical appliance, and the power of the product is in the ON state.
When you turn on a powered device, the powered device uses the main AC power directly.
In this state, when the main power supply is cut off, it will automatically switch to the product's internal battery power supply.


*ln the UPS mode of U.S. and JPN standard, the maximum power of AC output is below 1100W, and the AC output exceeds 1100W, and the "  " AC output icon flashes to indicate overload.
*In the UPS mode of CN, UK, EU and KR standard, the maximum power of AC output is below 2400W, and the AC output exceeds 2400W, and the " " AC output icon flashes to indicate overload.
Connection of Solar Panels
The company's products can be connected to solar panels and can be charged through the solar panels.
The power of the solar panel is 500W, and can fully charge the product within 4 hours. (The input of the solar panel can be maximum 500W, maximum voltage 50V)
*The charging power of the solar panel is determined according to the weather and other conditions.
*The solar panel voltage exceeding 50V will damage the equipment and may be out of warranty
- By solar panels
Option one: Portable Power Station Charging Area

- By solar panels
Option two: Portable Power Station Charging Area


Car Charging
This product uses the ACC charging cable, which can be used for mobile charging by the cigarette lighter (Accessory: hereinafter referred to as ACC) in the car.
Before using the product, whether it is charging or discharging, you must open the fan covers on both sides at the same time to prevent the product from being over heated and damaging the product.

Connect the ACC charging cable to the cigarette lighter in the car and the Anderson interface on the side of the product, turn on the engine of the car, and the LED display of this product will display the input power.
Use of Fan Covers
Before operating the product, whether it is charging or discharging you must open the fan covers on both sides at the same time to prevent the product from over heating and causing the product to stop working or enter a protection state.

Product Specifications
| Product Name | F2400 Portable Power Station |
| Dimension | L*W*H=396X284X321mm |
| Weight | 22.0Kg |
| Capacity | 2048Wh |
| AC Charging | AC Mains Input, 1100W max |
| MPPT Input | 11.5-50V/20A/500W max |
| AC Output | 50/60Hz (switchable), rated 2400W, pure sine wave with overload, short circuit protection |
| USB QC3 0 | 18W*2 |
| Type-C | Type-C-A(PD 20W)*3 |
| Type-C | Type-C-B(PD 100W)*1 |
| DC 5521 | 12V/3A*2 |
| XT-60 Output | 12V/25A |
| Car Charging Output | 12V/10A |
| Shutdown Current | < 500uA |
| Working Temperature | -10~40°C |
| Environment Humidity | ≤ 90%RH |
| Cycle Times | > 3500 Times |
Battery Specifications
| Cell type | 40135 LiFePo4 |
| Rated voltage of single battery | 3.2V |
| Rated capacity of single battery | 20Ah |
| Rated voltage of battery pack | 51.2V |
| Output voltage range of the battery pack | 43.2-57.6V |
| Rated capacity of battery pack | 2048Wh |
Troubleshooting
| Status | Explanation | Recover method |
 The output icon flashes and beeps | The output exceeds the standard and it's short-circuited. |
|
 The temperature warning icon flashes and beeps | The temperature of the product is too high or too low. | Remove the product, turn the power off, and wait for the product to reach a suitable temperature. |
 The icon of connecting to the mains flashes and cannot be charged | The charging cable is poorly connected | Verify the connection status of the cable and the power supply. |
Warranty
Manufacturer: Shenzhen Qichang Intelligent Technology Co., Ltd.
Address: Room 510, 5th Floor, Bld 7, Yunli Smart Park, Bantian Street, Longgang District, Shenzhen, Guangdong, China
Technical service email: support@fossibot.com
Company official website: https://www.fossibot.com
Documents / Resources
References
Download manual
Here you can download full pdf version of manual, it may contain additional safety instructions, warranty information, FCC rules, etc.
Advertisement


Need help?
Do you have a question about the F2400 and is the answer not in the manual?
Questions and answers