Advertisement
Available languages
Available languages
Quick Links
ITA
ENG
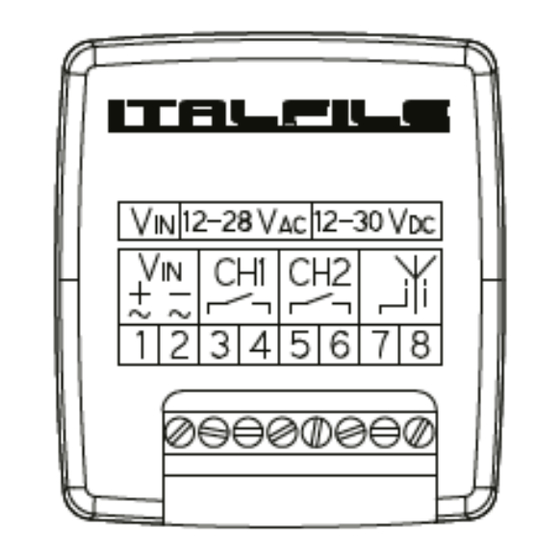
MINI RECEIVER
433.92 MHZ
RXJF2C
RXJR2C
Superheterodyne 2 channels receiver OOK/ASK
Alimentation 12 / 24 Volt AC/DC
Frequency 433.92 MHz
It has a digital noise reduction filter in order to optimise the radio frequencies.
3 independent modalities: pulse, step to step and timed.
COMPATIBILITY
RXJF2C
It is compatible with:
- Jane version F factory code
- Jane version Top 01 and Top 02 generating standard codes HT12 433.92 MHz
- Prime version F factory code or generating standard codes HT12 433.92 MHz
- Prime version Top 01 and Top 02 generating standard codes HT12 433.92 MHz
- Remotes with standard codes HT12 with frequency 433.92 MHz
RXJR2C
It is compatible with JANE R
The programming of every remote must be done working directly in the receiver. It cannot be done in self- learning mode.
LEARNING
Channel 1
1. Press and release the button on the receiver: the green led turns on. The channel 1 is activated.
2. Press the button you would like to operate: the green led turns off for a second; this confirms the successful learning. While the led is
on, it is possible to add another button of the same remote or of another one.
Channel 2
1. Press and release twice the button on the receiver: the red led turns on. The channel 2 is activated.
2. Press the button you would like to operate: the red led turns off for a second; this confirms the successful learning.
While the led is on, it is possible to add another button of the same remote or of another one.
CANCELLATION
DELETING ONE BUTTON OF THE REMOTE CONTROL
1. Press and release 3 times the button on the receiver: the led flashes red.
2. Press the button of the remote which you would like to delete: the led turns off for a second; this confirms the successful cancellation.
While the led is on, it is possible to delete another button of the same remote or of another one.
TOTAL CANCELLATION
If the receiver is set on step to step or timed modality, through the procedure of cancellation it will be reset on pulse modality.
1. Press 3 times the button on the receiver: the led flashes red and then becomes fixed confirming the correct cancellation.
RXNEW.indd 1
FUNCTIONS
When the receiver leaves the parent company, it is set on impulse modality.
The different modalities are activated for every single channel.
STEP TO STEP MODE
Channel 1:
1. Press without releasing the button: the led turns on green. Release it when the led starts to flash.
2. While the led is flashing, press and release the button again: the led flashes twice confirming the correct procedure. Wait for the receiver to
switch off.
Channel 2:
1. Press without releasing the button: the led turns on red. Release it when the led starts to flash.
2. While the led is flashing, press and release the button again: the led flashes twice confirming the correct procedure. Wait for the receiver to
switch off.
TIMED MODE
Channel 1:
1. Press without releasing the button: the led turns on green. Release it when the led starts to flash.
2. While the led is flashing, press and release two times the button again: the led flashes twice and then becomes fixed on red. If the button is
not pressed again, the led goes off confirming the timed mode set to 60 seconds.
3. If you want to modify the contact time, you need to press again the button before the red led goes off: the time will be set to 5 seconds.
Every time you press the button again, the time will increase by 5 seconds.
Channel 2:
Press without releasing the button: the led turns on red. Release it when the led starts to flash.
1. While the led is flashing, press and release two times the button again: the led flashes twice and then becomes fixed on red. If the button is
not pressed again, the led goes off confirming the timed mode set to 60 seconds.
2. If you want to modify the contact time, you need to press again the button before the red led goes off: the time will be set to 5 seconds.
Every time you press the button again, the time will increase by 5 seconds.
The maximum time which can be set is 20 minutes using 240 key presses.
PULSE MODE
Channel 1:
1.Press without releasing the button: the green led turns on. Release the button when the led starts to flash.
Wait for the led to stop flashing confirming the successful procedure.
Channel 2:
1. Press twice the button. Do not release it: the red led turns on. Release the button when the led starts to flash. Wait for the led to stop
flashing confirming the successful procedure.
CHANGE RELAY EXIT
In order to change the relay from normally open (N.O.) to normally closed (N.C.):
1. Cut the track of the channel in the point that is marked by X in the picture.
2. With a drop of tin join the point marked with the dash -
Max. Permissible Values
Supply Voltage
RF Input
GND voltage of output pins
Storage temperature
Operating Temperature
Electrical characteristics at 25 °C
Parameter
Min
Typical
Supply Voltage (VDC)
12
-
Supply Voltage (VAC)
12
-
Absorbed current (receive only)
-
11
Absorbed current (1 active channel)
-
25
Absorbed current (2 active channels)
-
36
Centre frequency
-
433.92
Sensitivity
-
- 105
Passband RF - 3dB
-
+ - 100
Spurious aerial signals
-
-
Switch on time
-
-
Command implementation time
-
-
Max. contact output VDC
-
-
Max. contact output VAC
-
-
33VAC / 35VDC
+ 20 dBm
120V
- 40 / + 100 °C
-20 / + 70 °C
Max
Unit
Notes
30
volts
-
28
volts
-
-
mA
-
-
mA
-
-
mA
-
-
MHz
-
-
dBm
Note 1
-
kHz
-
- 60
dBm
-
2.8
S
Note 2
0.5
S
Note 3
1A 24V
Amp vdc
-
1A 120V
Amp vac
-
21/11/2019 16:39:05
Advertisement

Related Manuals for ITALFILE RXJF2C

Summary of Contents for ITALFILE RXJF2C
- Page 1 1. Press without releasing the button: the led turns on red. Release it when the led starts to flash. 2. While the led is flashing, press and release the button again: the led flashes twice confirming the correct procedure. Wait for the receiver to RXJF2C switch off.
- Page 2 è possibile inserire un secondo tasto dello stesso radiocomando o un tasto di un altro telecomando. Il fabbricante, Luigino Pellattiero, dichiara che il tipo di apparecchiatura radio RXJF2C / RXJR2C è conforme alla direttiva 2014/53/UE. Il testo completo della dichiarazione di conformità UE è disponibile al seguente indirizzo Internet: http://italfile.it/wp-content/ CANALE 2 uploads/2019/01/bugiardino_rx.pdf...
Need help?
Do you have a question about the RXJF2C and is the answer not in the manual?
Questions and answers