
Related Manuals for Air Control KN-SMART-S


Summary of Contents for Air Control KN-SMART-S
- Page 1 A4102602 123-00279 Installer's manual KOOLNOVA Thermostat remote controlSMART RADIO KN-SMART-S / KB-SMART-S SMART www.aircontrolclima.it...
- Page 2 Customer support: Technical assistance and commercial consultancy: +39 02.45482147 For more information: www.aircontrolclima.it Installer's manual...
- Page 3 Index Security and guarantee General recommendations and requirements Chapter 1: General 1.1. Home screen 1.2. Further information 1.3. Alarms 1.4. Scheme 1.5. Functions Chapter 2: Installer menu Accessing the installer menu/ Exiting the installer menu 2.1. RESET 2.2. INT (INTERFACE 0-63) 2.3.
- Page 4 All warranties other than those described in this paragraph are expressly disclaimed. DRUMS:The rechargeable battery of p. lithium ion batteries in the SMART remote control must be replaced and recycled or disposed of, separated from household waste, by the AIR CONTROL technical service. Installer's manual...
- Page 5 General recommendations and requirements - The installation must be carried out in total absence of electricity. - Identify and connect the elements according to current electronic legislation. - To connect the system elements via the KOOLNOVA bus, use a cable made up of two wires with a section of 0.5mm2 (2x0.5mm2).
- Page 6 Installer's manual...
- Page 7 General www.aircontrolclima.it...
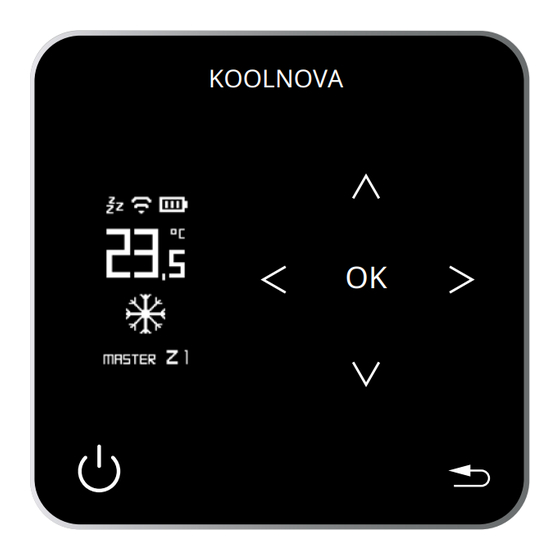
- Page 8 1. General 1.1. Home screen RADIO COVERAGE BATTERY CONDITION SLEEP STORED BUTTON. ON/OFF THE DISPLAY KOOLNOVA MORE INFORMATION/ TEMPERATURE CONFIRM/SAVE NOMINAL (ºC/ºF) ROTATING MENU MODE MASTER/SLAVE BELOW ON/OFF RETURN (GO TO THE PASSAGE PREVIOUS) SENSOR OF TEMPERATURE AND HUMIDITY AREA LOAD.
-
Page 9: Further Information
1.2. Further information KOOLNOVA PERCENTAGE OF HUMIDITY IN THE ROOM TEMPERATURE ENVIRONMENT (ºC/ºF) EFFICIENCY 1-5 SPEED Chapter 1: General... - Page 10 1.3. Alarms HUMIDITY ALARM: NO RADIO COVERAGE HIGH HUMIDITY, RELAY ACTIVATED KOOLNOVA ENTRANCE OF ALARM DETECTED ALARM INPUT DETECTED - System in STOP. The display shows the icon NOTE: While the alarm is active the system remains in STOP. HUMIDITY ALARM - High humidity, relay activated - The cooling floor heating turns off automatically and the cold air continues to work...
- Page 11 Radio ntraline (up to 8 zones).With ica series WiFi module on the There is ( un market) T r And zed] KN-ETERNAL-M mustedETERNAL RADIO. Full Color [metal grey ThermostatSMART RADIO. Capacitive buttons [metallic grey]. KN-SMART-S NH-ES- Motorized nozzle [width]X[height] [white / aluminium/special]. NH-CO Motorized damper[ diameter] NH-CFI-CDZ FILO interface.Communication with AC machine/[select brand]...
- Page 12 1.5. Functions 1.3″ OLED screen, backlit capacitive keys and metallic color finishes. Functions: Zone On-Off. System stop (MASTER). System operating mode and efficiency (MASTER). Control of the temperature and speed of the machine. Reading of the ambient temperature and relative humidity of the area. SLEEP function.
-
Page 13: Installer Menu
Installer menu www.aircontrolclima.it... -
Page 14: Access To The Installer Menu
2. Installer menu Installer menu SLAVE MASTER'S DEGREE RESET INT(INTERFACE 0-63) INT(INTERFACE 0-63) MASTER/SLAVE SLAVE/MASTER MACHINE AC(MACHINE AC) (1-4) MACHINE AC(MACHINE AC) (1-4) EFI(EFFICIENCY 1-5) VOL(VOLUME 01-16) VOL(VOLUME 01-16) RADIANT FLOOR(RADIANT FLOOR ACTIVATING RADIANT FLOOR(RADIANT FLOOR ACTIVATING MODES) MODES) CALIBRATE. CALIBRATE. - Page 15 2.1. RESET - Press the buttonOK. ATTENTION: Please note thatthe zones previously activated in the system will be deleted. - Use the buttons to selectYES. - Press the buttonOK. NOTE: Make sure all thermostats are reset before starting pairing. To perform a RESET on a SLAVE control, you must first convert it to a MASTER control.
- Page 16 2.3. MASTER/SLAVE Select the MASTER/SLAVE control type (by default SLAVE). - Press the buttonOK. - Use the buttons to select the type of control. - Press the buttonOK. - The saved option appears on the home screen. Example: MASTER. 2.4. MACHINE AC (MACHINE AC 1-4) The screen shows the saved option.Example: AC 3.
- Page 17 2.5. EFI (EFFICIENCY 1-5) Select energy efficiency (1-5, default 3). Use the and buttons to select the efficiency level. - Press the buttonOK. - The data is saved the next time you access this screen it will display the last assigned efficiency level.
- Page 18 2.7. RADIANT FLOOR (How to activate the RADIANT FLOOR mode) - Press the buttonOK. To activate the radiant floor modes (default NO): - Use the buttons And . - To selectNOorYESand pressOK. NO: (2 ways). YES: (5 ways). - The data is saved the next time you access this screen it will display the last assigned mode.
- Page 19 2.9. RADIO - Press the buttonOK. View radio parameters. For correct association the radio signal must be greater than 20%. 2.10. ADVANC. (ADVANCED) - Press the buttonOK. View advanced settings: - AC ENABLEMENT. To activate or deactivate AC (default YES). - To selectYESorNOand pressOK.
- Page 20 Installer's manual...
- Page 21 User menu www.aircontrolclima.it...
- Page 22 3. User menu User menu(rotating menu) SLAVE MASTER'S DEGREE MODE(MODE) SLEEP SLEEP SPEED(SPEED) SPEED(SPEED) DEGREES(DEGREES) DEGREES(DEGREES) (Celsius °C /Fahrenheit °F) (Celsius °C /Fahrenheit °F) BRIGHT(BRIGHTNESS) BRIGHT(BRIGHTNESS) CLOCK(CLOCK) CLOCK(CLOCK) LANGU.(TONGUE) LANGU.(TONGUE) (6 different languages) (6 different languages) Access the more information screen With the remote control showing the home screen.
- Page 23 - Press the buttons to select the mode. - Press the buttonOK. ICON MODE Cold air Hot air Underfloor heating Cold air + Underfloor heating (refreshing) Warm air + Underfloor heating (heat) 3.2. SLEEP - Press the buttonOK. 4 Options available: 30 / 60 / 90 / 120 minutes. - Use the buttons to select the time interval.
- Page 24 3.2.1. Delete stored SLEEP Access the SLEEP screen. - Use the buttons to select the icon - Press the buttonOK. The home screen will not show the icon 3.3. SPEED - Press the buttonOK. SPEED:4 options available (default AUTO). Minimum / Average / Maximum / AUTO.
-
Page 25: Days Of The Week
3.5. BRIGHT (BRIGHTNESS) Adjustable brightness of the backlit capacitive buttons. - Press the buttonOK. Five different brightness levels. - Use the buttons to adjust the brightness. - Press the buttonOK. 3.6. CLOCK (CLOCK) - Press the buttonOK. During configuration this parameterflashes. Clock The hours flash. - Page 26 3.7. LANGU. (LANGUAGE - 6 different languages) - Press the buttonOK. - Use the FR / ES to select the language: EN / IT / PT / GE/ buttons. - Press the buttonOK. The language is saved, the next time you access this screen you will see the last language assigned.
- Page 27 Activation of zones - Association of thermostats - www.aircontrolclima.it...
- Page 28 4. Activation of zones - Association of thermostats - (Up to 8 zones) Step by step 1.Power up the KOOLNOVA system radio control unit for the first time. The LEDTX BUS(D7) flashes quicklyand the LEDSTATUS(Q9)flashes slowly. AC INo TX BUS L No GND B- A+ +24 H ALR...
- Page 29 4.1. Successful association The thermostat has been successfully paired.The area was successfully registered - View the home screen. 4.2. Association error The thermostat has not been associated. - Try again, repeat the process: 4. Activation of zones - Association of thermostats - www.aircontrolclima.it Chapter 4: Activating zones 29...
- Page 30 4.3 Reassociation of thermostats Re-pair a thermostat that was previously paired with another installation. Step by step 1.With the KOOLNOVA system radio control unit powered. The LEDSTATUS(Q9)flashes slowlyor it issteady on. AC INo TX BUS L No GND B- A+ +24 H ALR COM D- AUX 1...
- Page 31 5.Press the pairing buttonPAIRING(S1) to complete the installation. The red LED (Q1) stops flashing. LEDs PAIRING www.aircontrolclima.it Chapter 4: Activating zones 31...
- Page 32 ITALY AIR CONTROL SRL Via Colico, 10 20158 Milan. Tel: +39 02.45482147 info@aircontrolclima.it aircontrolsrl@pec.it www.aircontrolclima.it...
Need help?
Do you have a question about the KN-SMART-S and is the answer not in the manual?
Questions and answers