Advertisement
CONTENTS

- 21mm G½ (½"bsp)
- 26.5mm G¾ (¾"bsp)
- 33.3mm G1 (1"bsp)
- Select Controller
- Water now button
- Aide memoire stickers

GENERAL INFORMATION
- This product is not suitable for supplying drinking water.
- Threaded water connections are suitable for hand tightening only.
- This product is suitable for use on mains water up to max 10 bar pressure.
- This product can be used on an outdoor water butt that is higher than the area to be watered (a gravity fed system).
Please follow the instructions to make sure that you get the most from your timer for simple and efficient watering.
INSTALLING THE BATTERIES
You must use Alkaline or Lithium batteries - alternatives will result in incorrect operation.
- Remove the front panel – pull the panel away from the body of the timer.
- Insert two 1.5V 'AA' (LR6) Alkaline batteries.
(Check + and – terminals are correct.).
![]()
Rechargeable batteries must not be used. - The valve will open and close to check that it is closed.

Note: Replace batteries each season. (maximum 12 months use)
HOW TO PROGRAMME THE TIMER
There are two watering operations - AUTOMATIC and MANUAL.
AUTOMATIC WATERING

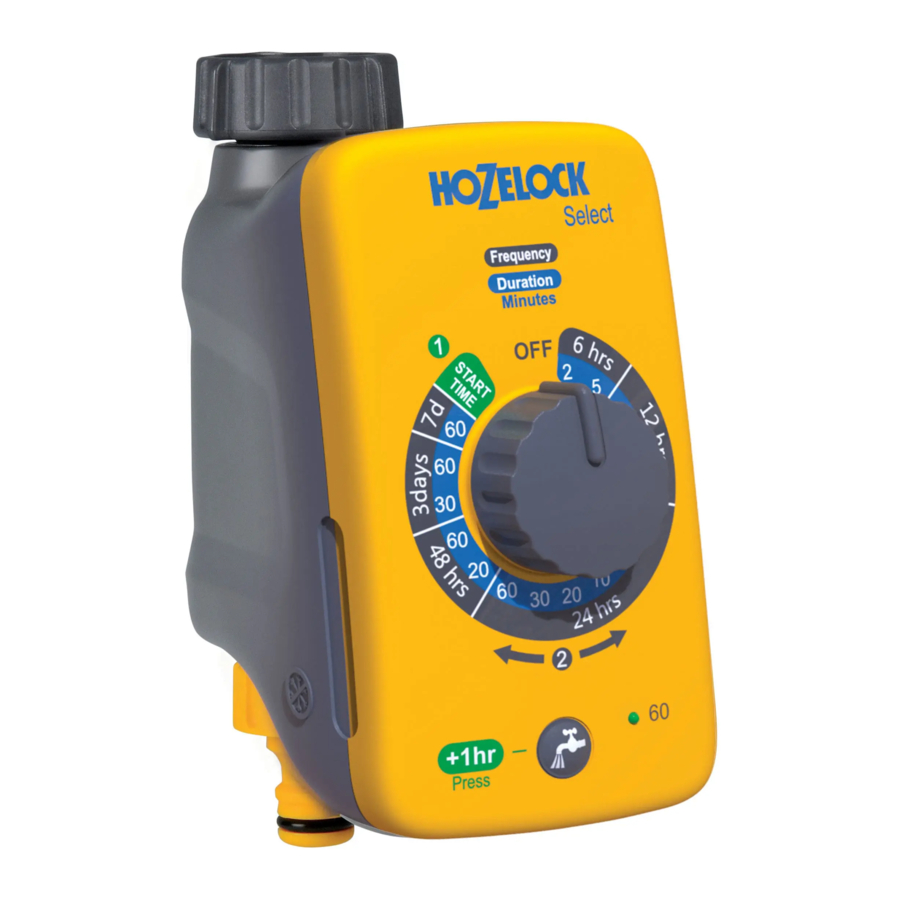
- Turn the dial fully clockwise to START TIME The timer has now memorised the START TIME until it is reset and will operate every day at this time. When you remove the batteries the start time is erased so only remove the batteries when you need to replace them.
Refer to the section CHANGING THE BATTERIES.
Start delay
If you want to delay the first start time you can now press the button by the number of hours from now that you want to delay it - Turn dial anti-clockwise to any of the 16 programs.
Light will flash the number of hours you have chosen to delay. If no delay was set the valve opens immediately.
The Start time does not need to be reset when a different program is selected, simply rotate the dial to the new position.
PROGRAM DESCRIPTION
| Every 6 Hours | 2 minutes 5 minutes |
| Every 12 hours | 2 minutes 5 minutes 10 minutes |
| Every 24 Hours (Daily) | 2 minutes 5 minutes 10 minutes 20 minutes 30 minutes 60 minutes |
| Every 48 Hours | 20 minutes 60 minutes |
| Every 72 Hours | 30 minutes 60 minutes |
| Every 7 days (once a week) | 60 minutes |
MANUAL WATERING
Note: You do not need to adjust the Automatic watering dial to water immediately.
MANUAL ON
Press the water now button on the front panel (the panel must be attached to the valve).

Water will flow for 60 minutes maximum or until it is turned off. The LED will flash green when watering occurs.
Note: After 60 minutes water shuts off automatically. Automatic watering will continue normally unless the dial is turned to the OFF position.
MANUAL OFF
Press the water now button again at any time and the valve will close. The led will stop flashing.
Note: To protect battery life the water controller can only be turned on and off
CONNECTING THE TIMER TO THE TAP
Use supplied adaptors if required.
Hand tighten firmly to ensure no leaks. Do not use a wrench or other tool to tighten the nuts as this can permanently damage the plastic components
BATTERY CHECK FUNCTION
| To check the status of the installed batteries simply press and hold down the water now button. | |
| GREEN LED | BATTERIES ARE OK |
| RED LED | BATTERIES NEED TO BE REPLACED WITH NEW ONES. See "CHANGING THE BATTERIES" section. |
FAILURE PREVENTION MODE
A built in safety feature detects when the battery levels have dropped to a level that could fail whilst the valve is open and result in wasting water.
The safety mode prevents the controller from turning on until the batteries have been replaced.
The LED indicator light will flash red when the failure prevention mode has been activated.
The water now function will also not operate until the batteries have been replaced.
CHANGING THE BATTERIES
When changing the batteries remove the old ones then wait 20 seconds before putting the new batteries in.
PROGRAM SELECTION STICKER
Your Select Timer is supplied with stickers to help you select the correct programs. Attach the sticker to the body behind the front panel as shown.

TROUBLESHOOTING
| PROBLEM | SOLUTION | |
| Valve opens and closes when batteries are first inserted but then fails to operate when watering manually or automatically. | Your Select Timer has detected low battery power. Replace with new batteries. | |
| The LED is flashing red colour | Your Select Timer has detected low battery power. Replace with new batteries. | |
| Valve operates but no water flows. | Check tap is turned on. | |
| Valve works on manual but no automatic watering. | Set the Start Time time as described in the Automatic Watering section. | |
| LED flashes green when I press the water now button but the valve does not operate | Make sure the front panel is fully inserted into the body. | |
TECHNICAL DATA
| Operating Pressure | 0.1 – 10Bar |
| Operating Temperature | 1 - 55°C |
| Maximum water temperature | 30°C |
This product is not designed to be used in subzero (frost) temperatures.
During winter months drain any remaining water out of your timer and bring it indoors until the next watering season.
CONTACT DETAILS
If you have any further problems with your water controller please contact Hozelock customer services.
Hozelock Limited
Midpoint Park, Birmingham,
B76 1AB. ENGLAND
Tel: +44 (0) 121 313 1122
e-mail: consumer.services@hozelock.com
www.hozelock.com
Documents / Resources
References
Download manual
Here you can download full pdf version of manual, it may contain additional safety instructions, warranty information, FCC rules, etc.
Advertisement


Need help?
Do you have a question about the Select and is the answer not in the manual?
Questions and answers