Advertisement
WHAT'S IN THE BOX

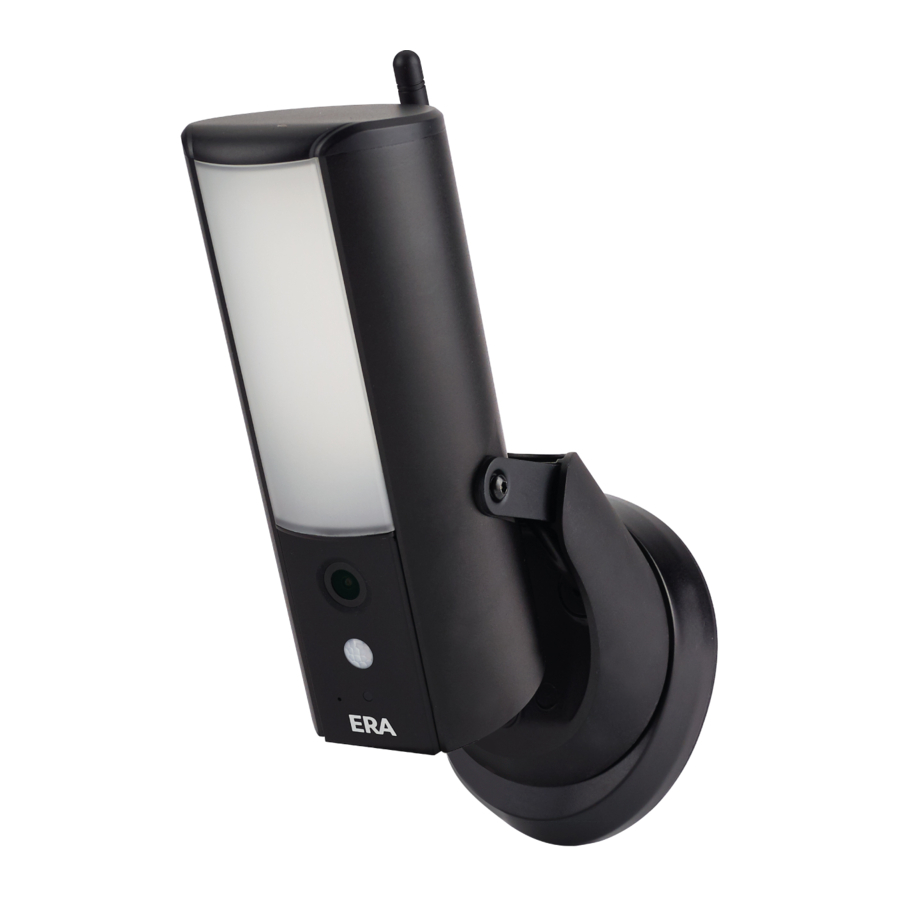
FLOODLIGHT CAMERA OVERVIEW

LED STATUS
 | Both Red and Green Lights - Booting Up |
 | Solid Green - Camera Connected To Server |
 | Green Light Flashing - Camera Recording |
 | Red Light Flashing - Camera Upgrading |
| Red Light Flashing - Camera Reset To Factory mode (when initiated from the ERA Protect App) |
 | Floodlight On For Approx. 45 seconds - Camera Rebooting When On Power Supply |
SPECIFICATIONS
| Power requirements: | 100-240VAC |
| Weatherproof: | IP55 Rated waterproof and weatherproof |
| LED Output: | 950 Lumens/ 3000K LED Lamp |
| Viewing Angle: | 120º Horizontal |
| Image Quality: | H.264 High Profile, 1/2.8" CMOS |
| Sensor: | Full HD (1920*1080P) |
| Connectivity: | Wi-Fi 802.11 b/g/n 2.4GhZ & Ethernet (WPA, WPA2-PSK) |
| PIR Detection: | 100º |
| PIR Detection Range: | Up to 15m |
| Size: | Body, 70 (W) x 180 (H) x 65 (D)mm Bracket: 95 (W) x 110 (H) x 110 (D)mm |
| Weight: | 1kg |
ERA FLOODLIGHT CAMERA SET UP
- Attach WiFi Antenna (if using WiFi)
![]()
- Unscrew the compartment located at the bottom of the Floodlight

- Locate the USB-C cable provided and find a compatible plug to use for power and plug this into the USB-C slot on the Floodlight Camera. Connect the plug into a power socket and turn it on.


Note: Removal of the SD card will invalidate the warranty of this product - PLEASE DO NOT REMOVE!
- Wait 1 minute for the Floodlight Camera to boot up and the the green light on the device will start flashing - your Floodlight is now ready to set up.
- Download the ERA Protect app
![]() on your smartphone (search for '"ERA Protect" on Google Play or the iOS App Store) then follow the steps below. If you're having problems finding the app please scan the QR code below with your smartphone.
on your smartphone (search for '"ERA Protect" on Google Play or the iOS App Store) then follow the steps below. If you're having problems finding the app please scan the QR code below with your smartphone.
![apps.apple.com]()
![]()
![play.google.com]()
![]()
 on your smartphone (search for '"ERA Protect" on Google Play or the iOS App Store) then follow the steps below. If you're having problems finding the app please scan the QR code below with your smartphone.


- Select 'Sign Up' to create an account.
- Once signed in for new and existing users, select 'Cameras' from the side bar menu. Then select the 'Add new' section on the app screen or press '+' in the top right corner.
- Select the 'ERA Protect Floodlight Camera' from the device selection menu.
- Follow the on screen instructions to complete ERA Protect Floodlight Camera set up.
ERA FLOODLIGHT CAMERA INSTALLATION
- For optimal performance, please install the Floodlight Camera 2.5 metres above floor level.

- Disconnect power at fuse or circuit breaker before proceeding to the installation.
- The distance between the Floodlight Camera and the router should be maximum 150 metres to ensure the transmission range of the WiFi works at optimum levels. Note: If this is not possible, you may need to consider a WiFi booster to improve the signal strength.
- Using the drilling template, mark the wall for the location of the fixing screws and where the mains power will lead.
- Using a drill, drill the marked holes for the wall mount to the surface where the Floodlight Camera will be located.

- Make a small hole in the rubber pad where the mains wire will be fed through into the wall mount.
- Lead the wires to the front of the base, screw the wires firmly to the terminal blocks. Put the terminal blocks back into the base properly to protect it against the any ingress.
- Fasten the wall mount to the wall. Make sure that the UP sign is at the top.
![]()
- Connect the power cable to the wall mount. Connect the Earth cable from the mains wire to the Earth terminal on the Camera.
![]()


ETHERNET CONNECTION (OPTIONAL)
Note: If you are using WiFi please skip this step and go to step 9! Follow the illustration below to connect the ethernet cable if not using the WiFi connection:

RX+ / RX- / TX+ / TX-: Ethernet Cable 1/0'
*Ethernet cable is not included in the package.
- Place Floodlight Camera on the wall mount.
![]()
- Fasten the bolt by using Hex key provided.

- Adjust Floodlight by tilting the Camera up and down and adjusting the bolts on the side or the Camera bracket.
![]()
- Loosen the screw on the back of the Camera bracket by using the allen key provided to adjust the pan angle. Screw firmly back up when the Camera is in position.


- Once completed, turn the power on from the breaker or fuse and the Floodlight Camera will power up. Wait for 1 minute for Floodlight Camera to connect to internet.


FACTORY RESET
App:
- Select the hamburger menu on your ERA Protect app select settings and select the Camera you would like to factory default under the 'Camera Settings' section.
- Once selected, scroll to the bottom of the camera settings and select 'Delete Camera'. Once you have confirmed that the Camera has been deleted from your account please proceed to the next steps below.
Camera:
- Remove the compartment from the bottom of the Floodlight Camera.
- Using the reset pin provided, slot the reset pin into Floodlight Camera the reset button hole and press and hold the rest button for 5 seconds.
- After 5 seconds the Red LED will flashing multiple times to indicate the rest process has been initiated.
- Once the Red LED has gone back to solid state, please proceed to power cycle your product. Your product has now been reset back to factory default. Please follow the Camera set up process to install your Floodlight Camera.
APP SCREENS
HOMESCREEN

SIDE BAR MENU

CAMERA SETTINGS

CAMERA ACTIVITY LOG

NEED SUPPORT?
Your ERA product is designed to be up and running in minutes. Please contact us for assistance or support. A more detailed installation and operation manual is available on our website.
Visit www.eraprotect.com or phone us 0345 257 2500
ADD THE ERA PROTECT PLUS
WANT THESE GREAT FEATURES?
- 30 day rolling cloud storage for video recordings
- Access to 30 day activity log via the APP
- 24/7 connected camera status
- Push notifications when the Camera detects movement
Customer Helpline: 0345 257 2500
email: support@eraprotect.com
www.eraprotect.com
SAFETY INFORMATION
- Do not try to disassemble the Camera.
- Keep the power supply dry.
- Small parts may cause a choking hazard, keep away from children.
- Only use approved ERA accessories and power supplies.
- Do not cover the ERA Protect Outdoor Camera Infrared Lights, they produce heat which may create a fire hazard.
Documents / Resources
References
Download manual
Here you can download full pdf version of manual, it may contain additional safety instructions, warranty information, FCC rules, etc.
Advertisement


Need help?
Do you have a question about the Protect Series and is the answer not in the manual?
Questions and answers