Advertisement
- 1 Inside your box
- 2 Setting up your Shot Scope H4
- 3 The Shot Scope App and Dashboard
- 4 Before you play for the first time
- 5 At the course
- 6 Post Round
- 7 Editing/Signing Off
- 8 Compete against your friends in Leaderboards and unlock Medals
- 9 SAFETY INFORMATION & HEALTH WARNINGS
- 10 Documents / Resources
Inside your box
Thank you for buying a Shot Scope H4. Before turning on the device, please read our full user guide to ensure the correct set up.
1 x Shot Scope H4
16 x Lightweight tags
1 x Charging cable
1 x Metal belt clip
1 x Carabiner clip
Setting up your Shot Scope H4
Download and install the mobile app
Shot Scope provides both an Android and iOS app, these can be downloaded onto any compatible mobile or tablet.
To download or install the Shot Scope app, simply search for Shot Scope on either the App Store or the Google Play Store.


Register
To register an account, open the app and then click on the 'Register' button. Complete all sections and then press the 'Continue' button. Your password must contain at least one letter and one number

Complete the tutorial on the app
The first time you enter the Shot Scope app after registering, you will be taken through a tutorial showing you how to use the handheld and the app. During this process, you will turn on your H4 and pair the device with the app. You will choose the settings for your device and sync the handheld to ensure it has the latest firmware installed. You must complete this process before using the H4.

Connecting to Shot Scope
If you need to connect the handheld to the mobile app, turn Bluetooth on in your phone settings, log into your app and then press the 'Connect' button at the top of the screen. The handheld screen will then change to show the connection has been made successfully.
Check course maps
We suggest that you check the mapping status of any courses you intend to play 48 hours before your tee off time. This is to make sure the course is in the system and has been mapped.
Most courses will be mapped and on the handheld, but there could be the occasional new course that isn't on the system or your course may have an update pending.
To view the list of mapped courses on the Shot Scope system, navigate to the 'Courses' section in the app. This is present on the tab bar of the iOS app and the main menu of the Android app.

Searching for, subscribing and adding a course
You can search our course database by entering the name of the course or using your location to find nearby courses. Either use the search bar or use the filter at the top right of screen to filter courses by proximity to your current location.
To make sure you always have the most up to date course maps, subscribe to any course that you play a lot to get notifications when the course map has been updated. To subscribe, tap on the course and it will be highlighted blue to confirm this action. If any of the courses you selected are due an update then they will be automatically added to the sync list.
If your course is mapped but not yet on the handheld, the course will have an 'add' button beside it, tap this and the course will be automatically added to your sync list.
We may have your course in the database but it has not yet been mapped. In this situation the course will have a 'request' button beside it, tap this to request the course be mapped. This will notify the mapping team who will endeavour to get the course mapped in 48 hours.
If you can't find the name of the course, press the 'Request' button at the bottom of the screen. This will bring up a form that can be filled out and sent to our mapping team. Again, we will aim for this to be mapped in 48 hours.

Syncing
If you have any course maps that need to be uploaded to the device, or any updates that need to be transferred to the handheld you will see a red notification at the top of the Courses screen. If you wish to perform a sync then tap on the 'Ready to Sync' button at the top of the screen.
On the resulting screen, you will see the list of courses that require a sync. Press the 'Sync All' button near the top of the screen to start the process.

The Shot Scope App and Dashboard
Download or update your mobile app
Please make sure you have the most up to date version of the iOS and Android app installed.
To upload rounds you must use the mobile app. You can also view and edit your round on the Performance Dashboard (shown on right) which can be accessed via web browser on a computer or tablet.
Shot Scope Mobile app
A quick overview of your statistics. Set up your Shot Scope, update firmware, update courses and upload your rounds.

Shot Scope Dashboard
A more detailed analysis of your statistics. Available to view online at: https://dashboard.shotscope.com

Before you play for the first time
Charging your Shot Scope H4
Your Shot Scope can be charged from any USB port or USB compliant wall charger. Please use the charger provided with the product.
Hold the charger with the Shot Scope logo facing the sky, then apply some pressure to the lever and carefully place the 4 prongs into the back of the device. The handheld screen will change to show the charging screen.
Additional chargers can be purchased at www.shotscope.com/products/accessories/

Installing tags
Your Shot Scope comes with 16 tags, each labelled with an initial to identify the club. It is best practice to match the appropriate tags with the corresponding club. For example, the D tag would screw into your driver.
Tags must be inserted securely into the grip of the club you wish to track. Do this by rotating the tag clockwise whilst applying a slight downward force.
There are 2 'spare' tags marked X1 and X2, these should be used for clubs such as a 7 wood or an extra driver.
Only the P tag can be used with a putter.
Existing Shot Scope User: The tags from your previous Shot Scope product will work with the handheld, however we recommend swapping the old tags for the new ones provided.

Setting up My Bag
My Bag is a feature on the Shot Scope dashboard and apps which allows you to create a database of all of the clubs you use and track their performance.
To access My Bag on mobile it can be found in the 'more' section of the app on iOS and in the drop down menu on Android.
To compliment the Shot Scope app we also a have an online web dashboard https://dashboard.shotscope.com. This webpage has more detailed performance statistics and is easier to assign your clubs to My Bag. You can log into this dashboard using the same email and password as your mobile app. The My Bag feature can be found in the 'Account' tab at the top right corner of the dashboard.
Once you have screwed your tags into their respective clubs, you should then enter the My Bag feature on either the mobile app or the online dashboard and create your set of clubs, then assign these clubs to the tag slots so that it matches your physical tag set up.
Please visit the support site for detailed instructions on how the My Bag feature works: support.shotscope.com

At the course
Getting ready to play
The H4 can be used several ways, for example putting the handheld in your pocket, attaching to your belt, clipping to a golf bag or securing to a golf cart. For performance tracking we recommend you place the H4 in your pocket or use the belt clip provided.

To start a round, firstly switch on the device by pressing the top left button, then unlock the handheld by pressing the bottom left button. Once the handheld is unlocked, press the top right button next to the 'tick'. This will confirm the selection of 'Play'.
We suggest that you start a round just prior to arriving at the first tee. A GPS fix which should take around 30 seconds, the first time you play this may take a bit longer.

How to use H4
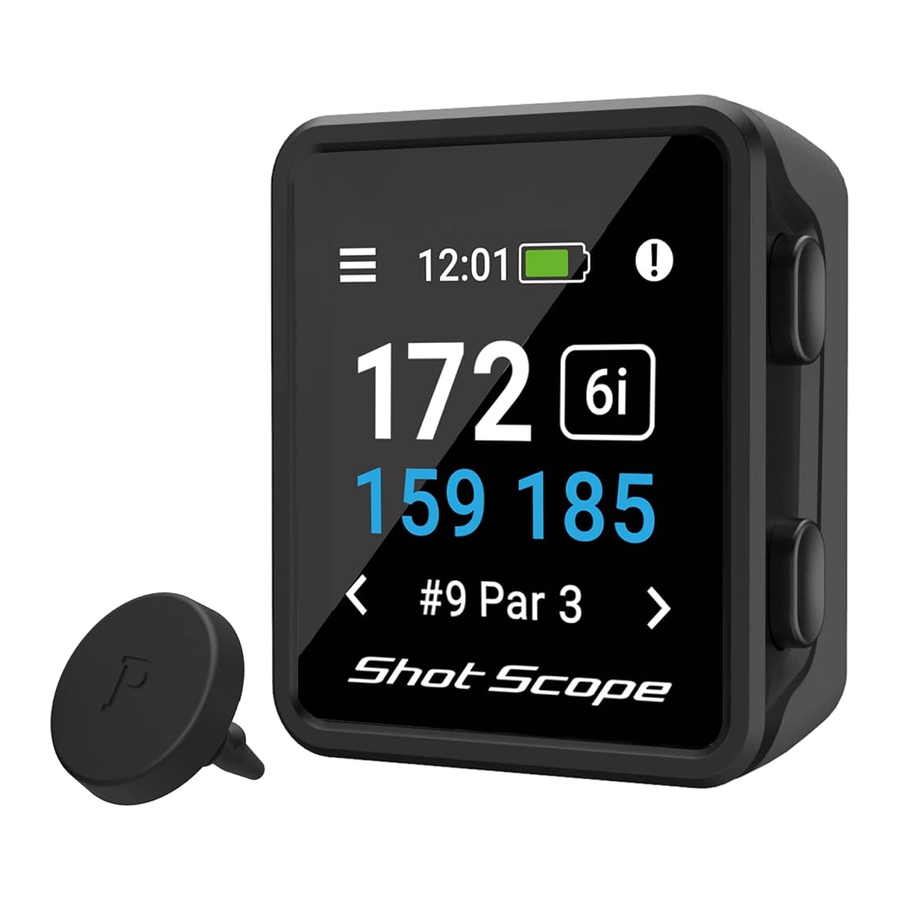
The Shot Scope H4 shows front, middle and back distances, hazards and lay up distances.
H4 has shot tracking and performance statistics included. To track your game simply tap the Shot Scope tag on the end of your club against the device to record a shot. Tagging works best when tapped against the Shot Scope logo. Once your tag has been detected the club will show on the screen.
We recommend tagging before you take a shot as part of your pre shot routine.
The device will vibrate to confirm the club has been detected.

Mode and course selection
The game modes are interchangeable and allow you to get the most out of your H4 by offering flexibility between events. After you have selected to start a new round you will be asked to confirm what mode you wish to play the round in. You can choose between: GPS only, Track only and GPS + Track.
After you have selected a game mode your handheld will then search for a GPS fix which should take around 30 seconds, the first time you play this may take a bit longer. The handheld will then show a list of available courses, use the bottom left and right buttons to find the correct course and then press the top right button to confirm your selection.
GPS + Track:
Combines both GPS distances and shot tracking so you can analyse your game post-round.

GPS only:
Provides F/M/B, lay up and hazard distances on the screen of your H4 throughout your round. This mode does not gather any shot tracking data.

Track only:
Gathers shot tracking data for retrospective game analysis. This mode does not provide any on-course information and no GPS distances will be displayed on your handheld whilst you play.

During Play
Main GPS Screen
The diagram below explains F/M/B distances and how to access the menu and hazard / lay up screens. You can skip holes by pressing the bottom left and right buttons. These features are explained in the user guide.

Tag ID
The tag ID gives the golfer visual feedback during the round and shows the last club tag the handheld has detected on the screen. This gives the golfer confidence that their shot has been detected.
The tag ID feature can be turned off in settings if you do not wish to use it.
Button Lock
The button lock feature locks the buttons while in play to avoid pressing accidentally.
The buttons will lock after 15 seconds of inactivity. To unlock, press the bottom left button.
To view hazards while in play, unlock the screen and the hazards icon will appear, top right.
You can disable the lock screen feature in the settings menu.

PinCollect
PinCollect is a simple feature that allows you to get the most out of your statistics by collecting the position of the pin. When you reach a green, your device will automatically change to the PinCollect screen. This screen shows the numbers 1-3, which represent the number of putts taken on the hole. On the following screen a 0 or 4 putt can be recorded. Once you have holed out, stand over the hole and press the button next to the number which correlates with the amount of putts taken. This will save the pin location for that hole.

What if I forget to PinCollect?
Although the device will remind you to do so on every green, forgetting is still easily done! If you do forget, you can add the pin position in editing and move your putts as required. There will be more on the editing feature later.
How to record a penalty on course?
Navigate to the penalties screen by pressing the top left menu button. The first option is 'Penalties', press the top right button to confirm the selection. You can then cycle through the different penalty options and select the one that is relevant to you. There is more information about using penalties on the support site: support.shotscope.com
Scrolling between holes
When you finish a hole, the device will automatically change to the next hole. If you need to manually change the hole the device is on you can do this by pressing the bottom right button to go forward and the bottom left button to go back.

How to access hazards and lay up distances
To view hazards for the hole, click the top right button beside the '!' icon. This will take you to the hazards and lay up screen where you can access distances to bunkers, water hazards and lay up distances that are on that hole. The screen will show the first two distances but you can scroll through all hazards / lay ups on the hole by pressing the top right and bottom right buttons. To get back to the yardages screen after this procedure, press the top left button beside the back arrow.

Last Shot
This feature measures the distance of the last shot automatically in GPS+Track mode, and also measures the last shot manually in GPS mode.
How to access last shot in GPS+Track mode
Unlock the screen, and press the menu button (top left). As you walk towards your ball, the number shown on the screen will increase. This then resets automatically, once you hit your next shot.

Pause Round
You can pause your round during GPS + Track mode by unlocking the screen by pressing the bottom left button then pressing the top left button for 2+ seconds.
For full instructions on how to use this feature visit our support website.
How to access last shot in GPS mode
When standing on the tee or beside your ball before hitting a shot, unlock the screen and press the menu button (top left) then press start (top right button). As you walk towards your ball, the number shown on the screen will increase. Should you wish, repeat this process every time you hit a shot.

Ending a round
After playing the 18th hole you will automatically be asked if you want to end the round. Press the top right button to confirm that you wish to end the round. If you don't want to end the round press the bottom right button until you see the 'Continue' option and then press the top right button to confirm this. You can manually end a round at any point by pressing the menu button top left and then scrolling through the options until you reach the 'End Round' option. If you press the top right confirm button the round will end and you will return back to the home screen.

Play back 9
If you are playing a 9 hole course but playing another 9 holes. Keep pressing the bottom right button on the end round screen until you see the 'Play Back 9?' Then press the top right confirm button to continue your round.
Post Round
Uploading your data
When going to upload your round, first make sure that you have your handheld turned on and next to your mobile phone (ensure you have Bluetooth enabled on your phone settings). The next step is to log into your app and tap the 'Connect' button at the top of the screen.
The screen will then change to show that a sync is waiting, tap on the sync button to start the round sync. You will see a progress bar and when this has completed the round will be uploaded to your account.

Editing data
Editing is one of the most useful features on your Shot Scope system and should be a part of every users routine.
Editing/Signing Off
All rounds that you upload need to be signed off before they are included in your stats. This process ensures that all of your data is completely accurate.
 Rounds that have not been signed off are identified by an orange scorecard icon on both your online dashboard and mobile app.
To begin the 'Sign Off' process on the dashboard, click on the card of the round you wish to sign off and then select 'Edit/Sign off' found below the map. On mobile, tap on the round card and then tap the pencil or scorecard icon on the round overview page.
This opens a scorecard for your round.
On this scorecard there is a five-step process.
- Select your handicap from the dropdown.
![]()
- Select which tees you played from, several options are included on the drop down list. If the tees you played from aren't present, click on the plus icon to create a new set. When creating a new set of tees make sure all the pars for each hole are correct before going forward.
- Once you reach step 3, the edit button will be enabled. Click on this button to begin making edits to your round. In order to 'sign off' your round you must view at least one hole in editing, however, we do recommend reviewing all holes to ensure data is correct.
- Once you have edited your round, you must decide whether to include the round in your performance statistics. This shall be set to include as default. To discount the round, simply move the slider on dashboard or untick the box on mobile.
![]()
- Press 'sign off' to complete the process.


To find out more about editing and signing off please visit: support.shotscope.com
Compete against your friends in Leaderboards and unlock Medals
When signing off your round you have the option to include the round in Leaderboards and Medals.
You can compete and play against other Shot Scope users to gain medals and top our leaderboards.
Opt into leaderboards via the 'compete' tab on the app and online dashboard.

SAFETY INFORMATION & HEALTH WARNINGS
For your personal safety and to avoid damage to device follow safety information guidelines detailed below. Failure to avoid the following potentially hazardous situations could result in serious injury:
- Always consult your Physician/Doctor before beginning or modifying any exercise program. If you have a pacemaker or other implanted electronics device, consult your Physician/Doctor before using any electronic devices from Shot Scope Technologies Ltd.
- Do not clean or wear the device when you are charging it. Always unplug the device first before cleaning it.
- Do not expose the device or any other electronics product used to charge the device to liquid, moisture, humidity, or rain whilst charging the device. Exposure to water or moisture during charging could result in damage to the electronics circuits and may result in failure or explosion.
- Only use the device as detailed in the user manual.
BATTERY WARNINGS
If these guidelines are not followed, the internal lithium-ion battery may experience a shortened life span or may present a risk of damage to the device, fire, chemical burn, electrolyte leak, and/or injury.
- Do not charge or use the unit in a car or similar place where the inside temperature may be over 45 degrees Celsius (113°F). To prevent damage, remove the device from the vehicle or store it out of direct sunlight, such as in the glove box.
- Do not disassemble, modify, re-manufacture, puncture or damage the device.
- Do not short circuit the battery or device by bringing the terminals in contact with metal or another object. This could cause personal injury, explosion or fire.
- Do not immerse or expose the device to water, other liquids, fire, explosion, or any other hazard.
- Do not shock the battery by dropping or throwing it.
- Do not operate the device outside of the temperature ranges specified in the temperature specifications in this manual.
- If the device or battery shows any type of damage, such as bulging, swelling or disfigurement.
Discontinue use immediately and contact Shot Scope Technologies Ltd. - Keep any exposed battery out of reach of infants or small children.
CARE GUIDELINES
- Avoid extreme shock and harsh treatment, because it can degrade the life of the device.
- Only use a damp cloth or paper towel with water to clean the device. Do not spray with any chemicals to clean the device.
- Do not expose the device to extremely high or low temperatures.
- Do not bring the device into contact with any sharp objects. This could cause damage or scratches.
- Do not attempt to repair, modify or disassemble your Shot Scope device; it does not contain any user serviceable components and doing so will void the warranty.
- Use the supplied usb cable to charge the Shot Scope device with usb compliant ports.
- If the device becomes submerged in a liquid, turn the device off, wipe excess liquid from the surface of the device and place the device in a dry area for 24 hours. In most cases the device should power up and function properly once completely dried. If the watch does not power up after following these steps contact customer support if your warranty period is still active.
- If the plastic the device comes into direct and prolonged contact with chemicals or suncream its appearance may be altered.
GPS NOTICE
The device may experience degraded performance if you use it in proximity to any device that uses a terrestrial broadband network operating close to the frequencies used by any Global Navigation Satellite System (GNSS), such as the Global Positioning Service (GPS). Use of such devices may impair reception of GNSS signals.
POWER SPECIFICATIONS
Charging: 5V USB
BATTERY
The device has an internal Lithium Polymer rechargeable battery. The battery should only be replaced by authorized Shot Scope Technologies Ltd approved personnel. A customer should never attempt to replace the battery.
TEMPERATURE SPECIFICATIONS
Operating Temperature: 0°C to 50°C (32°F to 122°F)
Charging Temperature: 5°C to 40°C (41°F to 104°F)
Storage Temperature: -10°C to 45°C (14°F to 113°F)
Get the most out of your Shot Scope H4
Visit www.shotscope.com/getstarted for FAQs, tutorial videos and customer support
TECHNICAL SUPPORT
This limited warranty is neither a service nor a support contract. Answers to technical support questions can be found at: support.shotscope.com
To find out more information visit: support.shotscope.com
Join our social pages to be kept up to date with the latest Shot Scope news:
 Facebook: shotscope
 Twitter: @shotscope
 Instagram: @shot_scope
Documents / Resources
References
![www.apple.com]() App Store - Apple
App Store - Apple![play.google.com]() Google Play
Google PlayRounds - Shot Scope
Golf Accessories from Shot Scope | Tracking Tags, Watch Straps
Get Started Guides and Support | Shot Scope
Download manual
Here you can download full pdf version of manual, it may contain additional safety instructions, warranty information, FCC rules, etc.
Advertisement


Need help?
Do you have a question about the H4 and is the answer not in the manual?
Questions and answers