Table of Contents
Advertisement
Quick Links
Advertisement
Table of Contents

Related Manuals for Shot-Scope PRO LX+


Summary of Contents for Shot-Scope PRO LX+
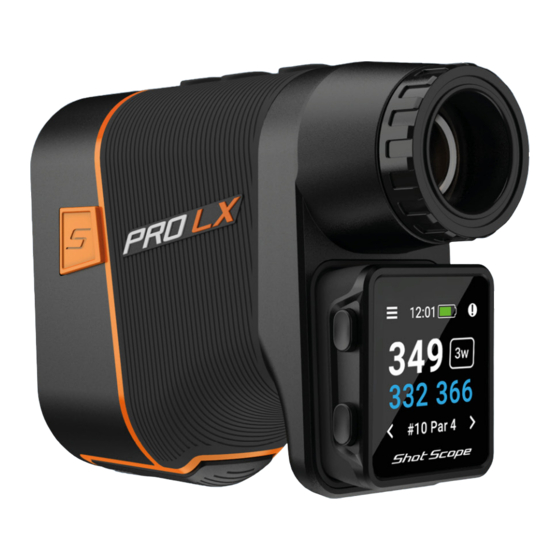
- Page 2 Inside your PRO LX+ box H4 handheld product box By combining the two products together they become the PRO LX+ This user guide contains instructions on how to use the H4 handheld and instructions on how to use the PRO LX When used together they give you all the distances you cover plate from the PRO LX press the bottom half of The handheld slots in underneath the eye-piece and is...
- Page 3 with PRO LX+ The PRO LX+ is a versatile product and how it is used is down to personal preference of the golfer.
-
Page 5: Table Of Contents
Contents Inside your box Inside your box Thank you for buying a Shot Scope H4. Before turning on the device, please read our full user guide to ensure Setting up your Shot Scope H4 the correct set up. The Shot Scope App and Dashboard Shot Scope H4 At the course 16 x... -
Page 6: Setting Up Your Shot Scope H4
Setting up your Shot Scope H4 Step 1: Download and install the mobile app Shot Scope provides both an Android and iOS app, these can be downloaded onto any compatible mobile or tablet. To download or install the Shot Scope app, simply search for Shot Scope on either the App Store or the Google Play Store. - Page 7 Step 2: Complete the tutorial on the app you will be taken through a tutorial showing you how to use the handheld and the app. During this process, you will turn on your H4 and pair the device with the app. You will choose the settings for your device and sync the handheld to ensure it has the latest the H4.
- Page 8 Step 4: Check course maps We suggest that you check the mapping status of any courses you intend to play 48 hours before your tee off time. This is to make sure the course is in the system and has been mapped. Most courses will be mapped and on the handheld, but there could be the occasional new course that isn’t on the system or your course may have an update pending.
- Page 9 Step 5: Searching for, subscribing and adding a course You can search our course database by entering the name of the courses by proximity to your current location. To make sure you always have the most up to date course maps, when the course map has been updated.
- Page 10 Step 6: Syncing If you have any course maps that need to be uploaded to the device, or any updates that need to be transferred to the screen. If you wish to perform a sync then tap on the ‘Ready to Sync’...
-
Page 11: The Shot Scope App And Dashboard
The Shot Scope App and Dashboard Download or update your mobile app Please make sure you have the most up to date version of the iOS and Android app installed. To upload rounds you must use the mobile app. You can also view and edit your round on the Performance Dashboard (shown on right) which can be accessed via web browser on a computer or tablet. - Page 12 Before you play for Step 1: Charging your Shot Scope H4 Your Shot Scope can be charged from any USB port or USB compliant wall charger. Please use the charger provided with the product. Hold the charger with the Shot Scope logo facing the sky, then apply some pressure to the lever and carefully place the 4 prongs into the back of the device.
- Page 13 Step 2: Installing tags Your Shot Scope comes with 16 tags, each labelled with an initial to identify the club. It is best practice to match the appropriate tags with the corresponding club. For example, the D tag would screw into your driver. Tags must be inserted securely into the grip of the club you wish to track.
- Page 14 Step 3: Setting up My Bag My Bag is a feature on the Shot Scope dashboard and apps which allows you to create a database of all of the clubs you use and track their performance. To access My Bag on mobile it can be found in the ‘more’ section of the app on iOS and in the drop down menu on Android.
-
Page 15: At The Course
At the course Step 1: Getting ready to play The H4 can be used several ways, for example putting the handheld in your pocket, attaching to your belt, clipping to a golf bag or securing to a golf cart. For performance tracking we recommend you place the H4 in your pocket or use the belt clip provided. - Page 16 Step 2: How to use H4 The Shot Scope H4 shows front, middle and back distances, hazards and lay up distances. H4 has shot tracking and performance statistics included. To track your game simply tap the Shot Scope tag on the end of your club against the device to record a shot.
- Page 17 Step 3: Mode and course selection The game modes are interchangeable and allow you to get After you have selected a game mode your handheld will then After you have selected to start a new round you will be asked then show a list of available courses, use the bottom left and right choose between: GPS only, Track only and GPS + Track.
- Page 18 Step 4: During Play Button Lock The button lock feature locks the buttons while in play to avoid Main GPS Screen pressing accidentally. The diagram below explains F/M/B distances and how to access the menu and hazard / lay up screens. You can The buttons will lock after 15 skip holes by pressing the bottom left and right buttons.
- Page 19 Step 4: During Play (cont) How to record a penalty on course? PinCollect PinCollect is a simple feature that Navigate to the penalties screen by pressing the top left allows you to get the most out of your statistics by collecting through the different penalty options and select the one that the position of the pin.
- Page 20 Step 4: During Play (cont) How to access hazards and lay up distances Last Shot To view hazards for the hole, click the top right button beside the This feature measures the distance of the last shot ‘!’ icon. This will take you to the hazards and lay up screen where automatically in GPS+Track mode, and also measures the you can access distances to bunkers, water hazards and lay up last shot manually in GPS mode.
- Page 21 Step 4: During Play (cont) Ending a round After playing the 18th hole you will automatically be asked if you want to end the round. Press the top right the round. If you don’t want to end the round press the bottom right button until you see the ‘Continue’...
-
Page 22: Post-Round
Post Round Step 1: Uploading your data have your handheld turned on and next to your mobile phone (ensure you have Bluetooth enabled on your phone settings). The next step is to log into your app and tap the ‘Connect’ button at the top of the screen. -
Page 23: Editing / Signing Off
Editing / Signing Off All rounds that you upload need to be signed off before they are included in your stats. This process ensures that all of your data is completely accurate. Rounds that have not been signed off are your online dashboard and mobile app. - Page 24 Step 2: Select which tees you played from, several options are included on the drop down list. If the tees you played from aren’t present, click on the plus icon to create a new set. When creating a new set of tees make sure all the pars for each hole are correct before going forward.
-
Page 25: Leaderboards / Medals
Compete against your friends in Leaderboards and unlock Medals When signing off your round you have the option to include the round in Leaderboards and Medals. You can compete and play against other Shot Scope users to gain medals and top our leaderboards. -
Page 26: Get The Most Out Of Your Shot Scope H4
Get the most out of your Shot Scope H4 Visit www.shotscope.com/getstarted for FAQs, tutorial videos and customer support... - Page 28 Instructions...
Need help?
Do you have a question about the PRO LX+ and is the answer not in the manual?
Questions and answers