Advertisement
INTRODUCTION
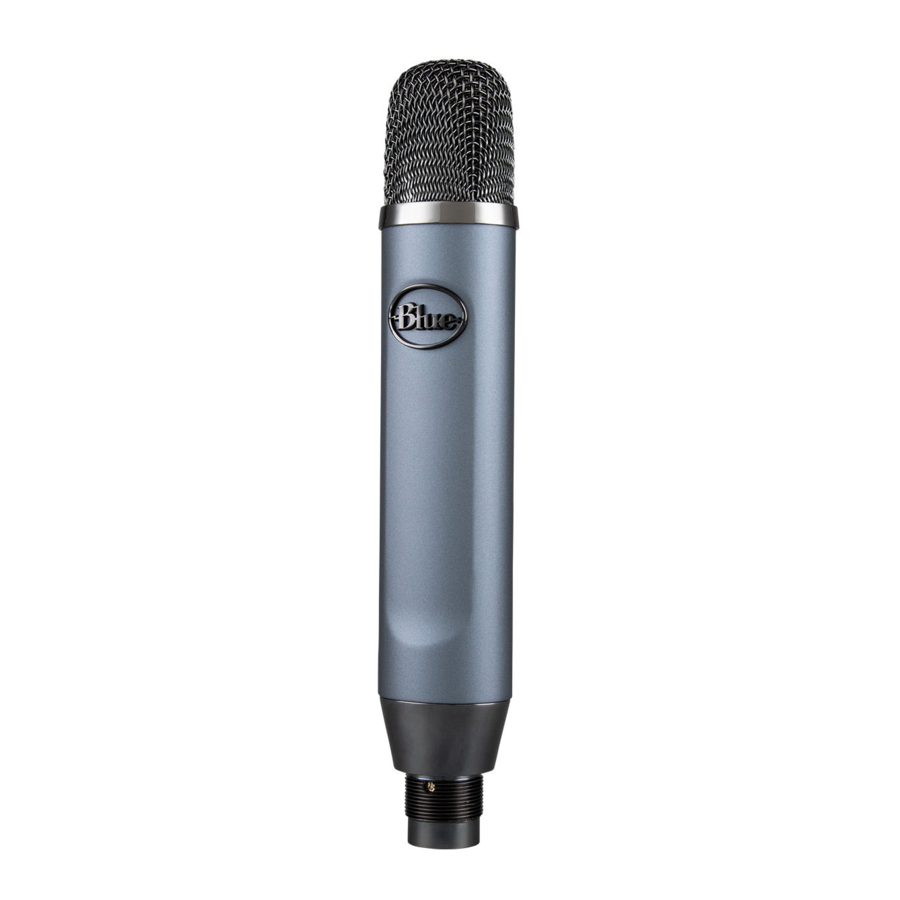
Ember brings Blue's legendary studio sound to your creative space. Featuring our proprietary custom, hand-tuned condenser capsule. Ember delivers superbly clear, open and detailed performance for recording or streaming voice and instruments. Ember's cardioid pickup pattern focuses on the sound source and minimizes room noise, and the compact, side-address design 's perfect for mic placement in tight spaces or limited on-screen real estate.
Custom, hand-tuned condenser capsule
Superbly clear, open and detailed performance for voice and instruments
Cardioid pickup pattern
Excellent off-axis rejection, minimizes room noise for recording and streaming
Compact, side-address design
Compact design enables precise mic placement
Ember is a studio condenser microphone with a cardioid pickup pattern designed to reject off-axis sound arriving at the back of the capsule. Ember requires +48V phantom power and works great with audio interfaces, mixers and mic preamps. For best performance and to avoid damage to the microphone's audio components, we recommend the following procedure:
- Connect Ember to a mic stand using the included mic stand adapter.
- Turn down the preamp gain on your audio interface or mixer.
- Mute the input channel in your DAW or mixing console.
- Connect an XLR microphone cable to Ember and the opposite end of the mic cable to the mic preamp on your audio interface or mixer.
- Switch on phantom power.
- Un-mute all previously muted signal paths and adjust mic preamp gain as necessary.
- Ember is a side-address microphone, so make sure the sound source is pointing at the side of Ember with the Blue logo, not the top of the microphone.
- Press record and perform!
MOUNTING OPTIONS
Ember connects to all standard mic stands and desktop boom arms using the included mic stand adapter. If you are looking for additional isolation, Ember is compatible with Blue's S3 Shockmount.
Please see bluedesigns.com for more information.

RECORDING APPLICATIONS
What do you want to record with your Ember? Whatever it is, we have some great tips for you, and some interesting techniques to experiment with. Ember excels in recording a wide range of different sound sources, so check out the sections below for the straight story on recording each of these sources with your Ember mic.
Vocals
A little-known secret in the recording world is that vocalists love singing into beautifully engineered microphones like Ember. Put Ember in front of any singer and you're guaranteed to get an inspired vocal performance. Position the vocalist at the front of Ember (the side with the Blue logo) between three and twelve inches from the microphone. The closer you get to Ember, the more present and intimate Ember will sound. For a "big" vocal sound with maximum presence, get the vocalist within three to five inches of the capsule. To control "P" and "B" plosives, use a Pop filter-Blue's The Pop for instance.
Acoustic Guitar
For a balanced sound with plenty of sparkling high end, position Ember facing the guitar neck, right where the neck joins the body (usually around the 12th-14th frets). For starters, keep the mic as close to the guitar as possible and tilt the capsule (microphone head) toward the soundhole to capture a blend of low-end and pick sound. If you need more low-end sound, move the microphone closer to the soundhole. For more high-end detail, move Ember farther from the guitar-either at the same neck position, or above the instrument up by the guitarists head.
Electric Guitar
To create a clean electric guitar sound, point Ember toward the center of the speaker cone to capture more highs, or move the capsule toward the edge of the cone for a fuller sound with more low-end frequencies. For overdriven or distorted tones, point Ember toward the outer edge of the amplifier's speaker cone. For a more lively sound, back Ember away from the amp a foot or more to add in a little room sound and soften the high end frequencies.
Drums
Ember's fast transient response makes it an ideal mic for recording drums. Begin by placing the microphone two to four inches above the rim of the drum and angle the front of the mic toward the center of the drum for more attack. Moving the microphone closer to a drum generally increases the ow end, shell resonance, and separation from other sound sources, while more distant placement emphasizes the interaction of the drum and the environment, producing a blended and airy sound.
Voice-Over, Podcasting and Streaming
Ember isn't just for instruments and singers! Ember is also an ideal desktop rnicrophone for voice-over work, YouTube narration, podcasting and game streaming. To get a rich, detailed broadcast sound, start by placing the mic roughly five to eight inches from your mouth. To control "P" and "B" plosives, use a pop filter like Blue's The Pop. Be sure to keep your mouth at a consistent distance from the microphone and speak at a consistent volume. You can also connect Ember directly to your computer with Blue's Icicle XLR to USB adapter.
Piano
Pop and jazz piano recordings can be accomplished with a pair of Ember microphones placed inside a grand piano-either close to the hammers for a defined, percussive sound, or roughly in the middle of the piano body to get a more resonant and blended tone.
Saxophones, Flutes, and Reeds
For soprano sax, clarinet, oboe, and related Instruments, position Ember directly above and in front of the keys between the middle of the horn and the lowest pads. Try moving Ember up or down along the length of the body to adjust the balance of airy highs (toward the mouthpiece) or midrange (toward the bell). On flute, start by placing Ember above the middle of the Instrument and move the diaphragm closer to the mouthpiece if more high frequencies and breath sounds are desired. For other members of the saxophone family, start by placing Ember two to six inches in front of the lip of the bell. Angle Ember upward toward the mouthpiece to capture more air, brightness, and high notes. For a mellower sound, orienting the diaphragm toward the floor will emphasize the low range of the sax, and will tame the upper midrange that projects straight out of the bell.
Violins, Viola, Cello and Bowed Instruments
When recording bowed Instruments, place Ember about one or two feet in front of the bridge of the instrument. If you're recording a violin or Viola, this means you'll need to place Ember above the person playing, pointed down toward the bridge of the violin or viola If the instrument sounds harsh (too much high end), try moving Ember slightly toward the Side of the instrument and away from the "f" holes. If you're recording multiple string or bowed Instruments, simply place Ember about three to six feet above and in front of the Instruments, pointed toward the players.
OK, we've lit the fuse-now it's time to light up Ember and create some professional-quality recordings!
TECHNICAL SPECIFICATIONS
- Transducer Type: Condenser capsule
- Polar Pattern: Cardioid
- Frequency Response: 38Hz - 20kHz
- Sensitivity: 12mV/PA
- Output Impedance: 40 ohms
- Rated Load Impedance: 1k ohm
- Maximum SPL: 132 dB SPL
- Power Requirements: +48V DC phantom power
- Weight: 0.38 kg (0.84 lbs.)
- Dimensions: 219 mm (L), 38.26 mm (W), 31.91mm (D)
PACKAGE CONTENTS
Microphone, mic stand mount
WARRANTY
For warranty service or for a copy of Blue's Warranty Policy including a complete list of exclusions and limitations, contact Blue at 818-879-5200.
Documents / Resources
References
Download manual
Here you can download full pdf version of manual, it may contain additional safety instructions, warranty information, FCC rules, etc.
Advertisement


Need help?
Do you have a question about the ember and is the answer not in the manual?
Questions and answers