Advertisement
Introduction
This manual contains important information on how your X-Sense® Pro remote controller works. Make sure you read this manual completely before installing and using this remote controller. If you install this remote control for the use of others, you must leave this manual (or a copy of it) with the end user.
 NOTE! This remote controller only fits X-Sense® Pro wireless interlinked alarms like XS01-M, XH02-M & XC01-M
Important Safety Instructions and Guidelines
- Do not hold the test/silence for a time longer than recommended by this manual.
- Do not press the test/silence repeatedly, and make sure to wait until the wireless alarms have had time to respond.
- Under no circumstances should you alter this device.
- Only use this product for its intended purpose.
- Only use the specified batteries, and make sure to match the battery polarities when installing and changing the batteries.
Package Contents
1 × Remote Controller (Battery Included)
1 × Adhesive Tape
1 × Key
2 × Screw
2 × Anchor Plug
1 × Manual
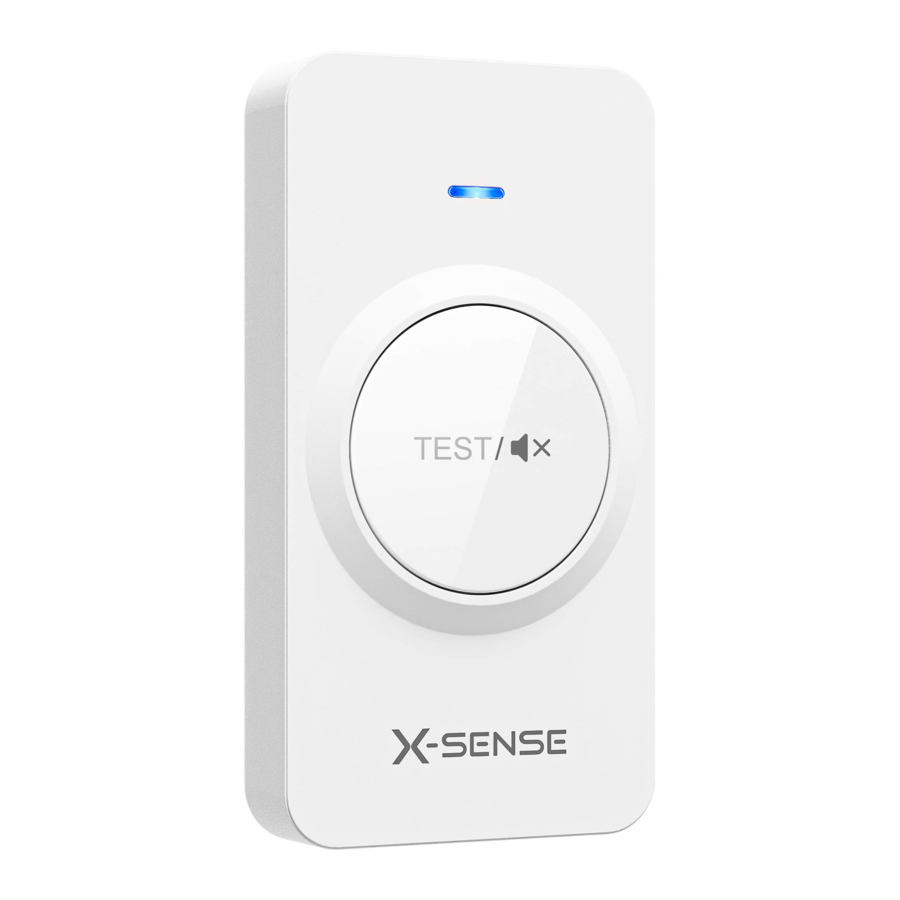
Product Overview

- LED Indicator
- Test/Hush Button
- Rear Cover
- Battery
Operating Instructions
Battery Installation
Open the rear cover by inserting the included key into the slot at the bottom of the remote controller. Remove the insulating film on the button cell battery. Make sure the battery polarities are correctly matched (plus to plus and minus to minus). Install the battery and then close the cover.
Pairing the Remote Controller with X-Sense® Pro Wireless Interlinked Alarms
(Purchased Separately) XS01-M, XH02-M or XC01-M
- Create an interlinked group of wireless alarms by following the operating instructions included with the device packaging.
- Press the test/silence button on one wireless interlinked alarm in the interlinked group quickly 4 times. The unit will beep once, and the red LED will flash slowly, indicating it has entered pairing mode and is waiting for a new unit to be added.
- Press the test/silence button on the remote controller quickly twice. The blue LED will flash rapidly, indicating that it is searching for a device to connect to.
- After successful linking, the alarm will beep once and automatically exit the pairing mode. Then the alarm will only flash once per minute, indicating that it is in normal monitoring mode. The LED indicator on the remote controller will light up for about 3 seconds, then turn off.
Testing the Wireless Connection Between the Wireless Interlinked Alarms
- Hold down the test/silence button (>7 sec) to be able to control the sensors within the range of the remote controller. The LED indicator on the remote controller should flash.
- After the wireless interlinked alarms have received the signal (takes about 7 seconds), their LED indicators will flash, and all wireless interlinked alarms will sound.
- Release the test/silence button. The LED indicator on the remote controller will stop flashing, indicating that the test has ended. All alarms should go silent.
Hush alarms
Simply press the test/silence button to silence the wireless interlinked alarms in case of a false alarm initiated from fumes from cooking, cigarette smoke, etc.
NOTE: NEVER silence an alarm that you do not know the origin of. Always investigate an alarm BEFORE silencing!
During an alarm, press the test/silence button once, and all devices paired will be silenced. Press the button again to also silence the initiating alarm.
The LED on the remote controller will flash blue each time you press the button, indicating it has received the command.
How to test the battery status of the remote control
In standby mode (non-alarming mode), if you briefly click the test button on the remote control, the LED indicator flashes blue, indicating normal operation and sufficient battery level.
Technical Specifications
| Transmission Frequency | 868 MHz |
| Remote Control Range | 15 m (in open air) |
| Operating Temperature | 0-50°C |
| Battery Type | 3 V CR2032 Lithium Battery |
| Battery Lifetime | 1 year |
Troubleshooting
| Issue | Possible Cause | Solution |
| The indicator on the remote controller does not light up when the button is pressed. | The insulating film on the battery has not been peeled off. | Peel off the insulating film. |
| The battery is not properly installed (polarization or position). | Take out the battery and re-install it again. Make sure the contacts are clean. | |
| The battery power is low. | Replace with a new battery. | |
| Wireless interlinked alarms do not respond to the remote controller. | Unsuccessful pairing. | Pair the remote controller and the wireless interlinked alarms again. |
| Out of range or interference from the environment/other devices. | Move to a closer location or another place and try again. |
Note: The range of the remote controller depends on many factors, and the operating distance will vary depending on the actual operating environment and interference from other electronic devices. Avoid communication issues or interruptions by checking for things that may affect the radio communication. Electromagnetic waves can be generated by a variety of devices including TVs, induction cookers, and microwave ovens.
info@deltronic.se
www.deltronic.se
Documents / Resources
References

Download manual
Here you can download full pdf version of manual, it may contain additional safety instructions, warranty information, FCC rules, etc.
Advertisement


Need help?
Do you have a question about the Pro and is the answer not in the manual?
Questions and answers