Advertisement
Instructions for use
 Please read these instructions carefully in order to familiarise yourself with the features of the watering timer and its correct assembly and usage.
Check that the programmes work as expected when using the timer for the first time.
This electronic watering timer has been designed to be used exclusively in outdoor spaces and in gardens for the control of sprinklers and watering systems. The watering timer should not be used for industrial purposes or in conjunction with chemical products, food, flammable materials or explosives.
Technical specifications
| Supply voltage: | 9V. (Use a high-power alkaline battery). |
| Quiescent current: | Less than or equal to 18μA. |
| Working life of the battery: | 1 season (6 months) under normal conditions of use. |
| Time error: | +0.25 per day. |
| Working temperature: | 5°C to 60°C. |
| Working pressure: | 0.2 to 8 bar. |
| Stop tap: | Easy to activate or deactivate. Prevents accidental or unauthorised changes to the programme. |
How the electronic watering timer works
The electronic watering timer will water your garden, flowerpots or plants automatically based on the programme that you select. You may adjust the timer to water your garden in the earliest hours of the morning or at dusk, when less water will evaporate. The timer will continue to water your garden while you are on holiday. There are two flexible options for programming watering cycles:
- Manual: Press the Man/Auto button to switch between: On - Off - Auto (you will hear a click when it is 'On' and silence when it is 'Off').
- Automatic: Enables up to 8 watering cycles per day. You can quickly select up to 15 different combinations of days to determine the day of the week on which the timer will operate.
Set-up
- Insert one 9-volt battery.
- Set the time (see below).
- Set the watering programme. This is extremely easy to operate. It is best to familiarise yourself with this system and get a feel for how easy it is to change and adjust the programmed times before you set it up in your garden. Always programme the timer with the water supply disconnected.
Screw the adapter to the output tap and then the timer to the adapter. This adapter has a ¾" screw which is suitable for most taps used to water gardens. The sleeve nut used to install the adapter has a 1" screw which is suitable for larger irrigation outlets. Tighten carefully by hand only: never use tools.
Remember that the timer must only be set up in a vertical position.
Installing the battery

- The control unit has a square "release tab" (a) located in its lower part. Press this tab to release it from the body of the timer.
- Insert one standard 9V battery into the battery compartment, paying close attention to the + and - poles.
- Click the rear part of the control unit in the body of the timer.
- CONNECT TO THE OUTLET
- UNSCREW THE TWO SCREWS
- INSERT THE BATTERY
- COVER THE BATTERY COMPARTMENT
We recommend using alkaline batteries to ensure the correct operation of the timer. Never use rechargeable batteries.
To avoid damaging the timer and ensure greater durability:
The timer must only be set up in a vertical position with the connector nut of the watering outlet pointing vertically up. This will prevent water from entering the battery compartment.
Only use water from the mains pipes. Check the filter if necessary.
Avoid subjecting the hose coming from the timer to tension or traction.
Frost will damage the timer. Disconnect the timer at the start of the winter and store it in a dry, protected place.
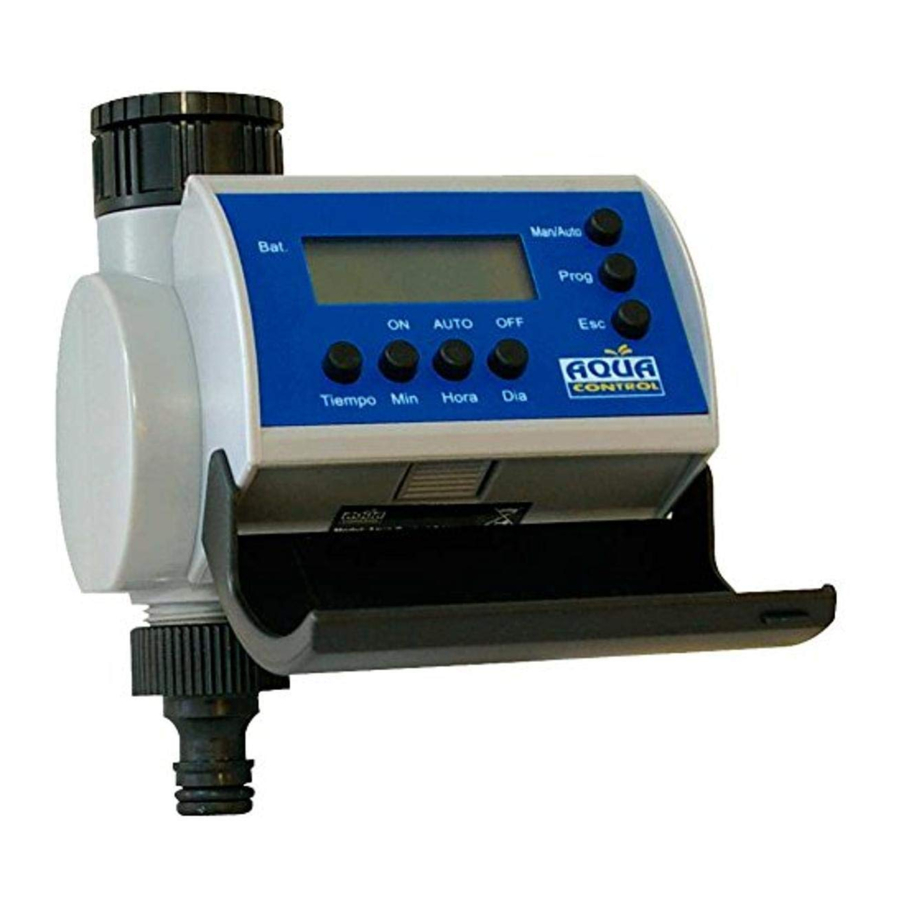
Parts and Features

- Time: Sets the current date and time. Hold down and then press:
Min: Press once to move forward one minute. Hold down for faster operation.
Hour: Press once to move forward one hour. Hold down for faster operation.
Day: Press once to move forward to the following day, displayed above the time. - Low battery indicator. When the low battery indicator flickers you will need to replace the battery. After completing this, press ESC for 3 seconds. Wait for a moment, then press ESC again for another three seconds and the timer will be ready to use.
- LCD screen
- Man/Auto: Switch between On – Auto – Off, indicated by an arrow.
- Prog: Press to show the first activation and then the hour, minute and day for the programming time.
Esc: Deletes the programming time that has been set. Hold down for 3 seconds to lock the keypad.
Function keys and screen
- The control unit: This can be removed as long as the programmes can be conveniently set (see the previous "Installing the battery" section).
- Keypad lock: Hold Esc down for a further 3 seconds to lock. Hold down for another 3 seconds to release.
- Setting the time: Make sure that the keypad is unlocked. Hold the "time" key down while alternately pressing "min", "hour" and "day". Pressing gently will move forward by one unit, whereas holding the minutes or hours key down will move forward more quickly.
- Programming the unit: See below.
- Esc Key: Acts as a delete button for the time settings for individual programmes. It will not delete the current time.
Programming the unit
- Press "Prog" once. The screen will display Programme 1 ON.

- Press "hour" and "min" to adjust the start time of Programme 1 (24-hour clock).
- Press "day" to set the days of the week in which Programme 1 will operate. (The default setting is Monday-Sunday, i.e. every day).

- Press "Prog" again. The screen will display Programme 1 OFF.

Press "hour" and "min" to set the finish time of Programme 1.


If you want the watering system to activate once a day only, on the days set in part 3 above, stop here.
- Press "Prog" again. The screen will display Programme 2 ON.
- Repeat steps 2 to 5 for a second watering cycle on the previous days or for a watering cycle on the days selected only.
- Up to 8 programmes can be set from a total of 15 different configurations for days of the week.
- Ensure that the days for the OFF setting are the same as the days for the ON setting.
![]()
Check that each ON time has an OFF time!- To exit the programming menu, press "time". The display will go back to showing the current time and date.

If, after pressing "Prog", you press "day" repeatedly, the following combination of days will appear (see part 3 above).

MO = Monday;
TU = Tuesday;
WE = Wednesday;
TH = Thursday;
FR = Friday;
SA = Saturday;
SU = Sunday.
Please note:
- Set up with the vertical input and output
- Take action before the frosts start
- On/Off "Man/Auto" cancellation programming.
Documents / ResourcesDownload manual
Here you can download full pdf version of manual, it may contain additional safety instructions, warranty information, FCC rules, etc.
Advertisement


Need help?
Do you have a question about the C4100 and is the answer not in the manual?
Questions and answers