Table of Contents
Advertisement
Quick Links
Instruction Manual
CORDLESS PUSH LAWN MOWER
CAUTION: Before using this tool, please read this manual completely,
and follow all operating safety measures.
Senix Australia Pty Ltd. 32/3 Westside Avenue, #Port Melbourne, Victoria, 3207
For customer support, please call 1300 461 825 or email us at info@senixtool.com
SENIXTOOLS.COM
Model:
LPPX2-M1-EU
LPPX2-M2-EU
LPPX2-M1-EU
LPPX2-M2-EU
• SAFETY
• ASSEMBLY
• OPERATION
• MAINTENANCE
English
Advertisement
Table of Contents

Related Manuals for Senix LPPX2-M1-EU


Summary of Contents for Senix LPPX2-M1-EU
- Page 1 CAUTION: Before using this tool, please read this manual completely, • MAINTENANCE and follow all operating safety measures. Senix Australia Pty Ltd. 32/3 Westside Avenue, #Port Melbourne, Victoria, 3207 For customer support, please call 1300 461 825 or email us at info@senixtool.com SENIXTOOLS.COM...
-
Page 2: Table Of Contents
TABLE OF CONTENTS Look behind when backing up with the lawn mower. SAFETY & INTERNATIONAL SYMBOLS ....2 SAFETY INSTRUCTIONS .........2 KNOW YOUR UNIT .............6 WARNING – Disconnect battery SPECIFICATIONS* .............7 before maintenance. ASSEMBLY ..............7 OPERATION ..............10 MAINTENANCE ............13 Blades continue to rotate after TROUBLESHOOTING .......... - Page 3 Only operate the lawnmower in daylight or To avoid operator blade contact or a good artificial light. Low light or dark areas thrown object injury, stay in the operator are more prone to accidents. zone behind the lawnmower handles. Do not operate lawnmowers in explosive Blade contact or thrown objects may result atmospheres, such as in the presence in serious personal injury.
- Page 4 Maintain the lawnmower and accessories. WARNING! Check for misalignment or binding of moving parts, breakage of parts and Use only SENIX X2 batteries (B40X2/B50X2/ any other condition that may affect the B60X2/B80X2) and chargers (CHX2/CHQX2/ lawnmower’s operation. If damaged, have CHQX2-M-EU/CHDX2-M-EU).
-
Page 5: Lawnmower Safety Warnings
LAWNMOWER SAFETY of loss of control, slipping and falling which may result in personal injury. WARNINGS Use extreme caution when reversing or pulling the lawnmower towards you. Do not use the lawnmower in bad Always be aware of your surroundings. weather conditions, especially when This reduces the risk of tripping during there is a risk of lightning. -
Page 6: Know Your Unit
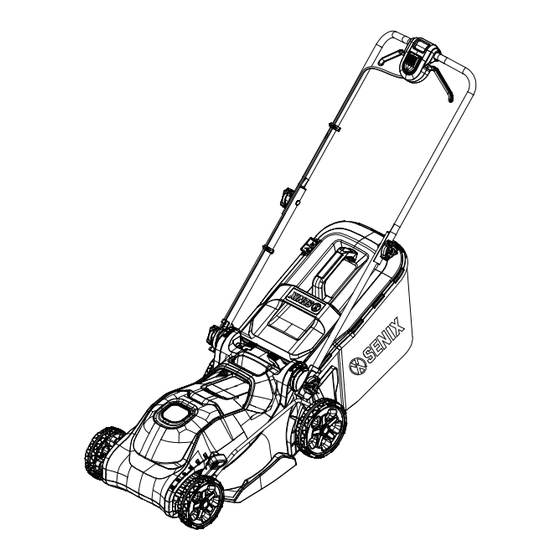
KNOW YOUR UNIT APPLICATIONS Model: LPPX2-M1-EU LPPX2-M2-EU As a cordless lawn mower: Cutting grass in domestic use. Carry handle Safety button Battery compartment cover Switch trigger Cutting-height adjustment lever Power cord Grass bag Cord clip Discharge chute door Upper handle... -
Page 7: Specifications
SPECIFICATIONS* Model LPPX2-M1-EU LPPX2-M2-EU Input Voltage 36 V (40 V Max*) 36 V (40 V Max*) Motor Type Brushed Brushless No Load Speed ECO 3000 rpm/ 3500 rpm Max ECO 2900 rpm/ 3200 rpm Max Mowing Functions 2-in-1 (Mulch and bag) -
Page 8: Installing The Upper Handle
WARNING! To prevent accidental starting that could cause serious personal injury, always remove the battery pack from the machine when assembling parts. WARNING! Do not attempt to modify this tool or create accessories not recommended for use with this mower. Any such alteration or modification is misuse and could result in a Fig. - Page 9 completely assemble grass bag, assemble the two side and the bottom clips to the frame. Fig. 8 To remove the grass bag, lift the discharge chute door on the mower. Lift the grass bag up and off of the mower. Release the Fig.
-
Page 10: Operation
the mulching insert, and pull it out. Release Close the battery compartment cover. the discharge door. NOTE: NOTE: Refer to the manuals for the charger and the The mulching insert must be removed in order battery pack for more details about how to to install and use the grass bag and must be charge the battery pack and other information. - Page 11 WARNING! UPPER OPERATING POSITION: Pull the quick-adjust levers up to loosen the Do not at any time make any adjustment to the handle and release the handle from the lawn mower without first stopping the motor, Locked Storage Position. Begin to lift the removing the battery packs, and waiting until handle from its folded position.
-
Page 12: Mowing Tips
is overloaded, the motor will stop. Remove the Locked storage position battery pack from the mower. Check to see Upper operating position if grass has collected beneath the deck and clear it if necessary, then install the battery Middle operating position and restart the mower. -
Page 13: Maintenance
advisable to first cut at a high cut-height setting, and then re-cut to the final cut height. Otherwise, make narrower cuts and mow slowly. ALWAYS MAKE SURE THAT THE BLADE IS SHARP. MAINTENANCE WARNING: Always switch the product off, remove the battery pack and let the product cool down before performing cleaning and maintenance Fig. -
Page 14: Sharpening The Blade
damaged, replace the bracket with a new worn or damaged blade. one. NOTE: Keep the blade sharp for best mower performance. A dull blade does not cut grass cleanly or mulch properly. To remove the blade, follow the “REPLACING THE BLADE” section in this manual. A dull blade can be sharpened, but a blade that is excessively worn, bent, cracked, or otherwise damaged must be replaced. - Page 15 “REPLACING THE BLADE” section). • After each cutting session, remove accumulated grass clippings and debris using either a dry cloth or hand brush. • Inspect the product before and after each use for worn and damaged parts. Do not operate it if you find worn and damaged parts.
- Page 16 Fig. 27 WARNING! If the mower to tips over from the upright position, mower damage or personal injury may result. Always keep the mower stable and out of the reach of children when it is in Fig. 24 the upright position. If possible, lay it flat for storage.
-
Page 17: Troubleshooting
TROUBLESHOOTING Suspected malfunctions are often due to causes that the users can fix themselves. Therefore, check the product using this section. In most cases the problem can be solved quickly. PROBLEM POSSIBLE CAUSE SOLUTION The battery packs are depleted. Charge the battery packs. The battery packs are not Reattach the battery packs to mounted in place in the battery... - Page 18 The battery packs are depleted. Charge the battery packs. Raise the cutting height or slow Mower is in overload condition. down the mowing. The mower stops Unclog the mower deck. Raise while mowing Mower deck is clogged with grass the cutting height and/or cut a and debris.
Need help?
Do you have a question about the LPPX2-M1-EU and is the answer not in the manual?
Questions and answers