Table of Contents
Advertisement
Quick Links
Advertisement
Table of Contents

Related Manuals for Cromtech Outback CTL1500I


Summary of Contents for Cromtech Outback CTL1500I
- Page 1 OWNER’S MANUAL CTL1500I Lithium-ion 1500 Watt Portable Power Station...
- Page 2 Thank you for purchasing your Cromtech Power Station. This manual provides understanding of the operation and maintenance of your power station. Please read this manual carefully before operating. For any questions regarding operation or maintenance, please consult your local service agent. Find your local service agent at www.crommelins.com.au.
-
Page 3: Table Of Contents
Index Warranty ................4 Warranty Period ............. 4 Consumer Advice ............4 Safety Notice ..............5 General Safety ..............5 Equipment Storage And Handling ........5 Equipment Maintenance ..........5 Disposal Guidelines ............6 Product ................6 Packing List ..............6 Product Inspection ............ -
Page 4: Warranty
WARRANTY CROMTECH™and CROMMELINS™ are a registered trademark of Crommelins Machinery. Crommelins Machinery warrants their goods against defects in materials and workmanship under normal use and service. The warranty does not cover fair wear commensurate with the age of the product, any damage caused by accident, abuse, misuse, neglect or failure to observe proper operating instructions or proper machinery maintenance as described in the instruction manual. -
Page 5: Safety Notice
SAFETY NOTICE GENERAL SAFETY Our products are designed with safety and reliability in mind. To ensure that you can use your device comfortably and efficiently, please take the time to read this guide, which contains important safety information. If you do not follow the instructions for proper setup, usage, and maintenance of your device, it could result in harm to yourself or others, as well as damage to the unit. -
Page 6: Disposal Guidelines
PRODUCT PACKING LIST Please check whether all accessories are complete. If any accessories are missing, please contact your dealer or place of purchase. CTL1500I packing list: ––– Anderson MC4 Solar Power AC Fast 12 Volt... -
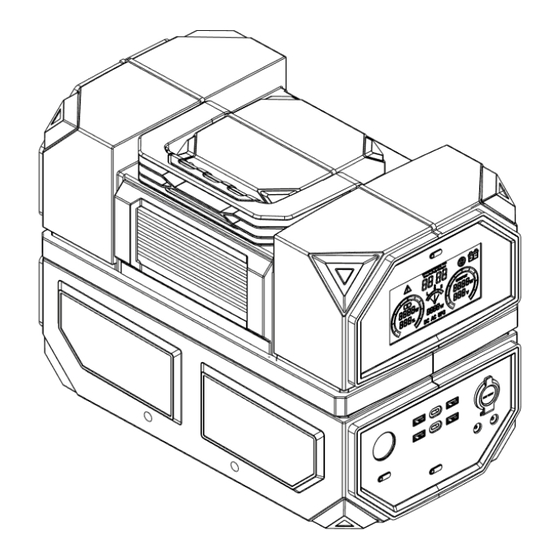
Page 7: Product Diagram
PRODUCT DIAGRAM CTL1500I Do not exceed 1500 watts maximum output in AC, DC, or combined. Overloading can lead to battery or appliance damage. BATTERY RESCUE CHARGING PORT If the battery is critically low and cannot be charged using normal methods, you can use the battery rescue charging point (requires a maximum of 5V DC/ 2AMP) until the LCD screen lights up. -
Page 8: Lcd Display
LCD display 01: Machine Failure 07: Charge icon Overheat/Overload/ 08: Charge power of 750 Short Circuit watts max 02: Battery high and low 09: Battery power temperature fault 10: Inverter power 03: Temperature Fault 11: DC output - Low/Normal/High 12: AC output 04: Battery run 13: Mains charge(UPS) - Page 9 Icon Fault Description and Handling Methods Icon Number Inverter fault icon: This is displayed when a fault occurs (Including: short circuit, overload, under voltage, over voltage, over temperature, etc.) When the power station experiences under voltage, there will be a “di” sound that will repeat for 10 seconds.
- Page 10 Battery charging failure in high-temperature environment: When the battery is protected against high temperatures, the icons 01, 02, and 03 are displayed at the same time. Icon 03 will be flashing. After the battery cools down, it resumes normal operation.
-
Page 11: Product Operation
PRODUCT OPERATION LCD display on/off Power on: Press the LCD switch for a couple of seconds to turn on or turn off the LCD Screen. If you switch on the DC, AC, and LED, the screen will also light up. If idle, the LCD screen will turn off after 5 minutes Indicator: A green indicator light shows that LCD is... -
Page 12: Led Light
LED Light Power on: Press the LED switch for a couple of seconds. Pressing on the LED switch multiple times changes the light mode: low light/ highlight/ flashing (SOS mode)/off If the LED light is on for over one minute in any mode, the LED light can be turned off when pressing the LED switch. -
Page 13: Charging Methods
CHARGING METHODS To recharge your power station, you can use the following methods below. Multiple charging methods that are used simultaneously will not charge your power station – only use one method for charging. CHARGE BY MAINS Connect the Insert the AC AC cord to plug into the AC charge... -
Page 14: Charge By 12 Volt Outlet
CHARGE BY 12 VOLT OUTLET Insert the DC output Insert the 12 volt plug into plug into the device the 12 volt vehicle outlet charging port socket Please operate in the order of in the above figure. When fully charged or you need to stop charging, first pull out the 12 volt plug from the vehicle socket and then pull out the DC plug. -
Page 15: Charge By 12V/24V Lead-Acid Battery
CHARGE BY 12V/24V LEAD-ACID BATTERY Connect the power station to the battery using a multifunctional DC charging cable and the 12-volt plug. Battery clip adapter is not included and should be supplied by the user. Clamp the positive connector (red) to the positive battery terminal first and then the negative (black) to the other. -
Page 16: Charge By Solar Panels
CHARGE BY SOLAR PANELS Connect the solar panels (in series or parallel) to the power station using the multifunctional DC charging cable and the solar charger cable, or the Anderson plug connector. Connect the Insert DC plug into the Solar charging charging port of the device cable or the Anderson plug to... -
Page 17: Charge By Battery Rescue Point
CHARGE BY BATTERY RESCUE POINT Insert Type-C Plug the Type-C Charge Charge plug Charger into cable (user- into mains outlet supplied) the charge port of the device If the battery is low and cannot be charged by normal methods, you can charge the battery through this point. Using this method of charging, the power station will be fully charged in around 10 hours. -
Page 18: Charge By Generators
CHARGE BY GENERATORS Connect the power station to the generator’s AC outlet via AC adapter to start charging Insert the AC Connect the plug into the generator cord to AC charge port of the device. Please operate in the order of in the above figure. -
Page 19: Simple Troubleshooting
SIMPLE TROUBLESHOOTING Fault Fault Description and Handling Methods Category Put the unit in a cool and ventilated place. After the temperature of the battery has lowered. Battery High Notice: Do not directly cool the battery by freezing Temperature or refrigeration. This will damage the unit and void Protection warranty. - Page 20 3. The equipment is overloaded or short-circuit protected. After reducing the load or eliminating the fault, switch the AC button to off and then on to reset the overload. 4.The reset switch pops up due to overload. The load needs to be reduced. Press the red button to restore.
-
Page 21: Power Station Specifications
POWER STATION SPECIFICATIONS General Model CTL1500I Net Weight 12.5kg Dimensions 39*21.9*28.6cm Charge The best use temperature is Temperature 25℃ (77℉) 1.5 hours from 5% to 85% Recharge Time 2.5 hours to 100% Working 10%-90% Humidity Input Ports AC charge 750W Max... - Page 22 1X 12 Volt Socket & 2 *DC Ports USB-A DC 5V,3.1A (Max 15W, Shared) USB-A DC5V 3A, DC9V 2A, DC21V (QC3.0) 1.5A (18W Max) Type-C (PD) 1 x 60W Max, 1 x 100W Battery Information Battery Type Li-ion (NMC) Battery 1023.12Wh Capacity Lifecycles...
-
Page 23: Faqs (Frequently Asked Questions)
FAQs (Frequently Asked Questions) Q: How can I determine if this product is compatible with my devices? A: Before using this power station, it is necessary to assess the cumulative power requirement of all your appliances to determine if it is within the maximum output power of the power station. - Page 24 CROMTECH OUTBACK™ is a registered trademark of Crommelins Operations Pty Ltd, ABN 11 008 889 656...
Need help?
Do you have a question about the CTL1500I and is the answer not in the manual?
Questions and answers