BE QUIET! PURE POWER 12 M - Power Supply Manual
- User manual (62 pages)
Advertisement
INTRODUCTION
We are delighted that you have chosen to use a be quiet! Pure Power 12 M PSU in your PC Please read and follow all the information contained in these instructions carefully prior to installation Should you have any further questions, please contact our customer service See contact information in item Manufacturer's details
COMPATIBILITY
The be quiet! Pure Power 12 M series power supplies are compatible with all recent popular power supply and motherboard specifications such as:
- Intel ATX12V 31 Power Supply Design Guide Revision 21
- PCIe 51
- BTX Version 10a
- E-ATX Server Motherboards via 8-Pin connector
- EPS12V version 292
- Intel C6/C7 Status for the new processor generation
- Energy Star 80 guidelines
- ErP guidelines
INSTALLING YOUR NEW POWER SUPPLY
Please read „Safety instructions" before you begin the installation
Note: You will need a screwdriver to fit the power supply in your PC Only use the screws provided with the power supply because they have the correct thread

Only use the supplied cable set Using cables that were not included (eg cables of older power supply unit series) may lead to defects!
First remove your old power supply. To do so, proceed as follows:
- Carefully disconnect your PC from any power sources and unplug all cables connected to the PC
- Open the PC case, taking care to follow the manufacturer's instructions
- Disconnect all plugs from the motherboard and all other components, such as FDDs, HDDs, or optical drives Make sure that there are no plugs from the old power supply connected to any of the components
- Now remove the screws at the rear of the power supply and carefully pull the power supply out of the PC case Take special care that no cables get caught in the components and damage them
Fitting your new be quiet! Pure Power 12 M power supply:
- Place the new power supply in the space provided in the PC case and connect to the rear panel using the four screws provided Do not use excessive force
- Plug the 20/24-pin connector into the socket provided on the motherboard If you have a 24-pin connection, place the remaining 4 pins in the correct position before you plug the connector into the socket If you have a motherboard with a 20-pin connector, fold the additional 4 pins to one side
- Now plug the 12V-P4 or P8 connector for the CPU into the socket provided on the motherboard
SAFETY FUNCTIONS
All be quiet! power supplies have numerous safety functions They are designed to protect the power supply and the components connected to it against damage If one of these safeguards is triggered, the system will reboot or power off in most cases If this happens, you should immediately check the PC for errors For more info on troubleshooting see the "Troubleshooting" chapter
The be quiet! Pure Power 12 M series has the following safety functions:
OCP (Over current protection)
If the load on the individual circuits exceeds the specified limit, the power supply is automatically switched off
UVP (Undervoltage protection)
This safeguard is triggered if the voltage on the circuits drops below a certain limit The power supply is automatically switched off in this case
OVP (Overvoltage protection)
The overvoltage safeguard is triggered if the voltage in the circuits is too high; the power supply is deactivated
SCP (Short circuit safeguard)
The fuse protecting the power supply's secondary circuits prevents physical defects of the power supply and the components connected to it
OTP (Temperature safeguard)
In the case of excessive heat build-up in the power supply, the power supply immediately and automatically switches off You cannot switch it back on until it has cooled down Please ensure that the PC has sufficient cooling
OPP (overload protection)
This safeguard is triggered if the total output of the power supply exceeds the specified maximum load This can happen if the output of power supply is insufficient for the system (incorrectly dimensioned)
TROUBLESHOOTING
Please note: If you have an ATX system, the power supply is enabled by the motherboard in order to boot the PC For this reason, please refer to the motherboard or case manual to check whether the on/off switch is connected correctly
There is a risk of fatal injury when working on power sources If you notice traces of smoke, damaged cables and exposure to liquids, immediately disconnect the power from the mains and do not use it again
Never open the power supply case High-voltage components in the interior of the power supply may still be live after a longer period of disuse
Please have any and all necessary repairs conducted by an authorized expert!
Opening the device will void your warranty.
If the system in which you installed the power supply does not work properly, check for these possible sources of error first:
- Check that the mains cable to the power supply is correctly and firmly plugged into the power supply and the socket Ideally, you should use a separate power socket for the computer power supply
- Check whether all connectors are correctly plugged in, and make any necessary adjustments, such as in case of incorrect polarity
- Check the connection between the on/off switch on the case to the motherboard Refer to the motherboard manual if needed! Switch the power supply on by setting the switch to position "I" and then pressing the on/off switch on the case If the power supply still does not switch on, continue with the next item
- Check your system for possible short circuits or faulty hardware, making sure that you switch off the computer and disconnect all devices not required for the computer to start Switch the computer back on Repeat this process and connect one device after each reboot, until you discover the fault If the power supply does not react due to a short circuit, wait for at least 5 minutes before switching back on as the device is equipped with overload protection
FREQUENT PROBLEMS
The selected voltages (via BIOS/UEFI) are to low/high
If you check the power supply voltages via the BIOS/UEFI on the motherboard or the operating system, note that they may be displayed incorrectly This typically results from imprecise measurements by motherboard and does not necessarily imply a genuine problem
Problem: After installing a new graphics card, the PC will not power on, or it crashes frequently.
You have installed a new higher performance graphics card in your system and now your PC fails to boot, or it crashes immediately with minimal workload The power supply is inadequately dimensioned for your graphics card Before making a purchase, please refer to our PSU calculator tool on www.bequiet.com The tool will help you to find the right be quiet! power supply from our range of products
Important note:
If the problems persist, please contact our customer service department immediately
ACCESSORIES
The power supply package includes the following accessories: Cable management cable set, mains lead, operating manual, cable ties, screws for installing the power supply
MANUFACTURER'S DETAILS
Listan GmbH | Wilhelm-Bergner-Straße 11c | 21509 Glinde | Germany
For support in Germany, you can call our free service hotline,
Tel 0049 40 736 7686 - 44 Fax 0049 40-7367686-69
Email: service@bequietcom
Internet page and PSU Calculator: www.bequiet.com
UK Authorised Representative (for authorities only) ProductIP (UK) Ltd
8, Northumberland Av London WC2N 5BY
TECHNICAL DATA
- LABEL
AC Input 100 - 240Vac 50 - 60Hz 10 - 5A DC Output ⎓ 3.3V 5V 12V1 12V2 -12V 5VSB Max. Current 20A 20A 36A 32A 0.3A 3A Max. Combined Power 120W 750W 3.6W 15W 750W AC Input 100 - 240Vac 50 - 60Hz 10 - 5A DC Output ⎓ 3.3V 5V 12V1 12V2 -12V 5VSB Max. Current 20A 20A 32A 28A 0.3A 3A Max. Combined Power 120W 650W 3.6W 15W 650W AC Input 100 - 240Vac 50 - 60Hz10 - 5A DC Output⎓ 3.3V 5V 12V1 12V2 -12V 5VSB Max. Current 20A 20A 28A 24A 0.3A 3A Max. Combined Power 120W 550W 3.6W 15W 550W - VOLTAGE REGULATION
| DC Output | 33V | 5V | 12V1 | 12V2 | -12V | 5VSB |
| Tolerance | +/- 4% | +/- 4% | +/- 4% | +/- 4% | +/- 10% | +/- 4% |
| Ripple/Noise (max.) | 40mV | 40mV | 80mV | 80mV | 40mV | 40mV |
- OPERATING CONDITIONS
| Environment | Temperature | Rel. Humidity |
| Operation | 0 ~ 50°C | up to 90% (non-condensing) |
| Storage | -20 ~ 70°C | up to 95% (non-condensing) |
- MINIMAL LOAD
| 33V | 5V | 12V1 | 12V2 | -12V | 5VSB | |
| 750W-550W | 0A | 0A | 0A | 0A | 0A | 0A |
- RAIL DISTRIBUTION

* Use 12V1 first
** only for 650 / 750 Watt

- DIMENSIONS
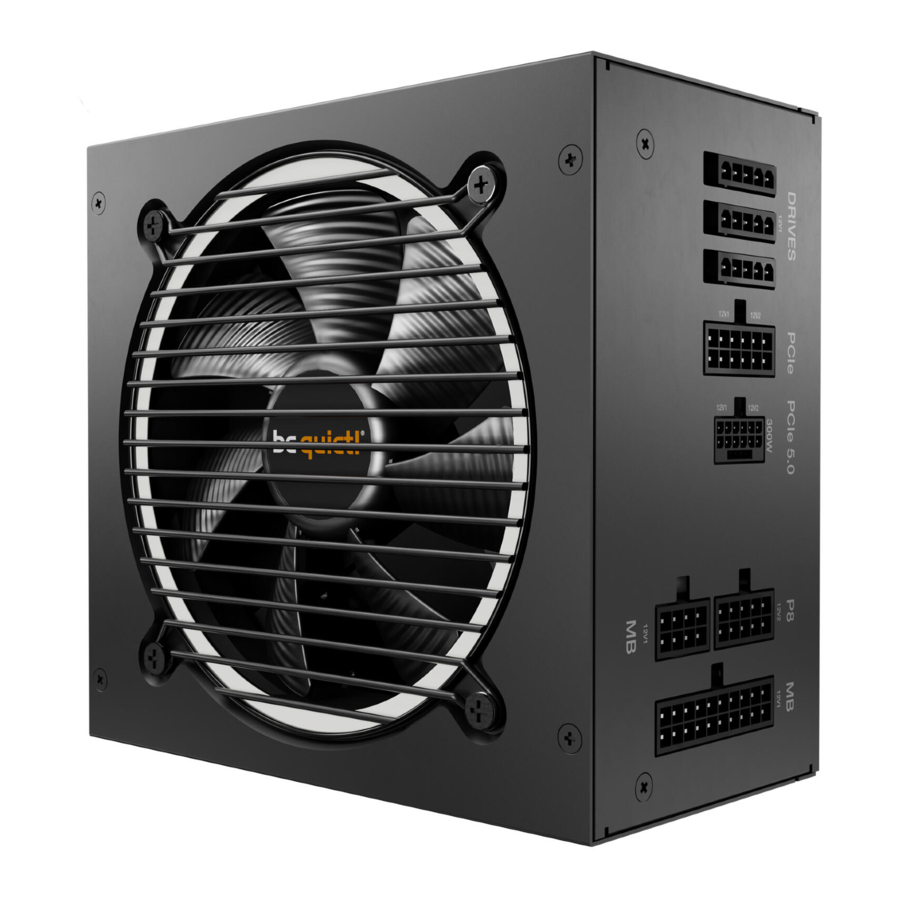
L x W x H (mm): 160 x 150 x 86 - CONNECTIVITY AND CABLE LENGTHS
750W

650W

550W


SAFETY INSTRUCTIONS
 The power supply is only guaranteed to function properly if the inWstructions are followed
Only use the supplied cable set Using cables that were not included (eg cables of older power supply unit series) may lead to defects!
Never open the power supply case The electronic components inside the case generate a high voltage that is dangerous to humans Even after disconnecting the power supply from the network, some parts still have high voltages For this reason, a power supply adapter should only be opened by an authorised technician
Opening the device voids your warranty.
- Never handle the power supply with wet or damp hands when in operation
- Never insert objects into the power supply's apertures/fans
- Note that the power supply is designed for use indoors in conditions without high levels of moisture in the ambient air Using the power supply outdoors will lead to serious damage
- Never work on the power supply while it is connected to the mains In this case, always set the power switch to "0" and / or disconnect the power plug
- In the event of a short circuit in the device, unplug the mains cable and do not use the device
Make sure that your PC is not located directly next to a heating system or any other source of heat
Make sure that your computer case is sufficiently ventilated by means of additional fans; with today's complex and powerful systems a power supply is incapable of dissipating the heat produced in the PC case without additional support
If you want to clean your power supply, disconnect it completely from the mains and never use a damp cloth or cleaning agent Clean the power supply from the outside using a dry cloth
Before using the power supply, allow it to warm up to room temperature for one hour to prevent condensation accumulating in the power supply
Documents / Resources
References
Download manual
Here you can download full pdf version of manual, it may contain additional safety instructions, warranty information, FCC rules, etc.
Advertisement


Need help?
Do you have a question about the PURE POWER 12 M and is the answer not in the manual?
Questions and answers