Honeywell HWM845 Series, HWM845BC - Humidifier Manual
- Instruction manual (48 pages) ,
- Instruction manual (18 pages) ,
- Instruction manual (19 pages)
Advertisement
- 1 GETTING TO KNOW YOUR WARM MIST HUMIDIFIER
- 2 SETTING UP YOUR HUMIDIFIER
- 3 FILLING/REFILLING
- 4 RESETTING YOUR HUMIDIFIER
- 5 USING YOUR HUMIDIFIER
- 6 USING THE ESSENTIAL OIL CUP
- 7 CLEANING YOUR HUMIDIFIER
- 8 END-OF-SEASON CARE AND STORAGE
- 9 TROUBLESHOOTING
- 10 SPECIFICATIONS
- 11 IMPORTANT SAFETY INSTRUCTIONS
- 12 CONSUMER RELATIONS
- 13 Documents / Resources
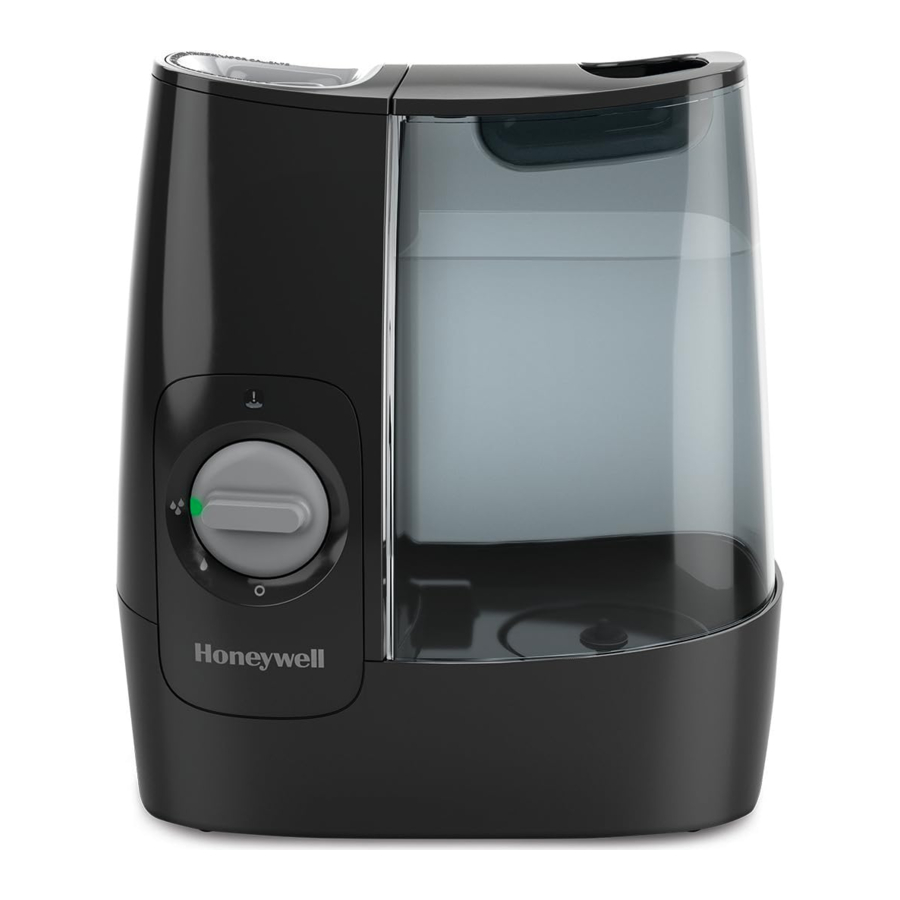
GETTING TO KNOW YOUR WARM MIST HUMIDIFIER
How it Works
The tank feeds water into the boiling chamber where it is heated to a steam vapor. The steam vapor mixes with dry air in the mist chimney and warm moist air is released into the room. When the humidifier runs out of water, the reset light will illuminate and the unit will shut off.
COMPONENTS

- Essential Oil Cup
- Mist Chimney
- Reset Light
- Power Knob
- Heating Element (not visible)
- Heating Element Cover
- Heating Chamber
- Water Tray
- Water Tray Tab
- Reservoir
- Base
- Locking Latch
- Water Tank Handle
- Water Tank
- Tank Cap
- Plunger
SETTING UP YOUR HUMIDIFIER
- Remove packaging materials. Keep this Instruction Manual for reference.
- Remove twist tie from power cord and extend power cord full length.
- Ensure Proper Assembly. Make sure Mist Chimney, Essential Oil Cup, and Water Tray are securely in place and that Heating Element Cover is secured. See Reassembling instructions after Cleaning your Humidifier section for reference.
- Place humidifier on a firm, level, water resistant surface a minimum of 12 inches (30 cm) from walls. Steam should be directed away from any walls, bedding, and furniture.
![]()


KEEP OUT OF REACH OF CHILDREN. THIS PRODUCT PRODUCES HOT STEAM AND SHOULD BE PLACED IN AN AREA NOT ACCESSIBLE TO CHILDREN OR PETS, WITH THE POWER CORD OUT OF REACH.
FILLING/REFILLING
NOTE: Tank should be carried using two hands; one hand on the Tank Handle and the other supporting the bottom of the Tank.
Manufacturer will not accept responsibility for property damage caused by water spillage.
- Remove Tank by grasping Handle and pulling up. Remove Tank Cap by turning counter clockwise (to the left).
![]()
- Fill Water Tank with cool water. DO NOT fill with warm or hot water.
DO NOT ADD ESSENTIAL OILS, MEDICATIONS, OR INHALANT LIQUIDS to the Water Tank. Doing so could cause damage to the humidifier and void the warranty.
![]()
- Replace Tank Cap by turning clockwise (to right) to screw back in place. DO NOT over-tighten. Place Water Tank back on humidifier Base.
![]()


RESETTING YOUR HUMIDIFIER
When your humidifier is out of water, the Reset Light (![]() ) will illuminate.
) will illuminate.

To reset:
- Turn power OFF (
![]() )
) - Refill and replace Tank
- Wait 5 minutes and turn power ON (
![]() )
)
NOTE: If Reset Light (![]() ) is still on, clean the Heating Element
) is still on, clean the Heating Element
(see Cleaning Instructions section)
USING YOUR HUMIDIFIER
- Power: With the Power Knob in the OFF position (
![]() ), plug the filled humidifier into a polarized 120V outlet.
), plug the filled humidifier into a polarized 120V outlet.
![]()
To avoid electric shock, DO NOT plug in humidifier with wet hands. - Output: Turn Power Knob to high (
![]() ) or low (
) or low (![]() ). A green light will indicate the humidifier is working, but it will take 3-4 minutes for visible steam to appear.
). A green light will indicate the humidifier is working, but it will take 3-4 minutes for visible steam to appear.
![]()
- Humidity Level: Once a comfortable humidity level has been reached, turn to the low setting. A comfortable humidity level is between 40-60%.
Consider using a humidity monitor such as Honeywell HHM10 /H10C to display current room humidity and temperature. If condensation forms on walls, windows, or around unit, turn humidifier off; the humidity level is too high.
![]()


TURN HUMIDIFIER OFF, UNPLUG AND WAIT 20-30 MINUTES FOR UNIT TO COOL BEFORE MOVING OR CLEANING. DO NOT OPERATE YOUR HUMIDIFIER WITHOUT THE TANK IN PLACE OR IF THE UNIT IS EMPTY. DO NOT OPERATE YOUR HUMIDIFIER WITHOUT THE MIST CHIMNEY, WATER TRAY, HEATING ELEMENT COVER, AND ESSENTIAL OIL CUP PROPERLY ASSEMBLED.
NOTE: Consider using a Protec® Cleaning Ball to keep your humidifier cleaner longer.
It will continuously clean and protect against bacteria and mold. It will also help prevent the buildup of slime in the water and on humidifier surfaces. The Protec Ball will keep your humidifier cleaner longer between cleanings. However, your humidifier still needs to be cleaned regularly.

USING THE ESSENTIAL OIL CUP
This humidifier features an Essential Oil Cup that can be used with your favorite essential oil or liquid inhalant for added enjoyment. This is not a diffuser - the oil does not come in contact with water and is passively evaporated into the air. Essential oil and inhalant sold separately.
- Add a few drops of essential oil or liquid inhalant in the Cup.
![]()
![]()
DO NOT pour any liquids into the Mist Chimney. DO NOT ADD LIQUID INHALANTS, ESSENTIAL OILS OR ANY ADDITIVES TO THE WATER. DOING SO CAN HAVE ADVERSE EFFECTS ON THE HUMIDIFIER AND VOID THE WARRANTY. - To clean the Essential Oil Cup, ensure the humidifier is off, unplugged, and cooled for at least 20 minutes and gently wipe residue from the Essential Oil Cup.
![]()


CLEANING YOUR HUMIDIFIER
To keep your humidifier running efficiently, clean it regularly. Weekly cleaning is recommended. All maintenance should be done in the kitchen or bathroom on a water-resistant surface near a faucet.
To properly clean your humidifier, we recommend the separate processes of Scale Removal and Disinfecting. These two processes must be performed separately.
Before Cleaning
- Turn off and unplug humidifier. NEVER clean the humidifier when it is running. If the humidifier has recently been in use, wait at least 20-30 minutes for unit to cool before beginning cleaning process.
![]()
- Remove any accessories, and empty oils from the Essential Oil Cup. Then remove and empty Water Tank and set aside.
![]()
- Pull red Locking Latch toward front of unit (a) and lift Mist Chimney up (b) to remove. Remove Water Tray from Base by pulling up from the Tab (c) and the opening in front of the Latch, then empty Water Tray.
![]()
- Replace Water Tray and Mist Chimney. These must be in place for cleaning.
![]()
See Reassembling instructions after Cleaning your Humidifier section for reference.


Scale Removal
Keeping the Heating Element free of scale will help the humidifier to run efficiently.

- Remove Water Tank and slowly pour 2 cups (0.5 liters) of undiluted, distilled white vinegar into the Reservoir on the Water Tray. DO NOT pour vinegar over the red Locking Latch. Only pour into the deep Reservoir.
NOTE: Pour slowly to give enough time for vinegar to flow from the Reservoir into the Heating Chamber. The vinegar will slowly begin to fill the Heating Chamber, located under the Mist Chimney. Let soak for 20 minutes to loosen scale on the Heating Element.
For Tank scale removal:
While Heating Element is soaking, pour additional vinegar into the Water Tank, replace Tank Cap and swish to coat inside of Water Tank. Use a cloth dampened with vinegar to wipe away any scale on the inside of the Water Tank and Tank Cap. Empty vinegar and rinse Tank until the smell of vinegar is gone. - Remove the Mist Chimney by gently sliding red Locking Latch towards the front of the unit (a) and lifting Mist Chimney upwards (b).
- Remove Heating Element Cover by lifting from the large round opening and pulling away from the Mist Chimney.
![]()
- Wet the bristles of a soft brush with vinegar from the Water Tray and gently scrub the surface of the Heating Element, Heating Element Cover, Reservoir, and Heating Chamber to remove mineral deposits.
![]()
DO NOT USE HARD BRUSHES, STEEL WOOL, OR OTHER HARD ABRASIVES ON THE HEATING ELEMENT. DOING SO WILL DAMAGE THE HEATING ELEMENT. DO NOT POUR VINEGAR DIRECTLY ONTO THE HEATING ELEMENT.
If scale is still visible on the Heating Element, moisten a paper towel with vinegar, and wrap it around the Heating Element. Let it sit for 30 minutes or until scale loosens.
![]()
Remove paper towel from the Heating Element before proceeding to the next step. - Remove Water Tray by gently lifting from the Tab and the opening in front of the Latch, and empty vinegar in sink. Rinse Water Tray and Heating Element Cover with water until the smell of vinegar is gone.
![]()
- With a soft damp cloth, wipe Heating Element to remove any excess scale. Press Heating Element Cover back on the bottom of the Mist Chimney. It will only fit one way.
![]()


DO NOT RINSE HEATING ELEMENT OR MIST CHIMNEY IN SINK OR UNDER RUNNING WATER AS WATER CAN GET INTO INTERNAL PARTS. DOING SO WILL DAMAGE THE HUMIDIFIER AND VOID THE WARRANTY. ONLY USE A WET CLOTH OR PAPER TOWEL TO CLEAN THIS PART.
Disinfecting
Before starting the disinfecting process, follow Steps 1-4 in Before Cleaning section.
NOTE: Bleach may stain clothes. It is recommended that you wear rubber gloves during this process to protect your hands.

- Mix ½ gallon (1.9 L) of water with ½ teaspoon of bleach. Pour the bleach solution into the Water Tank. Replace Tank Cap and gently swish to coat the entire inside.
NOTE: Using more than ½ teaspoon of bleach to ½ gallon (1.9 L) of water may result in damage to the humidifier. - Place Water Tank on Base. Bleach solution will drain into the Water Tray. Let soak for 20 minutes.
- Remove Tank and slowly empty bleach solution into sink. Rinse with water until the smell of bleach is gone
- Remove the Mist Chimney by gently sliding red Locking Latch towards the front of the unit (a) and pulling Chimney upwards (b).
- Remove Heating Element Cover by lifting from the large round opening and pulling away from the Chimney, and rinse with Water. With a soft damp paper towel, wipe Heating Element until the smell of bleach is gone.
![]()
- Carefully remove Water Tray by lifting from the Tab and the opening in front of the Latch, and empty bleach solution into sink. Rinse Water Tray and Heating Element Cover with water until the smell of bleach is gone Wipe Water Tray to dry.
![]()


Dishwasher Safe
The following parts are TOP RACK dishwasher safe for residential dishwashers operating at temperatures below 70°C/158°F: Essential Oil Cup, Water Tray and Heating Element Cover.

Run the dishwasher on the light duty or normal cycle. DO NOT wash with soiled articles/dishes. DO NOT use detergents.
NOTE: DO NOT place parts on lower rack of dishwasher. Doing so could cause damage to the humidifier parts and dishwasher. The Water Tank, Mist Chimney and Base are NOT dishwasher safe. Placing these parts in the dishwasher will damage your humidifier and render it unable to operate properly.
Reassembling

- Place Water Tray back in Base.
- Ensure Heating Element Cover is secured back on the bottom of the Mist Chimney by snapping in place.
- Slide red Locking Latch toward the front of the unit (a) and secure Mist Chimney to Base (b). Ensure Mist Chimney is is secured to the Base and the Locking Latch is in the closed position.
- Press Essential Oil Cup back in place.
- Put Tank Cap back on Water Tank and place back on unit.
END-OF-SEASON CARE AND STORAGE
Follow the cleaning instructions when the humidifier will not be used for at least one week, or at the end of the season. At the end of the season, remove any accessories from the humidifier.
Dry the humidifier completely before storing. DO NOT store with water inside the Water Tray or Water Tank. Pack unit in original carton and store in a cool, dry location.
TROUBLESHOOTING
If your Humidifier is not working properly, refer to the following:
| PROBLEM | POSSIBLE CAUSE | SOLUTION |
| Power Knob is set to "On" and Power Knob light is off |
|
|
| Power is "On" and no mist appears |
|
|
| Little or no mist is produced |
|
|
| Reset Light illuminated |
|
|
| Water overflows from Reservoir |
|
|
| Condensation forms around humidifier or windows |
|
|
NOTE: Failure to keep this unit clean from mineral deposits normally contained in any water supply will affect the efficiency of operation of this unit. Customer failure to follow these instructions may void the warranty.
SPECIFICATIONS
Electrical rating: 120V, 60 Hz.
Capacity: 1 gallons (3.7 L)
If you experience a problem, please contact Consumer Relations. Do not return this humidifier to the original place of purchase.
Do not attempt to open the motor housing or tamper with the Power Knob yourself. Doing so may void your warranty and cause personal injury or damage to the product.
IMPORTANT SAFETY INSTRUCTIONS
READ AND SAVE THESE SAFETY INSTRUCTIONS BEFORE USING THIS HUMIDIFIER
When using electrical appliances, basic precautions should always be followed to reduce the risk of fire, electric shock, and injury to persons, including the following:
- The humidifier should ALWAYS be placed on a firm, flat, waterproof surface at least four feet (1.2m) away from bedside, 12 inches (30cm) from the wall and out of reach of children and pets.
- Be sure the humidifier is in a stable position and the power cord is away from heated surfaces and out of the way to prevent the humidifier from being overturned.
- The humidifier should not be left unattended, especially in a closed room since air could become saturated and leave condensation on walls and furniture. If room becomes saturated, open the door and turn the humidifier off or down.
- Before using the humidifier, extend the cord and inspect for any signs of damage. DO NOT use the unit if the cord has been damaged. DO NOT operate with power cord coiled or with twist tie in place.
- The humidifier has a polarized plug (one blade is wider than the other) as a safety feature. This plug will fit into a polarized outlet only one way. If the plug does not fit fully into the outlet, reverse the plug. If it still does not fit, contact a qualified electrician. DO NOT attempt to defeat this safety feature.
![]()
To avoid fire or electric shock hazard, plug the humidifier directly into a 120V AC electrical outlet. To avoid risk of fire, electric shock, or personal injury, DO NOT use an extension cord or power strip.- The humidifier should ALWAYS be unplugged and emptied when not in operation or while being cleaned. Shut off and unplug humidifier before moving. DO NOT move or tilt humidifier while it is in operation. Plug and unplug unit with dry hands. NEVER pull by cord.
- DO NOT operate the humidifier without water. Turn off and unplug unit when tank is empty and the reset light is on.
- Humidifier requires regular cleaning. Refer to and follow cleaning instructions.
- DO NOT operate outdoors; this humidifier is intended for indoor residential use only.
- DO NOT cover or insert objects into any openings on the unit. DO NOT block intake or output vents.
- DO NOT attempt to repair or adjust any electrical or mechanical functions on this humidifier. Doing so will void your warranty.
- DO NOT add any essential oils or medications (e.g. Kaz Inhalant or Vicks VapoSteam®) into Chimney, Reservoir, or Water Tank.
- DO NOT touch the steam vapor. Steam can cause burns. DO NOT operate without the Essential Oil Cup in place on top of the Mist Chimney.
- For Residential Use Only
CONSUMER RELATIONS
We are here to help.
Call us toll-free at: 1-800-477-0457
E-mail: consumerrelations@kaz.com
Or visit our website at: www.HoneywellPluggedIn.com
Please be sure to specify Model number HWM845.
NOTE: IF YOU EXPERIENCE A PROBLEM, PLEASE CONTACT CONSUMER RELATIONS FIRST OR SEE YOUR WARRANTY. DO NOT RETURN TO THE ORIGINAL PLACE OF PURCHASE. DO NOT ATTEMPT TO OPEN THE MOTOR HOUSING YOURSELF, DOING SO MAY VOID YOUR WARRANTY AND CAUSE DAMAGE TO THE HUMIDIFIER OR PERSONAL INJURY.
Documents / ResourcesDownload manual
Here you can download full pdf version of manual, it may contain additional safety instructions, warranty information, FCC rules, etc.
Download Honeywell HWM845 Series, HWM845BC - Humidifier Manual
Advertisement


Need help?
Do you have a question about the HWM845 Series and is the answer not in the manual?
Questions and answers