Dual DC207BT - AM/FM/CD Receiver Manual
- Installation & owner's manual (27 pages)
Advertisement
- 1 Preparation
- 2 Wiring Diagram
- 3 Control Locations
- 4 Remote Control
- 5 General Operation
- 6 General Operation - Setup Menu
- 7 AM/FM Tuner Operation
- 8 CD Player Operation
- 9 CD Player Operation - MP3 Files
- 10 USB Operation
- 11 Bluetooth Operation
- 12 Troubleshooting
- 13 Specifications
- 14 Documents / Resources
Preparation
Please read entire manual before installation.
Before You Start
- Disconnect negative battery terminal. Consult a qualified technician for instructions.
- Avoid installing the unit where it would be subject to high temperatures, such as from direct sunlight, or where it would be subject to dust, dirt or excessive vibration.
Getting Started

- Remove trim ring from unit.
- Remove 2 transit screws located on top of the unit.
- Insert the supplied keys into the slots as shown, and slide the unit out of the mounting sleeve.
- Install mounting sleeve into opening, bending tabs to secure.
- Connect wiring harness and antenna. Consult a qualified technician if you are unsure.
- Certain vehicles may require an installation kit and/or wiring harness adapter (sold separately).
- Test for correct operation and slide into mounting sleeve to secure.
- Snap trim ring into place.
Wiring Diagram

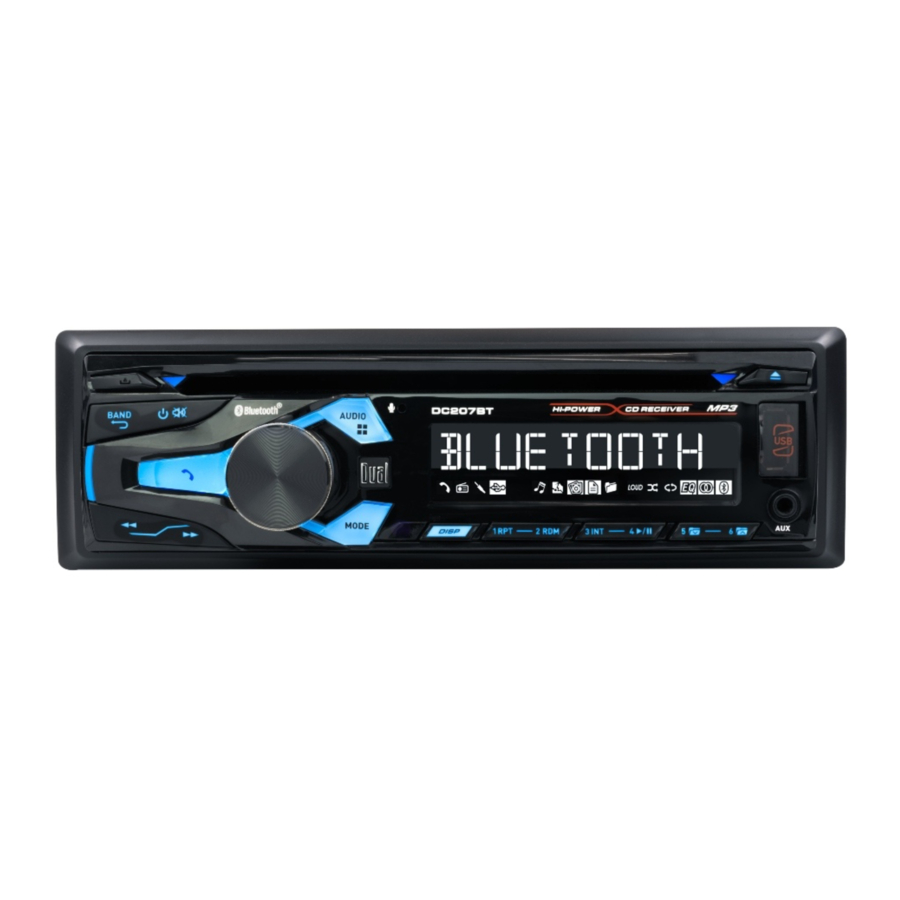
Control Locations

- Faceplate Release
- Band / Go Back
- Power / Mute
- Bluetooth Talk
- Volume Knob
- Audio / Menu
- Eject
- USB Port
- Auxiliary Input
- Preset 6 / Folder Up
- Preset 5 / Folder Down
- Preset 4 / Play / Pause
- Preset 3 / Intro
- Preset 2 / Random
- Preset 1 / Repeat
- Display
- Mode
- Reset (behind faceplate)
- Tune / Track Up
- Tune / Track Down
Remote Control

- Mode
- Volume Up
- Power
- Select
- Tune / Track Up
- Volume Down
- Band / Go Back
- Preset 3 / Intro
- Preset 2 / Random
- Preset 6 / Folder Up
- Mute
- Audio / Menu
- Preset 5 / Folder Down
- Preset 4 / Play / Pause
- Preset 1 / Repeat
- Bluetooth Talk
- Tune / Track Down
General Operation
| Power On/Off | Press  or any other button (except EJECT) to turn the unit on. Press to turn the unit off. or any other button (except EJECT) to turn the unit on. Press to turn the unit off. |
| Mode | Press MODE to select between AM/FM, CD player, Bluetooth, auxiliary and USB. Modes of operation are shown in the display. NOTE: CD and USB modes will not appear unless a CD is inserted or USB device is connected. |
| Auxiliary Input | The DC207BT offers a 3.5 mm auxiliary input port on the front panel of the unit for connecting an audio device, MP3 player, etc. Press MODE to select auxiliary input mode. |
| Volume | Adjust volume using volume knob (00-46). |
| Display | Press DISP to show the clock. During playback of MP3/files, ID3 tag information, elapsed time, track number and file/ folder names will automatically rotate on the display. |
| Reset | Press RESET upon initial installation or if abnormal operation occurs. |
| Set the Clock | With the unit on, press and hold DISP until the clock begins to flash, then release. Turn the volume knob to the right to adjust the hours or to the left to adjust the minutes. |
| 12/24-hour Clock | The clock will display 12-hour AM/PM time in USA frequency spacing mode (PM 10: 00). In European frequency spacing mode, the clock will display 24-hour time (22:00). |
| Setup Menu | Press and hold AUDIO for more than 3 seconds to access the setup menu. Press AUDIO momentarily to select between the menu functions and rotate the volume knob left/right to adjust or activate the desired function. |
| Audio | Press AUDIO momentarily to select between Bass, Treble, Balance and Fader.  |
| Bass | Press AUDIO until BASS appears then rotate volume knob left/right to adjust ( -6 minimum / +6 maximum). |
| Treble | Press AUDIO until TREBLE appears then rotate volume knob left/right to adjust ( -6 minimum / +6 maximum). |
| Balance | Press AUDIO until BAL appears then rotate volume knob left/right to adjust (BAL 12L - BAL 12R). BAL EVEN represents equal balance |
| Fader | Press AUDIO until FAD appears then rotate volume knob left/right to adjust (FAD 12R - FAD 12F). FAD EVEN represents equal fader |
General Operation - Setup Menu
| Menu Function | Options | Action |
| Auto Station Store | AUTO STORE | Press the volume knob to seek and save 6 strong stations in the current band. (Tuner mode only) |
| Local/Distance Tuning | LOCAL OFF | Activates distance tuning (Tuner mode only). |
| LOCAL ON | Activates local tuning for strong station reception only (Tuner mode only). | |
| Tuner Frequency Spacing | FREQ USA | Programs the unit to USA tuner spacing. (200kHz for FM and 10kHz for AM). (Tuner mode only) |
| FREQ EURO | Programs the unit to European tuner spacing. (50kHz for FM and 9kHz for AM). (Tuner mode only) | |
| Auxiliary Input | AUX ON | Enables the front panel 3.5mm auxiliary input. |
| AUX OFF | Disables the front panel 3.5mm auxiliary input. | |
| Beep Confirmation | BEEP OFF | Disables the confirmation beep. |
| BEEP ON | Enables the confirmation beep. | |
| Programmable Turn On Volume | PRO-VOL # | Programs unit to always turn on at a specific volume (default is OFF). Any volume level 1-30 can be selected. |
| Power On Message | MSG OFF | Disables power on message. (Example: GOOD MORNING) |
| MSG ON | Enables power on message to be displayed. | |
| Scrolling Option | SCROLL 15 SP | Programs unit to scroll information every 15 seconds (default). |
| SCROLL ONCE | Programs unit to scroll once then show the first 10 characters on display | |
| SCROLL ON | Programs unit to scroll continuously. | |
| SCROLL OFF | Programs the unit to show the first 10 characters on display. | |
| Demonstration Mode | DEMO OFF | Disables the demonstration mode. |
| DEMO ON | Enables the demonstration mode. | |
| Bluetooth | BT ON | Enables Bluetooth functionality. |
| BT OFF | Disables Bluetooth functionality. | |
| Auto Answer | ANSWER AUTO | Programs unit to automatically answer every incoming phone call after 2-3 rings. |
| ANSWER MANUAL | Programs unit to require the  button to be pressed to answer incoming phone calls (default). button to be pressed to answer incoming phone calls (default). |
AM/FM Tuner Operation
| Seek Tuning | Press TUNE  or TUNE or TUNE  momentarily to seek to the next strong station. momentarily to seek to the next strong station. |
| Manual Tuning Band | Press and hold TUNE or TUNE until "MANUAL" nn ll appears, then press TUNE or TUNE momentarily to change radio frequency up or down one step at a time. Press and hold to advance quickly. Note: Seek and manual tuning functions are reversed if Seek Priority is set to SEEK 2 in the setup menu (refer to Seek Priority). Press BAND to select between FM1, FM2, FM3, AM1 and AM2 bands. |
| Storing and Recalling Station Presets | Up to 18 FM stations and 12 AM stations can be stored. To store a station, select the desired band and station. Press and hold the desired preset button (1-6) for more than 2 seconds. When stored, the preset number will appear in the display. The station can be recalled anytime by pressing the corresponding preset button. |
| Automatically Store Stations | Press and hold AUDIO/MENU for more than 3 seconds to find auto store in the display. Then press volume knob to automatically store strong 6 stations in the current band. |
CD Player Operation
| Insert CD | With the label facing up, insert a standard size CD into the CD slot. The CD will automatically begin playback. |
| Eject CD | Press EJECT to eject the CD. The unit will change to previous mode of operation. If the disc is not removed within 10 seconds, the unit will reload the disc. The unit does not have to be turned on to eject CD. |
| Track Select | Press TRACK to skip to the beginning of the next nn track. Press TRACK to return to the beginning of the current track. Pressing TRACK again skips to the beginning of the previous track. |
| Fast Forward/Reverse | Press and hold TRACK or TRACK on the remote control to fast forward or reverse a track. |
| Pause | Press  to temporarily stop CD playback. to temporarily stop CD playback.Press again to resume playback. |
| Intro | Press INT to enter the Intro menu, then turn the volume knob to select one of the following options:
|
| Repeat | Press RPT to enter the Repeat menu, then turn the volume knob to select one of the following options:
|
| Random | Press RDM to enter the Random menu, then turn the volume knob to select one of the following options:
|
| CD-R/CD-RW Compatibility | Some CD-Rs and CD-RWs may be incompatible with this unit, depending on media type and recording method. In addition, the following CDs may be incompatible with this unit: CDs exposed to extreme temperatures or direct sunlight for extended periods of time, CDs recorded in which a recording session failed or a re-recording was attempted and, or encrypted or copy-protected CDs which do not conform to the audio CD-DA red book recording standard. |
CD Player Operation - MP3 Files
| Playing an MP3 CD | When an MP3 encoded disc is first inserted, "DISC READ" will appear in the display. Depending on the number of files and folders, this may take several seconds. |
| Displaying Information | Press DISP to select between song title, artist, file name, folder name, track number, and clock/elapsed time. "NO ARTIST" or "NO TITLE" will be displayed if the MP3 file contains no ID3 tag information. "ROOT" will be displayed if the directory name of a root folder is not labeled. |
| Title Icon | This icon will illuminate when the song title is displayed. |
| Artist Icon | This icon will illuminate when the artist name is displayed. |
| Folder Icon | This icon will illuminate when the folder name is displayed. |
| File Icon | This icon will illuminate when the file name is displayed. |
| Character Support | Maximum character display information
When referring to MP3 playback, the following terms are synonymous:
|
| Media Compatibility | The following types of discs/files are compatible:
|
| Playback Order | MP3 playback sequence is based on recorded order of files and begins in the root folder of the disc. Any empty folders or folders that do not include MP3 files are skipped. This unit may not play files in the order they were recorded in. Refer to your recording software's user's manual for more information. |
| Compatible Recording Formats |
|
| Additional MP3Information | An internal buffer provides ESP (Electronic Skip Protection) to virtually eliminate skipping. When playing a disc recorded with regular audio files (CD-DA or. WAV) and MP3 files, the unit will play the MP3 files only. Only MP3 files with filename extension (.mp3) can be played. Do not attempt to play discs which contain non-MP3 files with the MP3 extension. |
| Sampling Frequency Rates MP3 | 8kHz ~ 48kHz |
| Transfer Bit rates MP3 | 32kbps ~ 320kbps constant Variable bit rates Note: Some files may not play or be displayed correctly, depending on sampling rates and bit rates. |
| MP3 Tag Display | ID3 tags Version 1.0 to 2.4. This model will not display ID3 Version 2.4 or greater tags. |
| Recommended Settings | For best results, use the following settings when burning an MP3 disc: 128kbps or higher constant bit rate 44.1kHz or higher sampling frequency |
USB Operation
| Connecting a USB Device (sold separately) | To play MP3 files from most USB mass storage devices, line up the USB connector and insert the USB device into the unit's USB port. |
| Playing Music | When a USB device is first connected, "USB READ" will appear in the display and playback will begin momentarily. Depending on the number of files and folders, it may take several seconds for the device to begin playing. If no valid MP3 files are detected, "NO FILE" will be displayed and the last mode will be resumed. |
| Track Select | Press TRACK  to skip to the beginning of the next nn track. Press TRACK to skip to the beginning of the next nn track. Press TRACK  to return to the beginning of the nn current track. Pressing TRACK again skips to the beginning of the previous track. to return to the beginning of the nn current track. Pressing TRACK again skips to the beginning of the previous track. |
| Fast Forward and Reverse | Press and hold TRACK or TRACK on the remote control to fast forward or reverse a track. |
| Pause | Press  to temporarily stop USB playback. to temporarily stop USB playback.Press again to resume playback. |
| File Search |
|
| Displaying Information | When a file is accessed, the clock and elapsed time will be displayed. Press DISP momentarily to select beween song title, artist, file name, folder name, track number and clock/ elapsed time. "NO TITLE" will be displayed if no song title information is available. "NO ARTIST" will be displayed if no artist information is available. |
| Song Title Icon | This icon will illuminate when the song title is displayed. |
| Artist Icon | This icon will illuminate when the artist name is displayed. |
| Folder Icon | This icon will illuminate when the folder name is displayed. |
| File Icon | This icon will illuminate when the file name is displayed. |
| Folder Access | Press  to select the previous folder. to select the previous folder.Press  to select the next folder. to select the next folder.Note: Folder access is only available on devices with more than one folder. |
| Repeat | Press RPT to enter the Repeat menu, then turn the volume knob to select one of the following options:
|
| Random | Press RDM to enter the Random menu, then turn the volume knob to select one of the following options:
|
| Intro | Press INT to enter the Intro menu, then turn the volume knob to select one of the following options:
|
| Character Support | Maximum character display information
|
| Media Compatibility | The following types of files are compatible:
|
| Playback Order | MP3 playback sequence is based on order the files are copied to the USB device and begins in the root folder. Any empty folders or folders that do not include MP3 files are skipped. Depending on your software, the playback order may vary. |
| Playback Capacity |
Note: Devices that exceed the maximum number of files or folders may not function properly. |
| USB Device Compatibility | Due to the differences of USB devices, some devices may not be compatible. USB devices must be 'mass storage class' and formatted to the FAT or FAT32 file system in order to ensure compatibility. |
| Additional MP3Information | Only MP3 files with filename extension (.mp3) can be played. Do not attempt to play non-MP3 files with the MP3 extension. |
| Sampling Frequency Rates MP3 | 8kHz ~ 48kHz |
| Transfer Bit rates MP3 | 32kbps ~ 320kbps constant Variable bit rates Note: Some files may not play or be displayed correctly, depending on sampling rates and bit rates. |
| MP3 Tag Display | ID3 tags Version 1.0 to 2.4 Note: If an invalid ID3 tag version is detected, "NO SUPPORT" will scroll on the display. |
Bluetooth ® Operation
| Pairing a New Device | Before you can use a Bluetooth device, it must be paired and connected. Make sure that Bluetooth is activated on your device before you begin the pairing process. The unit broadcasts the pairing signal constantly when no devices are currently connected. Complete the pairing sequence from your Bluetooth device. Refer to the owner's manual for your device for more details. The device name is "DUAL BT" The Bluetooth passcode "1234" Note: The unit can be in any mode of operation when pairing is performed. |
| Pairing Additional Devices | If a device is currently connected, press and hold  to disconnect the current device before a new device can be paired. Then begin the pairing sequence from the new Bluetooth device. to disconnect the current device before a new device can be paired. Then begin the pairing sequence from the new Bluetooth device. |
| Connecting a Paired Device | Most Bluetooth devices support the auto-connect feature, and will connect automatically if the device is in range when the unit is powered-on. If your device was previously paired but does not connect, use these instructions below.
|
| Disconnecting a Device | Press and hold for 3 seconds to disconnect a connected device. The device will remain paired and appear in the SEARCH menu, but not be connected. Note: Placing a phone call from your cell phone will also initiate Bluetooth function. |
| Recent Calls List | Press SELECT from Bluetooth mode to view recent calls dialed, received or missed while connected to the head unit. Turn the volume knob to cycle through the recent phone numbers. Press SELECT or  to dial to dial |
| Redialing the last number | To redial the last phone number, press from Bluetooth mode. Press or SELECT again to redial the phone number. |
| Receiving a phone call | Incoming phone calls will automatically appear on the display and a ring tone will be heard. Note: The volume of the ring tone depends on the volume level of the unit. The incoming ring tone may not be heard if the volume is set to a low level or mute is activated.
|
| Ending a Phone Call | During an active phone call, press to end a phone call. If the phone call was received when listening to music in another mode, the unit will resume the previous mode. |
| Streaming Audio | The unit supports A2DP (advanced audio distribution profile) wireless streaming audio from your Bluetooth mobile device directly to your head unit. The following functions can be used to control the music:
|
 to skip to the next available audio track.
 to skip to the previous audio track.
 to toggle between play and pause during
 Streaming Audio Operation
The unit supports A2DP (advanced audio distribution profile) wireless streaming audio from your Bluetooth mobile device directly to your head unit. You can also control your music from the front panel of the head unit using AVRCP (audio video remote control profile).
Notes:
- To stream music to your head unit, your mobile device must support the A2DP and AVRCP Bluetooth profiles. Check the owner's manual of your mobile device for details.
- Streaming audio must be enabled from your mobile device. This option will vary depending on the device. Some devices allow streaming audio to be disabled.
After pairing, connecting and enabling streaming audio from a compatible mobile device, begin playing music using the music player on your mobile device. Once the music is playing, the following functions can be used to control the music:
- The
![]() button will skip to the next available audio track.
button will skip to the next available audio track. - The
![]() button will skip to the previous audio track.
button will skip to the previous audio track. - The
![]() button will toggle between play and pause during playback.
button will toggle between play and pause during playback.
 button will skip to the next available audio track.
 button will skip to the previous audio track.
 button will toggle between play and pause during playback.
Note: Some Bluetooth devices may not fully support these commands.
Troubleshooting
| Problem | Cause | Action |
Unit will not turn on (no power) | Yellow wire not connected or incorrect voltage Red wire not connected or incorrect voltage | Check connections for proper voltage (11~16VDC) |
| Black wire not connected | Check connection to ground | |
| Fuse blown | Replace fuse | |
Unit has power (but no sound) | Speaker wires not connected | Check connections at speakers |
| One or more speaker wires touching each other or touching chassis ground | Insulate all bare speaker wires from each other and chassis ground | |
Unit blows fuses | Yellow or red wire touching chassis ground | Check for pinched wire |
| Speaker wires touching chassis ground | Check for pinched wire | |
| Incorrect fuse rating | Use fuse with correct rating | |
Excessive skipping | Unit is not mounted correctly or backstrap is not secure | Check mounting sleeve and backstrap support |
| Physical defect in media (CD, CD-R or CD-RW) | Check media for scratches | |
ERR FILE appears on display | Disc read error | Press eject or RESET |
| Focus error or disc is in upside down | Press eject or RESET | |
NO FILE appears on display | No playable MP3files found on the device | Check the device for valid MP3 files |
Unit will not accept a disc | CD mechanism position out of alignment | Press EJECT to reset CD mechanism position |
| CD transit screws still in place | Remove 2 transit screws located on top of the unit | |
NO SUPPORT appears on display | An invalid ID3 tag version is present | Version 1.0 to 2.0 ID3 tags are supported. |
Specifications
| CD Player | Frequency response: 20Hz-20kHz Channel separation @ 1kHz: >60dB D/A converter: 1 Bit |
| FM Tuner | Tuning range: 87.5MHz-107.9MHz Usable sensitivity: 8.5dBf 50dB quieting sensitivity: 10dBf Stereo separation @ 1kHz: >30dB Frequency response: 30Hz-13kHz |
| AM Tuner | Tuning range: 530kHz-1710kHz Usable sensitivity: <42dBu Frequency response: 30Hz-2.2kHz |
| General | USB Charge: 1A Speaker output impedance: 4~8 ohms Line output voltage: 1.2 Volts RMS Dimensions: 7" x 7" x 2" (178 x 178 x 50 mm) |
Design and specifications subject to change without notice.
CEA-2006 Power Standard Specifications (reference: 14.4VDC +/- 0.2V, 20Hz~20kHz)
Power Output: 16 Watts RMS x 4 channels at 4 ohms and < 1% THD+N
Signal to Noise Ratio: 80dBA (reference: 1 watt into 4 ohms)
Toll Free: 1-866-382-5476
9AM-5PM EST, Monday-Friday
www.dualav.com
Documents / Resources
References
Download manual
Here you can download full pdf version of manual, it may contain additional safety instructions, warranty information, FCC rules, etc.
Advertisement


Need help?
Do you have a question about the DC207BT and is the answer not in the manual?
Questions and answers