
Related Manuals for OMT PUL-QS01-00

Summary of Contents for OMT PUL-QS01-00
- Page 1 V20240108 Crankcase Splitter & Installer Tool User Manual Read Carefully Before Use Keep for Future Reference...
-
Page 2: Safety Information
Safety Information • Instructions provided herein are only for general information. ALWAYS perform all repairs in full compliance with your vehicle’s service manual. Particularly, ALWAYS use the transmission fluid type and amount listed in the service manual. After any repair, test your engine and vehicle in your workshop and at low speed before returning to normal use. - Page 3 Safety Information • Use the correct fluids, pressures, adapters, etc. for your vehicle.. • Use jack and jack stands able to fully support the necessary weight. Never touch any heated surface with exposed skin. DO NOT overreach. Keep proper footing and balance at all times. •...
-
Page 4: Package List
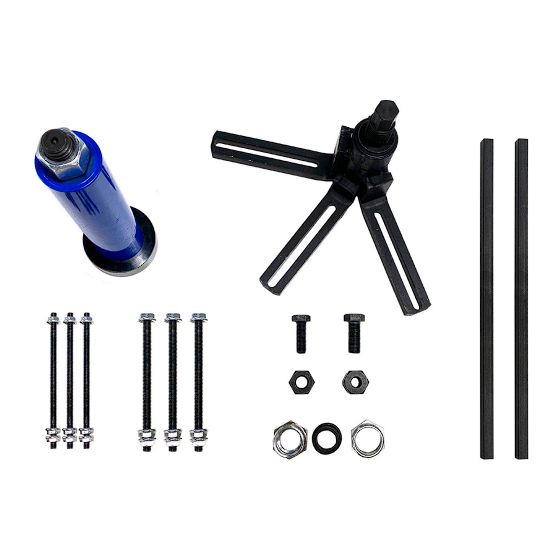
Package List Item Qty. Item Qty. Crankshaft Installer M10 Screw & Nut Crankcase Splitter M12 Screw & Nut M6 Mounting Bolts Steel Rods M8 Mounting Bolts Crankshaft Adapters... -
Page 5: Operation
Operation Disassembling the Crankcase 1. Align the splitter (B) with the exposed crank end, ensuring that the tool is pressing the dead center of the crankshaft. 2. Adjust the three ears of the tool so that their holes align with the bolt hole on the crank case. . 3. - Page 6 Operation Installing the Crankshaft 1. Grease your crankshaft and the main bearing. 2. Insert the crankshaft all the way into the hole on the crankcase. 3. Grab the correct adapter (H) and set it up on the crank. 4. Use a nut (E or F) to fix the chosen adapter to the crankshaft. 5.
-
Page 7: Maintenance
Maintenance • Clean the tool with a soft damp cloth using a mild detergent or solution after use. DO NOT rinse it or use abrasive cleaners or caustic chemicals. • For best results, lubricate the tool with high-quality anti-corrosive oil (not included) between uses. - Page 8 ASAP! For a .pdf copy of the latest version of these instructions, use the appropriate app on your smartphone to scan the QR code to the right. PUL-QS01-00 Rev. 8 Jan. 2024...
Need help?
Do you have a question about the PUL-QS01-00 and is the answer not in the manual?
Questions and answers