Advertisement
Quick Links
part
item code
(A)
PFS-TB-23
(B)
PFS-TB-18
(C)
PFS-TB-5
(D)
PFS-CLLR
(E)
PFS-FOOT
(F)
PFS-KNOB
(G)
PFS-TEE
(H)
PFS-WALL
2" #8 screws - BR, MB or PN- w/wall anchors [for part (h) above]
(I)
PFS-DRWR-366
(J)
PFS-STSLF-36
(K)
PFS-BRKT-8
2" #8 screws-black w/ wall anchors - to attach drawer box and shelf to wall [parts (I&J) above]
3/4" #8 screws- BR, MB or PN to attach bracket to shelf [for part (K) above]
1"x1"x8" aluminum wall bracket with screws and anchors for attaching sink to wall - supplied
when sink is ordered with stand
allen wrench (1), white gloves (1pr), 2"x2"x6" spacers for installation (2), extra set screws (6), installation template (1)
PFS-TD-SSD6-36
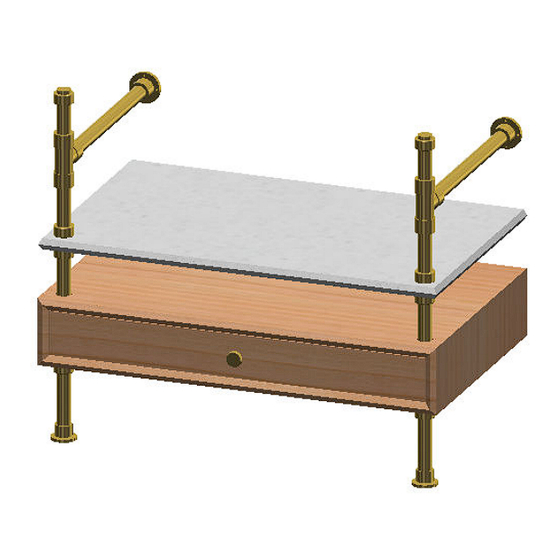
36"w ELEMENTAL CONSOLE VANITY
with STONE SHELF
DWG. NO.
PFS-TD- SSD6-36 exp
description
23" TUBE
18" TUBE
5" TUBE
COLLAR/SET
FOOT/SET
KNOB w/ SCREW
TEE
ESCUTCHEON
24"W DRAWER X6"D
24"W STONE SHELF
8" ANGLE BRACKET
DO NOT SCALE DRAWING
©2021 Stone Forest, Inc.
D
B
C
J
qty
X
D
X2
X2
I
X2
X4
X1
X1
X2
X2
X10
X1
X1
x1
x6
x3
x2
classic
facet
CIRCLE ONE
H
C
D
B
G
G
D D
H
K
D
F
D D
A A
E E
stand finish______________
stone finish______________
wood finish______________
Advertisement

Related Manuals for Stone Forest PFS-TD-SSD6-36


Summary of Contents for Stone Forest PFS-TD-SSD6-36
- Page 1 (1), white gloves (1pr), 2"x2"x6" spacers for installation (2), extra set screws (6), installation template (1) PFS-TD-SSD6-36 stand finish______________ 36"w ELEMENTAL CONSOLE VANITY with STONE SHELF stone finish______________ wood finish______________ DO NOT SCALE DRAWING classic facet DWG. NO. ©2021 Stone Forest, Inc. PFS-TD- SSD6-36 exp CIRCLE ONE...
- Page 2 Elemental Drawer Floor level (see back of page for instructions on mounting higher up) Using white gloves provided, carefully layout all brass or nickel fittings on a protected surface. Some assembly will be required using the included allen wrench. Start with the legs. The bottom collars and feet need to be installed to support the drawer 4-8”...
- Page 3 Elemental Drawer Upper position (see front of page for instructions on mounting floor level) Slide one collar onto each leg at the desired height for the bottom of the drawer. Remove the drawer from the cabinet box by depressing the tabs on the drawer glides (one pushes up, the other pushes down) With the help of someone else, carefully slide the empty drawer cabinet down onto the brass legs being careful not to twist it and scratch the legs.
- Page 4 Elemental Stone Shelf Floor level (see back of page for instructions on mounting higher up) Using white gloves provided, carefully layout all brass or nickel fittings on a protected surface. Some assembly will be required using the included allen wrench. With help, stand the shelf up on it’s back edge and carefully slide the legs through the shelf from the top about 4”.
- Page 5 Elemental Stone Shelf Upper position (see front of page for instructions on mounting floor level) Slide one collar onto each leg at the desired height for your shelf. Level the collars across the front. With blue tape placed vertically on the back wall centered in your installation location, place a mark on it using the level from the top of either collar just installed.
- Page 6 PFS-TD and PFT-ST Using white gloves provided, carefully layout all brass or nickel fittings on a protected surface. Some assembly will be required using the included allen wrench. NOTE: If you are installing the legs with other components, please see the individual instructions for each component Assemble the legs as shown.
Need help?
Do you have a question about the PFS-TD-SSD6-36 and is the answer not in the manual?
Questions and answers