Table of Contents
Advertisement
Quick Links
Advertisement
Table of Contents

Related Manuals for EVS XHub-VIA


Summary of Contents for EVS XHub-VIA
- Page 1 TECHNICAL REFERENCE MANUAL Version 2.00 - August 2021...
-
Page 3: Regional Contacts
This manual and the information contained herein are the sole property of EVS Broadcast Equipment SA and/or its affiliates (EVS) and are provided “as is” without any expressed or implied warranties, including, but not limited to, the implied warranties of merchantability and fitness for a particular purpose. - Page 4 EVS Broadcast Equipment SA Issue 2.00.A - August 2021 User Manuals on EVS Website The latest version of the user manual, if any, and other user manuals on EVS products can be found on the EVS download center, on the following webpage: https://www.evs.com/en/download-area.
-
Page 5: Table Of Contents
TECHNICAL REFERENCE MANUAL XHub-VIA 2.00 Table of Contents TABLE OF CONTENTS WHAT'S NEW? 1. INTRODUCTION 2. HARDWARE 2.1. Physical Dimensions 2.2. Environmental Ranges 2.3. Power 2.4. Front Panel 2.5. Rear Panel 3. IP AGGREGATOR 3.1. Cabling 3.1.1. Accepted Connectors 3.1.2. Connection to XT-VIA/XS-VIA 3.1.3. - Page 6 EVS Broadcast Equipment SA Issue 2.00.A - August 2021 6. CONFIGURATION 6.1. Viewing the Software License Agreement 6.2. Viewing the XHub-VIA Version 6.3. Entering Configuration Mode 6.4. Configuring the Management IP Address 6.5. Configuring the Hostname 6.6. Managing VLANs 6.6.1. Viewing the VLANs 6.6.2.
-
Page 7: What's New
The changes linked to new features in version 2.00 are listed below. XHub-VIA can be used as switch for XNet-VIA. • See section "XNet-VIA" on page 17. A command line interface allows to configure the switch. -
Page 9: Introduction
XNet-VIA switch XHub-VIA IP Aggregator The XHub-VIA IP Aggregator enables to have a single uplink to the Live IP fabric. It makes it possible for the XT-VIA/XS-VIA server to support single link UHD-4K streaming in ST2110 and also very dense 1080p SLSM configurations that could surpass the native 10Gbps bandwidth of the ports on the server. -
Page 10: Hardware
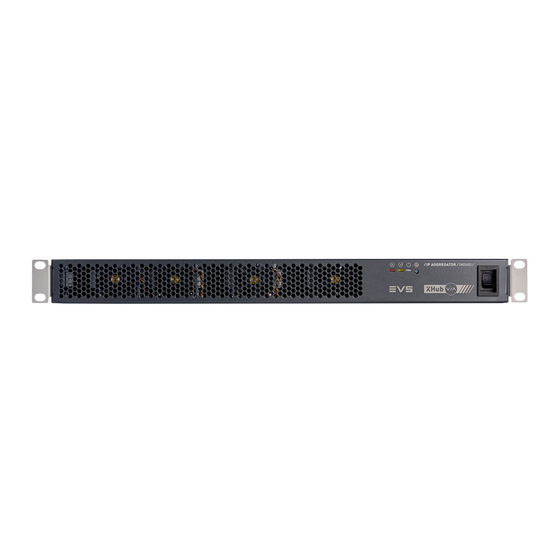
EVS Broadcast Equipment SA Issue 2.00.A - August 2021 Hardware 2.1. Physical Dimensions Dimensions Size 481.20 mm (W), 43.60 mm (H), 324 mm (D) 18.9" (W), 1.8" (H), 12.75" (D) Front View Top View 2. Hardware... -
Page 11: Environmental Ranges
TECHNICAL REFERENCE MANUAL XHub-VIA 2.00 Side View Weight 6 kg / 2.20 lbs 2.2. Environmental Ranges Temperature • Operating: 0° to 45°C / 32°F to 113°F Humidity • Operating: 85% RH (non-condensing) Altitude • Operating: sea level to 5000m Noise level 70dB 2.3. -
Page 12: Front Panel
EVS Broadcast Equipment SA Issue 2.00.A - August 2021 2.4. Front Panel Overview Element Error LED (red) Software Status LED (yellow) System On/Off LED (blue) System Recovery/Reset button Power switch Error LED The Error LED behaves as follows: Led Behavior Meaning No hardware or software error occurred. - Page 13 Error LED (red) that is flashing fast: A hardware error occurred. Flashing slowly (every 4s) In combination with: ◦ a Software Status LED (yellow) and an Error LED (red) that are off: XHub-VIA is off. Steady blue XHub-VIA is on. 2. Hardware...
-
Page 14: Rear Panel
Issue 2.00.A - August 2021 Recovery/Reset Button This button is used to start XHub-VIA in Recovery mode. In this mode, you will be able to configure certain aspects of the switch and upgrade the software. If you push this button, the default configuration file (XNet-VIA or Live IP) will be loaded by default at startup. -
Page 15: Management Port Status Leds
TECHNICAL REFERENCE MANUAL XHub-VIA 2.00 Management Port Status LEDS The management port has two status LEDs that behave as follows: Color LED Behavior Meaning Left Green Steady green Speed is 1Gbps. Orange Steady orange Speed is 100 Mbps. Right Yellow... -
Page 16: Ip Aggregator
3.1. Cabling 3.1.1. Accepted Connectors To create the connections between the XT servers and the XHub-VIA switch, and to create the link between the XHub-VIA and the LiveIP network, the following connectors can be used: Type of Connection Type of Connector between XT servers and XHub-VIA •... -
Page 17: Connection To Xt-Via/Xs-Via
You can connect only 1 server to the XHub-VIA IP Aggregator. Management Connection To establish a management connection between XHub-VIA and the server, the XHUB- VIA management port has to be connected to the server's EVS LNK connector. 3. IP Aggregator... - Page 18 XT servers and XHub-VIA • CAB-10GESS-1M between XHub-VIA and LiveIP fabric • QSFP-100G-SR4 Without ST 2022-7 In a setup without redundancy (ST 2022-7), the server's SFP+ ports should be connected with the XHub-VIA SFP28 ports as follows: XHub-VIA XT-VIA Port Port 3. IP Aggregator...
- Page 19 TECHNICAL REFERENCE MANUAL XHub-VIA 2.00 3. IP Aggregator...
- Page 20 XHub-VIA SFP28 ports as follows: XHub-VIA XT-VIA XHub-VIA XT-VIA Port Port Port Port The ports 17-24 on the XHub-VIA switch are not active. FEC (Forward Error Connection) Forward Error Connection is not activated on the XHub-VIA SFP ports. 3. IP Aggregator...
-
Page 21: Connection To External 100G Switch
TECHNICAL REFERENCE MANUAL XHub-VIA 2.00 3.1.3. Connection to External 100G Switch Without ST2022-7 The XHub-VIA should be connected to an external 100G switch as follows: XHub-VIA External Switch Port Port With ST2022-7 The XHub-VIA should be connected to an external 100G switch as follows:... -
Page 22: Network
EVS Broadcast Equipment SA Issue 2.00.A - August 2021 3.2. Network 3.2.1. Network Diagram Without ST2022-7 With ST2022-7 3. IP Aggregator... -
Page 23: Vlans
TECHNICAL REFERENCE MANUAL XHub-VIA 2.00 3.2.2. VLANs There are two VLANs on the XHUB-VIA. The table below shows the XHub-VIA and XT-VIA/XS-VIA ports that belong to each VLAN. VLAN # XHUB-VIA Ports XT-/XS-VIA Ports SFP 1-8 + QSFP 29 all SFP-C ports SFP 9-16 + QSFP 30 all SFP-D ports 3. -
Page 24: Port Speed Configuration
The port speed on the XHub-VIA is configured accordingly to the port speed on the XT- VIA or XS-VIA server. If a V4X module is set to 12.5Gbps, the appropriate port on the XHub-VIA (i.e. the port connected to this V4X module) is also set to 12.5Gbps. -
Page 25: Xnet-Via
XNet-VIA 4.1. Cabling 4.1.1. Accepted Connectors To create the connections between the XT servers and the XHub-VIA switch, and to create the uplinks between the XHub-VIA switches, the following connectors can be used: Type of Connection Type of Connector between XT servers and XHub-VIA •... -
Page 26: Connecting Evs Servers
EVS Broadcast Equipment SA Issue 2.00.A - August 2021 4.1.2. Connecting EVS Servers You can connect up to 24 servers to a single XHub-VIA switch. The XNet-VIA SFP+ connector of the server is connected to one of the 24 SFP28 ports of the switch. 4. XNet-VIA... -
Page 27: Connecting Xhub-Vias
• the XT servers belong to different sub-setups which are temporarily interconnected. The XHUB-VIA switches can be connected through one of the 100G QSFP ports using a fiber optics cable and QSFP adapters (QSFP-100G-SR4). In most cases, a single uplink is realized between two XHub-VIA switches. See section "Single Uplink"... -
Page 28: Network Architectures
XHub-VIA has only servers that are configured as Forbidden. Because there is no XNet server, they will be isolated from each other and be in standalone mode. - Page 29 As a result, for each uplink the total uplink bandwidth never exceeds the available 100Gbps (in both directions). In other words, the buffer of the incoming packets are not overflowing and we will never have packet drops on the XHub-VIA switch. 4. XNet-VIA...
- Page 30 The schema below differs slightly from the schema above. The uplink connection between the XHub-VIA in the center and the XHub-VIA in the red area has 11 XT-VIAs on one side, and 10 XT-VIAs on the other side. This uplink might become the bottleneck in a scenario where each of the 11 XT-VIAs in the red area is receiving a 10G transfer from a different other XT-VIA in the network.
-
Page 31: Protection Switching
Protection Switching About Protection Switching Protection switching (PRS) consist in linking 2 XHub-VIA switches with two 100G uplinks, namely a 'primary' and 'secondary' uplink. By default, the primary uplink (or 'working path') is the link used to transfer the data. If this link breaks, the secondary uplink (or 'protection path') will be used instead. - Page 32 EVS Broadcast Equipment SA Issue 2.00.A - August 2021 >2 XHub-VIAs with Protection Switching Enabling and Configuring Protection Switching The protection switching mechanism must be enabled and configured on each XHub- VIA. See section "Managing Protection Switching Interfaces" on page 44. 4. XNet-VIA...
-
Page 33: Network
The 14 SFP interfaces have their own IP addresses. They are configured via the Multicam configuration pages (see XT-VIA configuration manual). The QSFP interfaces of the XHub-VIA IP Aggregator do not have their own IP Address. OUTBOUND STREAM For the outbound stream, the multicast address configured in the Live IP interface will be used, together with the unicast address of the XT’s SFP interface (SFP 1-C, 1-D, ...). -
Page 34: Upgrading The Xhub-Via Software
Upgrading the XHub-VIA Software Manual Procedure Installation From an USB Key To install a new software package on the XHub-Via switch using a USB key, proceed as follows: 1. Plug your USB key into one of the USB ports of the XHub-VIA switch. - Page 35 TECHNICAL REFERENCE MANUAL XHub-VIA 2.00 The command line interface will open. 5. Enter the following command: install fromFileSystem xh5_update_package.bin By default, the software is automatically upgraded and the switch is rebooted. To prevent the switch from automatically rebooting, add the following option to your command: --no-reboot.
-
Page 36: Software
Interface in Standalone Mode (XNet- VIA) Requirements Make sure you know the management IP address of the XHUB-VIA switch and that your PC has network access to the management port. If not, please contact EVS support. Basic Access 1. Open the SSH client on your PC. -
Page 37: Configuration
TECHNICAL REFERENCE MANUAL XHub-VIA 2.00 Configuration 6.1. Viewing the Software License Agreement To view the XHub-VIA software license agreement, type the following command and then press ENTER: show license 6.2. Viewing the XHub-VIA Version To check the version of your XHub-VIA switch, proceed as follows: 1. -
Page 38: Configuring The Management Ip Address
Issue 2.00.A - August 2021 6.4. Configuring the Management IP Address To manually configure the management IP address of the XHub-VIA switch, proceed as follows: 1. Enter Configuration Mode. See section "Entering Configuration Mode" on page 29. 2. Type the following command and then press ENTER: management 3. -
Page 39: Managing Vlans
TECHNICAL REFERENCE MANUAL XHub-VIA 2.00 6.6. Managing VLANs 6.6.1. Viewing the VLANs Viewing the List of Configured VLANs To view the list of configured VLANs, type the following command and then press ENTER: show vlan The VLANs appear with ID and assigned ethernet interfaces. -
Page 40: Configuring Vlans
EVS Broadcast Equipment SA Issue 2.00.A - August 2021 6.6.2. Configuring VLANs Adding a New VLAN To add a new VLAN, proceed as follows: 1. Enter Configuration Mode. See section "Entering Configuration Mode" on page 29. 2. Type the following command and then press ENTER: config vlan <vlan_id>... -
Page 41: Deleting Vlans
TECHNICAL REFERENCE MANUAL XHub-VIA 2.00 6.6.3. Deleting VLANs Deleting a Single VLAN To delete a specific VLAN, proceed as follows: 1. Enter Configuration Mode. See section "Entering Configuration Mode" on page 29. 2. Type the following command and press ENTER: no vlan <vlan_id>... - Page 42 EVS Broadcast Equipment SA Issue 2.00.A - August 2021 Vlan [<vlan_id>,<vlan_id>, etc.] deleted Deleting All VLANs To delete all VLANs, proceed as follows: 1. Enter Configuration Mode. See section "Entering Configuration Mode" on page 29. 2. Type the following command and then press ENTER:...
-
Page 43: Managing Ethernet Interfaces
TECHNICAL REFERENCE MANUAL XHub-VIA 2.00 6.7. Managing Ethernet Interfaces 6.7.1. Viewing the Ethernet Interfaces Viewing the List of Configured Ethernet Interfaces To view the properties of one or more ethernet interfaces, proceed as follows: 1. Enter Configuration Mode. See section "Entering Configuration Mode" on page 29. - Page 44 EVS Broadcast Equipment SA Issue 2.00.A - August 2021 Viewing the Ethernet Interface Counters To view the packet counters of one or more ethernet interfaces, proceed as follows: 1. Enter Configuration Mode. See section "Entering Configuration Mode" on page 29. 2. Type one of the following commands and then press ENTER.
-
Page 45: Configuring Ethernet Interfaces
TECHNICAL REFERENCE MANUAL XHub-VIA 2.00 6.7.2. Configuring Ethernet Interfaces Configuration Parameters The following parameters can be configured for an ethernet interface: • Speed: 10G, 12,5G, 20G, 25G, 40G, 50G, 100G • Mode: KR, KR2, KR4 • Fec: Disabled, RS (Reed-Solomon), FC (Fire Code) - Page 46 EVS Broadcast Equipment SA Issue 2.00.A - August 2021 ◦ all aforementioned parameters, type configure interface ethernet <ethernet_interface_id> --speed <value> --mode <value> -- fec <value>. You will be informed that the configuration was successful. Setting <parameter> <value> on ethernet interface <ethernet_ interface_id>...
-
Page 47: Assigning To And Removing Ethernet Interfaces From Vlans
TECHNICAL REFERENCE MANUAL XHub-VIA 2.00 ◦ If you typed a valid ethernet interface ID, but no ethernet interface exists with that ID, the following message will appear: The interface ethernet <ethernet_interface_id> does not exist. ◦ If the configuration was successful, the following message is displayed: Setting <parameter>... - Page 48 EVS Broadcast Equipment SA Issue 2.00.A - August 2021 Add interface ethernet ['<ethernet_interface_id>', '<ethernet_interface_id>', etc.] to Vlan <vlan_id> Removing Ethernet Interfaces To remove one or more ethernet interfaces, proceed as follows: 1. Enter the Configuration Mode of the ethernet interface(s). To enter the Configuration Mode of: ◦...
-
Page 49: Deleting Ethernet Interfaces
TECHNICAL REFERENCE MANUAL XHub-VIA 2.00 6.7.4. Deleting Ethernet Interfaces Deleting a Single Ethernet Interface To delete a specific ethernet interface, proceed as follows: 1. Enter Configuration Mode. See section "Entering Configuration Mode" on page 29. 2. Type the following command and press ENTER: no interface ethernet <ethernet_interface_id>... - Page 50 EVS Broadcast Equipment SA Issue 2.00.A - August 2021 Deleting Multiple Ethernet Interfaces To delete multiple ethernet interfaces, proceed as follows: 1. Enter Configuration Mode. See section "Entering Configuration Mode" on page 29. 2. Type one of the following commands and then press ENTER.
- Page 51 TECHNICAL REFERENCE MANUAL XHub-VIA 2.00 Deleting All Ethernet Interfaces To delete all ethernet interfaces, proceed as follows: 1. Enter Configuration Mode. See section "Entering Configuration Mode" on page 29. 2. Type the following command and then press ENTER: clear interface ethernet...
-
Page 52: Managing Protection Switching Interfaces
IsOnProtectionPath eth29/1 eth30/1 Configuring Protection Switching Interfaces To configure protection switching between two XHub-VIA switches, proceed as follows: 1. Type the following command and press ENTER: configure interface protection_switching <id> <primary> <secondary> For example, configure interface protection_switching 1 25/1 26/1. - Page 53 TECHNICAL REFERENCE MANUAL XHub-VIA 2.00 Configure protection switching prs1 with eth25/1 and eth26/1 Configuring interface protection switching 1 2. Type the following command and press ENTER: add-to-vlan <vlan_id> For example, add-to-vlan 10 You will get a confirmation that the uplink has been successfully added to the VLAN.
- Page 54 EVS Broadcast Equipment SA Issue 2.00.A - August 2021 2. Type the following command and press ENTER: no interface protection_switching <id> The following can happen: ◦ If no protection switching interface exists with that ID, the following message will appear: The interface protection_switching <id> does not exist.
-
Page 55: Managing Routes
TECHNICAL REFERENCE MANUAL XHub-VIA 2.00 6.9. Managing Routes 6.9.1. Viewing the Routes To view all existing multicast routes, type the following command and press ENTER: show route The following information will be displayed about each route: • Source IP address: IP address of the sender of the IP packets. If you do not specify a source IP address, or enter 0.0.0.0, the switch will forward all sources originating... - Page 56 EVS Broadcast Equipment SA Issue 2.00.A - August 2021 Deleting Multiple Routes To delete multiple multicast routes, proceed as follows: 1. Enter Configuration Mode. See section "Entering Configuration Mode" on page 29. 2. Type one of the following command and then press ENTER.
-
Page 57: Managing Configuration Files
The XHub-VIA switch comes with 2 preconfigured configuration files: • LiveIP • XNet-VIA Depending on the context in which the XHub-VIA switch will be used, one or the other configuration file will be loaded by default at startup. 6. Configuration... -
Page 58: 6.10.2. Viewing The Configuration Files
EVS Broadcast Equipment SA Issue 2.00.A - August 2021 6.10.2. Viewing the Configuration Files To view the list of available configuration files, type the following command and then press ENTER: show config Initially, only two configuration files will be available: •... -
Page 59: Loading A Configuration
TECHNICAL REFERENCE MANUAL XHub-VIA 2.00 How to Save the Current Configuration as Startup Configuration To save the current configuration as startup configuration, type one of the following commands and press ENTER: • write • save startup-config You will be informed that the running configuration has been successfully saved as... - Page 60 EVS Broadcast Equipment SA Issue 2.00.A - August 2021 How to Remove the Startup Configuration To remove the current startup configuration, proceed as follows: 1. Type the following command and press ENTER: write erase You will be asked to confirm your action:...
-
Page 61: Monitoring
TECHNICAL REFERENCE MANUAL XHub-VIA 2.00 Monitoring 7.1. Extracting Logs Extracting the Logs to the Local File System of Your Switch To extract the logs to the local file system of your switch, proceed as follows: 1. Access the CLI of the switch. - Page 64 Belgium www.evs.com/contact EVS Broadcast Equipment is continuously adapting and improving its products in accordance with the ever changing requirements of the Broadcast Industry. The data contained herein is therefore subject to change without prior notice. Companies and product names are To learn more about EVS go to www.evs.com...
Need help?
Do you have a question about the XHub-VIA and is the answer not in the manual?
Questions and answers