
Related Manuals for Estia CELESTE 06-21191


Summary of Contents for Estia CELESTE 06-21191
- Page 1 ΑΝΕΜΙΣΤΗΡΑΣ ΟΡΟΦΗΣ CELESTE | CEILING FAN CELESTE 06-21191 & 06-21207 Οδηγίες Χρήσης | Instructions Manual Ελληνικά (GR) | English (EN)
- Page 2 Αγαπητέ Καταναλωτή, Σας ευχαριστούμε για την αγορά της συσκευής Estia. Στο παρόν εγχειρίδιο θα βρείτε αναλυτικές οδηγίες χρήσης του προϊόντος. Για περισσότερες πληροφορίες μπορείτε να επισκεφτείτε την ηλεκτρονική διεύθυνση www.estiahomeart.gr. Ευχόμαστε να απολαύσετε τη νέα σας συσκευή! Dear Customer, Thank you for purchasing an Estia appliance.
-
Page 3: Γενικεσ Πληροφοριεσ
ΕΛΛΗΝΙΚΑ (GR) ΓΕΝΙΚΕΣ ΠΛΗΡΟΦΟΡΙΕΣ Διαβάστε προσεκτικά τις οδηγίες χρήσης πριν θέσετε τη συσκευή σε λειτουργία και φυλάξτε τις οδηγίες συμπεριλαμβανομένης της εγγύησης, της απόδειξης, και εάν είναι δυνατόν το κουτί με όποια συσκευασία. Εάν παραχωρήσετε τη συσκευή σε άλλα άτομα, μεταφέρετε... - Page 4 ΠΡΟΣΟΧΗ 01. Για αποφυγή κινδύνου ατυχήματος, τοποθετήστε τον ανεμιστήρα απευθείας στο μπετόν, βάσει των οδηγιών και χρησιμοποιήστε μόνο το παρεχόμενο υλικό. 02. Για να αποφύγετε πιθανές ηλεκτροπληξίες, πριν εγκαταστήσετε τον ανεμιστήρα, αποσυνδέστε την τροφοδοσία, απενεργοποιώντας τους διακόπτες κυκλώματος του πίνακα, και τον διακόπτη τοίχου. 03.
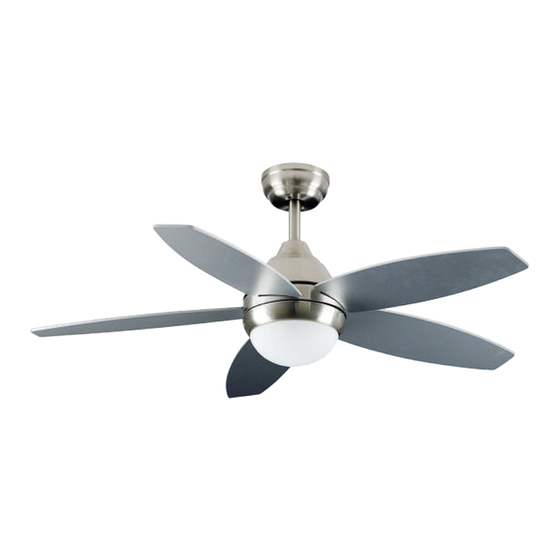
- Page 5 Βάση ανεμιστήρα Διακοσμητικά Καλύμματα Λεπίδες Μοτέρ Πίνακας λαμπτήρων Γυάλινο προστατευτικό Βίδες & Ούπατ Τηλεχειριστήριο...
- Page 6 ΕΓΚΑΤΑΣΤΑΣΗ Για να αποφύγετε τραυματισμούς και ζημιές, βεβαιωθείτε πως η βάση επιτρέπει στα λεπίδες του ανεμιστήρα να έχουν απόσταση 2.3m από το δάπεδο και 76εκ. από οποιοδήποτε τοίχο ή εμπόδιο.Βεβαιωθείτε ότι η βάση είναι καλά στερεωμένη στα ταβάνι και μπορεί να στηρίξει το βάρος του ανεμιστήρα οροφής. Εγκατάσταση...
- Page 7 Κάντε τρύπα φ8mm στην οροφή από τσιμέντο και τοποθετήστε τη βίδα. Ευθυγραμμίστε το βραχίονα με την τρύπα και στη συνέχεια, σφίξτε με το παξιμάδι. Συναρμολόγηση και κρέμασμα του ανεμιστήρα...
- Page 8 Αν επιθυμείτε να επεκτείνετε το μήκος του ανεμιστήρα (καθ’ ύψος), θα πρέπει να αντικαταστήσετε τον βασικό βραχίονα 6 ιντσών με τον μεγαλύτερο επεκτεινόμενο βραχίονα που περιλαμβάνεται στη συσκευασία. Για να αντικαταστήσετε τον βασικό βραχίονα 6 ιντσών θα πρέπει αρχικά να τον αποσυνδέσετε από τον προσαρμογέα. Για να το...
- Page 9 Σύνδεση τηλεχειριστηρίου...
- Page 10 Συναρμολόγηση Θόλου Σηκώστε το θόλο με το βραχίονα, ευθυγραμμίζοντας τις χαλαρές βίδες στο βραχίονα με τις τρύπες του θόλου. Περιστρέψτε τον θόλο για να κλειδώσει. Βάλτε ξανά τις βίδες και ασφαλίστε τις με το κατσαβίδι. Με τον βραχίονα στερεωμένο στο κουτί εξόδου...
- Page 11 Εξοικονόμηση Χρόνου: Οι ροδέλες για τις βίδες των λεπίδων μπορούν να τοποθετηθούν σε κάθε βίδα λεπίδας πριν την εγκατάσταση των λεπίδων. Οι βίδες στερέωσης των λεπίδων και η ροδέλα τοποθετούνται σε ένα από τα πακέτα του υλικού. Κρατήστε το βραχίονα της λεπίδας ανοιχτά στη λεπίδα και ευθυγραμμίστε τις στις...
- Page 12 ΤΕΧΝΙΚΑ ΧΑΡΑΚΤΗΡΙΣΤΙΚΑ Μοντέλο.: 06-21191 & 06-21207 Voltage.: 220-240V ~ 50Hz Ισχύς.: 70Watts Σύμφωνα με την οδηγία για τα απόβλητα ηλεκτρικού και ηλεκτρονικού εξοπλισμού (οδηγία της Ευρωπαϊκής κοινότητας 2012/19 / ΕΕ), τα απόβλητα ηλεκτρικού και ηλεκτρονικού εξοπλισμού θα πρέπει να συλλέγονται και να υφίστανται επεξεργασία ξεχωριστά. Εάν σε οποιαδήποτε χρονική στιγμή στο μέλλον χρειάζεται να...
-
Page 13: Important Safeguards
ATTENTION Read the operating instructions carefully before putting the appliance into operation and keep the instructions including the warranty, the receipt and, if possible, the box with the internal packing. If you give this appliance to other people, please also pass on the operating instructions. -
Page 14: Fan Parts
WARNINGS 01. To reduce the risk of personal injury, attach the fan directly to the support structure of the building according to these instructions, and use only the hardware supplied. 02. To avoid possible electrical shock, before installing your fan, disconnect the power by turning off the circuit breakers to the outlet box and associated wall switch location. - Page 15 Hanger bracket Decorative covers Motor Blade Lamp panel Glass shade Spiral package Remote control...
-
Page 16: Installation
INSTALLATION To prevent personal injury and damage, ensure that the hanging location allows the blades a clearance of 2.3m from the floor and 76cm from any wall or obstruction. Be sure the outlet box is securely attached to the building structure and can support the full weight of the fan. - Page 17 Installing the Hanger Bracket Please drill φ8mm hole on the concrete ceiling, and insert the bolt. Align bracket with the hole, then tighten with nut. ASSEMBLING & HANGING THE FAN...
- Page 18 If you wish to extend the length of the fan (in height), you will need to replace the basic 6 inch bracket with the larger extension bracket included in the package. To replace the 6 inch base arm you will first need to disconnect it from the adapter. To achieve this follow these steps: 01.
-
Page 19: Remote Control Connection
Remote control connection... - Page 20 Canopy Assembly Raise the canopy to the hanging bracket, aligning loosened screws in hanging bracket with slotted holes in canopy. Twist the canopy to lock. Re-insert and secure all screws with screwdriver. With the hanging bracket secured to the outlet box and able to support to fan, you are now ready to hang your fan.
- Page 21 Repeat for the remaining blades. Remove the blade arm screws and lock washers from the underside of the motor. If plastic motor locks are installed with blade arm screws, the discard plastic motor locks (save blade arm screws and lock washers to secure blade arms).
- Page 22 TECHNICAL SPECIFICATIONS: Model.: 06-21191 & 06-21207 Voltage and frequency.: 220-240V ~ 50Hz Power.: 70Watts According to Waste of Electrical and Electronic Equipment (WEEE) directive, WEEE should be separately collected and treated. If at any time in future you need to dispose of this product please do NOT dispose of this product with household waste. Please send this product to WEEE collecting points where available. In order to fulfill ruling UNE EN-60335, we indicate that if the flexible wire is damaged, it can only be substituted by a technical service recognized bv authorised organization, as per special tooling is required.
- Page 24 ESTIA HOME ART Α.Ε. Εισαγωγή και Εμπορία Οικιακών Ειδών Αναγεννήσεως, Θέση Ντρασσαριά, Ασπρόπυργος, 19300 Τηλ: 216 900 1064 | E-mail: info@estiahomeart.gr www.estiahomeart.gr...
Need help?
Do you have a question about the CELESTE 06-21191 and is the answer not in the manual?
Questions and answers