
Related Manuals for Estia LEVANTO 06-21092


Summary of Contents for Estia LEVANTO 06-21092
- Page 1 ΑΝΕΜΙΣΤΗΡΑΣ ΣΤΑΝΤ ΕΠΙΔΑΠΕΔΙΟΣ LEVANTO | FLOOR STAND FAN LEVANTO 06-21092 Οδηγίες Χρήσης | Instructions Manual Ελληνικά (GR) | English (EN)
- Page 2 Αγαπητέ Καταναλωτή, Σας ευχαριστούμε για την αγορά της συσκευής Estia. Στο παρόν εγχειρίδιο θα βρείτε αναλυτικές οδηγίες χρήσης του προϊόντος. Για περισσότερες πληροφορίες μπορείτε να επισκεφτείτε την ηλεκτρονική διεύθυνση www.estiahomeart.gr. Ευχόμαστε να απολαύσετε τη νέα σας συσκευή! Dear Customer, Thank you for purchasing an Estia appliance.
-
Page 3: Οδηγιεσ Ασφαλειασ
ΕΛΛΗΝΙΚΑ (GR) ΠΡΟΣΟΧΗ Διαβάστε προσεκτικά τις οδηγίες χρήσης πριν θέσετε τη συσκευή σε λειτουργία και φυλάξτε τις οδηγίες συμπεριλαμβανομένης της εγγύησης, της απόδειξης, και εάν είναι δυνατόν το κουτί με όποια συσκευασία. Εάν παραχωρήσετε τη συσκευή σε άλλα άτομα, μεταφέρετε τους το εγχειρίδιο αυτό. ΟΔΗΓΙΕΣ... - Page 4 10. Ποτέ μην εγκαθιστάτε τη μονάδα όπου μπορεί να υπόκειται σε: a. Πηγές θερμότητας όπως καλοριφέρ, σόμπες ή άλλα προϊόντα που παράγουν θερμότητα. b. Άμεσο ηλιακό φως. c. Υπερβολική σκόνη. d. Έλλειψη αερισμού, όπως ντουλάπι ή βιβλιοθήκη. e. Ανώμαλη επιφάνεια. 11.
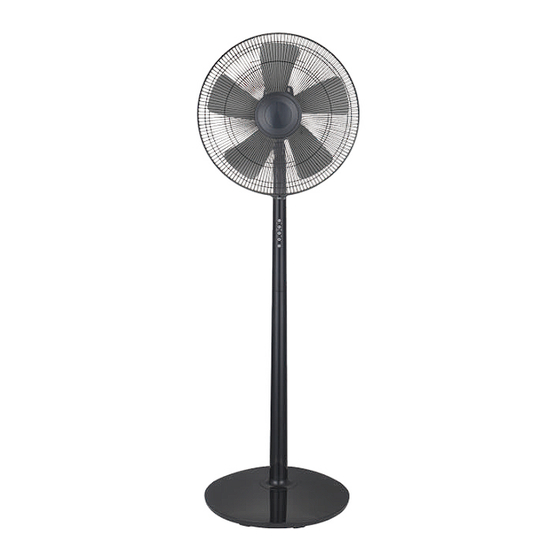
- Page 5 ΜΕΡΗ ΑΝΕΜΙΣΤΗΡΑ 01. Μπροστινό πλέγμα 02. Δαχτυλίδι πλέγματος 03. Πίσω πλέγμα 04. Καπάκι λεπίδας 05. Λεπίδα 06. Πλαστικό παξιμάδι στήριξης ΣΥΝΑΡΜΟΛΟΓΗΣΗ ΠΡΙΝ ΤΗ ΣΥΝΑΡΜΟΛΟΓΗΣΗ ΜΟΝΑΔΑΣ 01. Βεβαιωθείτε ότι έχετε όλα τα εξαρτήματα που ακολουθούν το διάγραμμα προϊόντος και ότι είστε εξοικειωμένοι με κάθε εξάρτημα πριν συνεχίσετε. 02.
- Page 6 Βήμα 1: Συναρμολογήστε τη βάση ανεμιστήρων • Χρησιμοποιήστε τη βίδα ασφάλισης βάσης για να στερεώσετε τη στρογγυλή βάση στον κάτω στύλο. Σφίξτε καλά τα δύο μέρη. Βήμα 2: Συναρμολογήστε το σώμα ανεμιστήρα και τον κάτω στύλο • Στερεώστε το κουτί ελέγχου (επάνω στύλος στήριξης) στον κάτω στύλο βάσης. Βήμα...
- Page 7 • Κάντε την αυλάκωση της λεπίδας ανεμιστήρα να ευθυγραμμιστεί με μια ράβδο T στον άξονα του μοτερ για να διασφαλίσετε τη σωστή τοποθέτηση και στερεώστε τη λεπίδα ανεμιστήρα στη θέση της με το χέρι, σφίγγοντας το καπάκι λεπίδας 4 αριστερόστροφα απαλά στο άκρο του άξονα του μοτέρ. •...
- Page 8 ΛΕΙΤΟΥΡΓΙΑ ΠΡΟΣΟΧΗ 01. Επιλέξτε μια κατάλληλη θέση για τον ανεμιστήρα. Να επιλέγετε πάντα μια ασφαλή τοποθεσία σύμφωνα με τις υποδείξεις ασφαλείας που περιγράφονται. 02. Όταν τοποθετείτε έναν ανεμιστήρα σε τραπέζι ή ράφι, βεβαιωθείτε πάντα ότι το καλώδιο τροφοδοσίας δεν κρέμεται σε σημείο που μπορεί να τραβηχτεί κατά λάθος και...
-
Page 9: Φροντιδα Και Καθαρισμοσ
ΦΡΟΝΤΙΔΑ ΚΑΙ ΚΑΘΑΡΙΣΜΟΣ ΠΡΟΕΙΔΟΠΟΙΗΣΗ: ΝΑ ΑΠΟΣΥΝΔΕΕΤΕ ΠΑΝΤΑ ΤΗ ΜΟΝΑΔΑ ΠΡΙΝ ΤΗ ΜΕΤΑΚΙΝΗΣΗ Ή ΤΟ ΣΕΡΒΙΣ. ΜΗΝ ΒΥΘΙΖΕΤΕ ΤΟ ΚΑΛΩΔΙΟ ΡΕΥΜΑΤΟΣ, ΤΗΝ ΠΡΙΖΑ Ή ΟΛΟΚΛΗΡΗ ΤΗ ΜΟΝΑΔΑ ΣΤΟ ΝΕΡΟ Ή ΜΗΝ ΤΗΝ ΞΕΠΛΑΙΝΕΤΕ ΚΑΤΩ ΑΠΟ ΤΗ ΒΡΥΣΗ! ΠΡΟΣΟΧΗ: Μη χρησιμοποιείτε απορρυπαντικό, βενζίνη, διαλυτικό ή άλλους διαλύτες για... -
Page 10: Important Safeguards
ATTENTION Read the operating instructions carefully before putting the appliance into operation and keep the instructions including the warranty, the receipt and, if possible, the box with the internal packing. If you give this appliance to other people, please also pass on the operating instructions. - Page 11 10. Never install the unit where it could be subject to: a. Heat sources such as radiators, stoves or other products that produce heat; b. Direct sunlight; c. Excessive dust; d. Lack of ventilation, such as a cabinet or bookcase; e.
- Page 12 FAN PARTS 01. Front Grill 02. Grill Ring 03. Rear Grill 04. Blade Cap 05. Blade 06. Plastic Mounting Nut ASSEMBLY BEFORE ASSEMBLING UNIT 01. Check that you have all the component parts following the Product Diagram and familiar yourself with each part before proceeding. 02.
- Page 13 Step 1: Assemble the Fan Base • Use the Base Lock Screw to fix the Round Base into the Lower Pole. Please tighten the two parts firmly. Step 2: Assemble the Fan Body and Lower Pole • Fix the Control Box (Upper Stand Pole) into Lower Stand Pole. Step 3: Assemble the Fan Grill &...
- Page 14 • Make the Fan Blade 5 align with the T-bar on the Motor Shaft to ensure cor- rect positioning and fix the Fan Blade into place by hand tightening the Blade Cap 4 anti-clockwise gently onto the end of the Motor Shaft. •...
- Page 15 OPPERATION CAUTION 01. Select a suitable location for the fan. Always choose a safe location in accor- dance to the safety recommendations outlined. 02. When placing a fan on a table or shelf, always ensure that the power cord does not hang where it can accidentally be pulled and that the unit cannot accidentally fall.
-
Page 16: Care And Cleaning
CARE AND CLEANING WARNING:ALWAYS UNPLUG THE UNIT BEFORE MOVING OR SERVICING. DO NOT IMMERSE THE POWER CORD, PLUG OR THE WHOLE UNIT INTO WATER, OR RINSE IT UNDER THE TAP! Caution: Do not use detergent, gasoline, benzene, thinner, or other solvents to clean the unit, to avoid damaging the appliance. - Page 18 ESTIA HOME ART Α.Ε. Εισαγωγή και Εμπορία Οικιακών Ειδών Αναγεννήσεως, Θέση Ντρασσαριά, Ασπρόπυργος, 19300 Τηλ: 216 900 1064 | E-mail: info@estiahomeart.gr www.estiahomeart.gr...
Need help?
Do you have a question about the LEVANTO 06-21092 and is the answer not in the manual?
Questions and answers