Sanyo DVD-SL40 Instruction Manual
Hide thumbs
Also See for DVD-SL40:
- Service manual (24 pages) ,
- Service manual (14 pages) ,
- Service manual (24 pages)
Table of Contents
Advertisement
Quick Links
Advertisement
Table of Contents

Related Manuals for Sanyo DVD-SL40


Summary of Contents for Sanyo DVD-SL40
- Page 1 INSTRUCTION MANUAL DVD-SL40 DVD-SL40(BK) DVD-SL88 DVD Player z /ON AUDIO SUBTITLE OPEN/CLOSE ZOOM ANGLE RANDOM REPEAT A-B REPEAT RETURN MENU SETUP ON SCREEN TOP MENU SLOW SEARCH MODE PAUSE/STEP PREV NEXT PLAY PROGRAM REMOTE CONTROLLER RB-SL40...
- Page 2 PRECAUTIONS CLASS 1 LASER PRODUCT LUOKAN 1 LASERLAITE KLASS 1 LASERAPPARAT CAUTION THIS PRODUCT CONTAINS A LOW POWER LASER DEVICE, CLASS 1 LASER PRODUCT TO ENSURE CONTINUED SAFETY DO NOT REMOVE ANY LUOKAN 1 LASERLAITE COVERS OR ATTEMPT TO GAIN ACCESS TO THE INSIDE OF KLASS 1 LASERAPPARAT THE PRODUCT.
-
Page 3: Front Panel
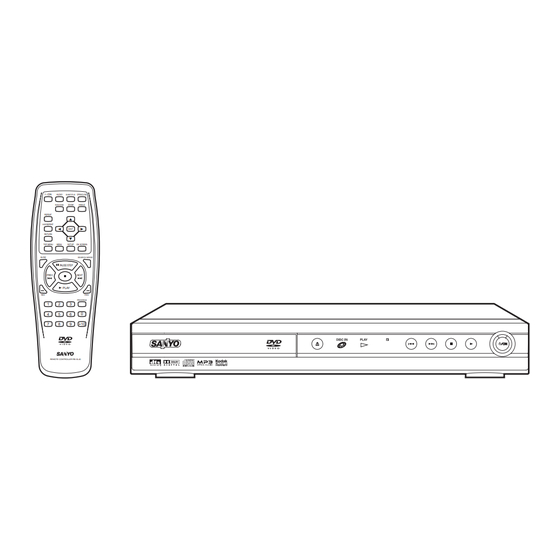
CONTROLS Front Panel 1. Disc tray 6. Skip/Next/Previous buttons (f, e) 2. Open/Close button (q) 7. Stop button (n) 3. Disc-in indicator (DISC IN) 8. Play button (a) 4. Play indicator (PLAY) 9. Power button (z/ON) 5. Remote sensor (IR) 10. -
Page 4: Inserting Batteries
REMOTE CONTROL Controls 1. Power button (z/ON) 2. Audio button (AUDIO) 3. Subtitle change button (SUBTITLE) 4. Open/Close button (OPEN/CLOSE) 5. Angle button (ANGLE) z /ON AUDIO OPEN/CLOSE SUBTITLE 6. Zoom button (ZOOM) 7. Enter button (ENT) RANDOM ZOOM ANGLE 8. - Page 5 CONNECTIONS Before connections Do not connect the unit to a VCR directly. The playback picture will be distorted because DVD disc are copy protected. When you connect the unit to your TV and other equipment, be sure to turn off the power and disconnect all of the equipment from the wall outlet until all the connections have been made.
-
Page 6: For Safe And Efficient Operation
Connecting to a digital multi-channel AV amplifier The digital multi-channel sound of a DVD can best be decoded and played with a multi-channel AV amplifier (Dolby Digital decoder or MPEG-2 decoder). To audio input The AV amplifier has to be able to process the DTS audio signal in order to play a DVD with DTS. -
Page 7: Playable Discs
PLAYABLE DISCS The following types of discs can be played on the unit. Video CD/Audio CD disc Video CD/Audio CD discs are divided into tracks. Disc type and logo mark Track 1 Track 2 Track 3 Track 4 Track 5 Note: DVD-Video Only the above types of discs can be played on this unit. -
Page 8: Basic Operation
TV screen for several seconds. [CD] [VCD] 1. Press the z/ON button. “SANYO” logo appears on the TV screen. Press the n button. The unit stops completely. • The power indicator lights on the front panel. -
Page 9: Various Playing Functions
VARIOUS PLAYING FUNCTIONS “ ” may appear on the TV screen during operation. This icon means that the function is not available on the disc now. Selecting a DVD Menu [DVD] Track search [VCD] [CD] 1. Press the MENU button. The main menu screen will appear. Note: If “PBC ON”... - Page 10 Frame by Frame Advance Playback [DVD] [VCD] Repeat Playback Press the k PAUSE/STEP button during play. Each time the button is Press the REPEAT button during playback (or programmed playback) pressed, the picture advances one frame. of the title (or track) you want repeat. Press the a PLAY button to return to normal play.
- Page 11 Notes: Programmed Play [CD] • In some cases, the subtitle language is not changed to the se- Up to 32 selections can be programmed. lected one. • When a disc supporting closed caption is played, the subtitle and Programming procedure the closed caption may overlap each other on the TV screen.
-
Page 12: Selecting On-Screen Information
Selecting on-screen information Press the ON SCREEN button repeatedly to show the disc informa- tion (Title, Chapter, Title elasped playing time, Language, etc.). Example for DVD: 1. Press the ON SCREEN button during play. Title remaining playing time Title elapsed playing time Title number Chapter number 00:08:40... - Page 13 MP3 OPERATION Before Starting Pause Press the k PAUSE/STEP button during playback. This unit can play back the CD that has recorded music data, MP3 files. • “k” appears on the TV screen. The file system is ISO9660 Level 1 and Level 2. •...
-
Page 14: Picture Cd Operation
PICTURE CD OPERATION KODAK Picture CD Playback FUJICOLOR CD can be used. Some discs cannot be played back depending on the recording With KODAK Picture CD, it is easy to turn film into pictures you can conditions. email from your PC and view on the unit. It would take 30 seconds or more for this unit to read KODAK Just bring your film in for processing, and check the box for KODAK Picture CDs depending on its structure. - Page 15 INITIAL SETTINGS FOR DVD Once the initial settings have been completed, the unit can always 8. Press the a button to select the submenu of “AUDIO”. be operated under the same conditions. The settings will be retained in the memory until they are changed, 9.
- Page 16 Setting Display TV Type: Select the appropriate setting for your TV screen size. 1. Press the SETUP button in the stop mode. 4:3 LB (Letterbox): “SETUP” screen appears. Select when a conventional TV set is connected. When the wide screen disc is played, the black bands appear at the SETUP top and bottom of screen.
- Page 17 Dolby Digital: Setting digital out If your amplifier has Dolby Digital Decoder, select “BitStream”. If not, If the COAXIAL DIGITAL OUT socket is connected to the amplifier, select “LPCM”. you must set as follows. 1. Press the SETUP button in the stop mode. MPEG (Moving Picture Expert Group): “SETUP”...
- Page 18 15. Enter the same password in the box. Setting Parental Note: 16. Press the ENT button. The PASSWORD is set to “0000” before shipping from the factory. The parental lock level is set. “PARENTAL” screen returns. 1. Press the SETUP button in the stop mode. 17.
-
Page 19: Troubleshotting Guide
TROUBLESHOTTING GUIDE If you have followed the instructions and are having difficulty operate the unit, locate the SYMPTOM in the left column below. Check the corresponding POSSIBLE CAUSE and CORRECTIVE ACTION columns to locate and remedy the problem. SYMPTOM POSSIBLE CAUSE CORRECTIVE ACTION No picture. -
Page 20: Specifications
Sanyo dealer. He will be pleased to give you a quotation for the 4. Failure due to fair wear and tear of any item, such as batteries, repair.
Need help?
Do you have a question about the DVD-SL40 and is the answer not in the manual?
Questions and answers