Table of Contents
Advertisement
Quick Links
Advertisement
Table of Contents

Related Manuals for TRUELOOK TrueDeter Fixed

Summary of Contents for TRUELOOK TrueDeter Fixed
- Page 1 Mobile Camera Trailer TrueDeter Fixed Installation Manual...
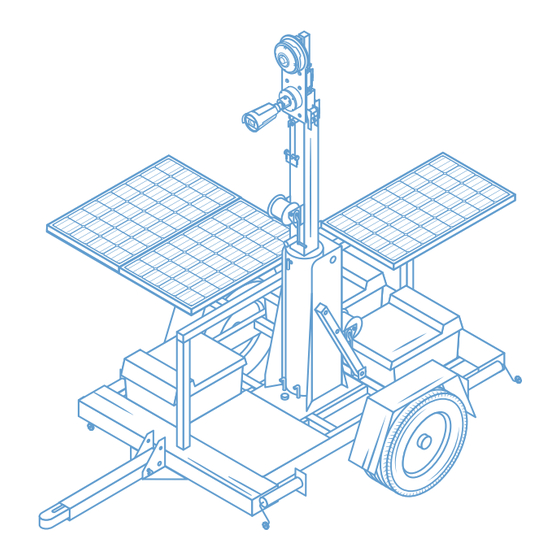
- Page 2 Getting Started Assembled Unit Mast Mast extending winch Trailer tongue Mast rotation lock bolt Trailer tongue pin Mast locking pins Jack stands (4) Solar panels Bubble level Panel angle adjuster bolt Trailer power input Panel swivel lock bolt Yellow lock handle Battery boxes (2) Red lock pin Storage compartment...
-
Page 3: Online Resources
Getting Started Unlimited Support If you have any questions or issues with your TrueLook system, please don’t hesitate to contact our Customer Support team. Phone 833-878-3566 (Option 2) Email support@truelook.com You can also submit a support request online at: support.truelook.com/contact-support... -
Page 4: Hardware Packing List
Getting Started Hardware Packing List Camera and Siren System [1x] Control Box [1x] Comes pre-mounted to mast adapter. - Page 5 Getting Started Solar Load Cable [1x] Mast Mounting Hardware Mast Adapter [1x] Steel Straps [2x] Assorted Hardware Allen Wrench [1x] Warning: This equipment contains flashing lights, which may induce epileptic seizures in at-risk individuals.
- Page 6 Getting Started Trailer Positioning Place your camera trailer 20–150 feet away. For optimal viewing, place your trailer 20–150 feet away from the area of your jobsite that you wish to capture. The distance you choose will depend on the camera you’ve selected (PTZ or fixed-position), the size of your jobsite, and the amount of detail you want to see.
- Page 7 Getting Started Step 2 Lower and extend jack stands by pulling pin and turning jack stands vertical. Step 3 Check that trailer is level using built-in bubble level. Adjust jack stands as needed by turning handle clockwise to lower and counterclockwise to raise. Bubble level located at base of mast...
- Page 8 Getting Started Step 4 To raise trailer tongue for storage, unhook clip and remove pin. Raise trailer tongue to stand upright, then place pin and hook clip to secure.
-
Page 9: Camera System
Camera Installation Camera System Step 1 Flip mast adapter with control box attached so control box is facing down. Step 2 Thread steel straps through top and bottom of pole mount on back of plate. - Page 10 Camera Installation Step 3 Tighten each strap around mast adapter using drill with 5/16 hex head driver bit (not included). Step 4 Trim steel straps to desired length using tin snips (not included).
- Page 11 Camera Installation Step 5 Slide mast adapter with camera system and control box installed onto trailer mast end. Step 6 Secure mast adapter to mast with two bolts using a 19mm socket wrench (not included).
- Page 12 Camera Installation Step 7 Loosen screw on camera neck with Allen wrench (included) to adjust camera angle. Tighten screw on camera neck with Allen wrench when desired angle is chosen. Connecting Step 1 Twist protective plug caps off bottom of control box. The caps should hang freely.
- Page 13 Camera Installation Step 2 Connect camera system to control box by plugging in both connectors of braided cable coming from camera. Connectors go into either socket and should snap firmly in place. Step 3 Twist protective plug caps on connectors up into bottom of control box.
- Page 14 Camera Installation Step 4 Provide power by aligning notches and plugging one end of solar load connector into control box power input. Gently hand tighten to screw silver collar into input. To Trailer Power Input To Camera Step 5 Repeat step 4 to connect other end of solar load connector into trailer power input located on mast.
-
Page 15: Raising The Mast
Trailer Setup Raising the Mast Warning: Check for overhead obstructions before raising mast. Do not stand beneath mast when raising or lowering. Step 1 Release yellow lock handle by pulling handle toward yourself. Step 2 Release red lock pin by unhooking wire and removing pin. - Page 16 Trailer Setup Step 3 Raise mast into vertical position using lower winch. Step 4 Secure mast by pushing two locking pins into holes on base of mast. Mast must be fully upright for pin holes to align.
- Page 17 Trailer Setup Step 5 Raise mast until desired height is reached using higher winch. Maximum mast height is 30 feet. Step 6 Fully loosen rotation lock bolt and rotate mast to desired position. Once position is achieved, re-tighten locking bolt.
-
Page 18: Solar Panel Positioning
Trailer Setup Solar Panel Positioning Warning: Solar panels must face the equator (directly south) in order to capture adequate sunlight and properly charge. Failure to observe all following requirements may result in system downtime. Units self-recover automatically once panels receive sufficient sunlight. Step 1 Remove pin(s) from travel arm(s) to unlock solar panels. - Page 19 Trailer Setup Step 2 Face panels due south by pulling down on panel swivel lock bolt and turning panels. Replace lock bolt to secure. Step 3 Angle solar panels for your location by removing panel angle adjuster bolt and placing it in corresponding hole. Refer to the chart on the following page to determine the proper angle based on your location.
- Page 20 Trailer Setup Alabama 45° Montana 70° Alaska 80° Nebraska 65° Arizona 45° Nevada 65° Arkansas 60° New Hampshire 65° California 45° New Jersey 65° Colorado 55° New Mexico 45° Connecticut 60° New York 65° Delaware 65° North Carolina 60° District of Col. 60°...
- Page 21 Trailer Setup Step 4 Ensure panels remain unobstructed. Panels must receive direct sunlight throughout the day. Do not let trees, equipment, structures, or anything else block the sun. Correct Wrong Orientation...
- Page 22 • A yellow LED lit on the ProStar unit means your panels are not receiving sunlight, and the camera is running on battery power. • A red LED lit on the ProStar unit means there is an issue with your system. Please contact TrueLook Support.
- Page 23 Trailer Setup Step 3 Verify that the following numbers are displayed on the ProStar’s digital readout. You may need to cycle left/right using the arrows to get to the pictured screen. If numbers are displayed correctly, the system should be fully functioning at this stage.
- Page 24 Trailer Setup Step 5 Verify that there are two green LEDs and one amber LED lit on the modem mounted to the side of the battery compartment.
-
Page 25: Verifying Camera Operation
10 minutes for it to come online. Then, use the link on the back of the manual to view the camera and verify its functionality. If you don’t see the camera in the TrueLook Platform, contact Customer Support for assistance. -
Page 26: Troubleshooting
LEDs will be flashing in sequence. Battery Is Not Charging Check that all wire connections in the system are correct and tight. If your system is still not functioning properly, please contact TrueLook Support for further assistance. - Page 27 Final Setup Mast Stabilization Due to a variety of factors (local weather conditions, camera weight, etc.), you may notice the trailer mast swaying. If you experience this, please follow these steps to increase your mast’s stability. Step 1 Lower the mast and locate the six rollers on the trailer. There are two sets of three;...
- Page 28 For the most efficient response from our team, include the following in your email: Company name Project name Contact person for installation issues The following photographs: A. Your whole TrueLook solution: the camera, what it’s mounted to, and any accessories B. Close-ups of mounting C. Close-ups of connections...
- Page 29 Notes...
- Page 30 Notes...
- Page 31 Notes...
-
Page 32: Accessing Your Camera
Accessing Your Camera © TrueLook Construction Cameras MAN100631 Manual-Mobile Camera Trailer, TrueDeter Fixed TRU 24019-12 D4...
Need help?
Do you have a question about the TrueDeter Fixed and is the answer not in the manual?
Questions and answers